54 vwr.com Instruction manual VWR
®
Imager Chemi Premium
Signal Accumulation Calculator (S.A.C)
Signal Accumulation Calculator (S.A.C) allows the user to take a series of cumulative images. The User
estimates the shortest and the longest exposure times required to achieve the optimal image. Then decide
on the number of images to be taken within this time range. For example select to capture 4 images and
specify shortest exposure time as 1 minute and the maximum as 4 minutes. The first image will be taken at
1 minute and the last at 4 minutes and the remaining two images are taken at even intervals in between at 1
minute each capture.
S.A.C. capture is useful for determining the optimal imaging time for a chemiluminescent sample. Note: For
very faint signals it is advisable to use Chemi Blot (Series) capture.
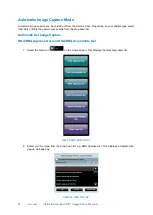
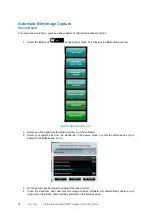
1. Select your Blot type from the drop-down list e.g. Signal Accumulation Calculator.
2. Select your sample size from the standards in the pop-up menu, or enter the dimensions of your
sample in the
Size
boxes, in cm.
3. Adjust the lens controls.
4. Select the level of binning using the drop down menu.
5. Input the exposure time for the first image e.g. 1 minute then input the exposure time for the last
image e.g. 4 minutes.
6. Select the total number of images to be captured.
7. Check the box if you would like to image a visible marker. Choose between ‘visible marker’ and
‘marker is colour’.
8. Press the capture button to capture the image.
Fluorescence Blot
1. Select your Blot type from the drop-down list e.g. Fluorescence Blot.
2. Select your sample size from the standards in the pop-up menu, or enter the dimensions of your
sample in the
Size
boxes, in cm.
3. From the dye selection screen select the dye(s) you wish to image. If multiplexing you can image
up to 5 different dyes at a time. Example of multiplex is select Alexa Fluor 488 and Alexa Fluor 647
from the list.
4. Check the ‘Light and filter’ check box to allow the user to select ‘more options’ and you can then
choose a different imaging condition from the list.
Note:
If you get the message ‘you do not have the hardware for this multiplex. To find out more
contact VWR. You may need to purchase a new lighting and filter option to be able to image this
dye.
5. From the sample positioning page adjust the lens controls.
Note:
it is advised when imaging
fluorescent blots to keep the Iris fully open. Use the Preview mode to turn on the upper white lights
to help with sample positioning.
6. Select the level of binning from the drop down menu. This will bin each colour channel to the same
level.
7. Press capture. The software will capture an image. If you have selected to multiplex then the
software will capture individual images for each dye and then automatically combine the images of


