After unpacking make sure that the appliance is complete and shows no signs of visible
damage or tampering.
• Keep the packing materials away from children.
• Check the supply voltage is the same as indicated on the heater.
• Do not touch the heater with wet hands.
• The heater should only be used with adult supervision.
• Do not operate the heater without the guard in position.
• Avoid the improper use of extension leads.
Installation
• The mains lead is made from high temperature cable(HO5SS-F) and as such
should not be replaced without consulting a suitably qualified person.
• The heater must always be installed using the mounting brackets provided. This
ensures correct positioning and adequate clearance.
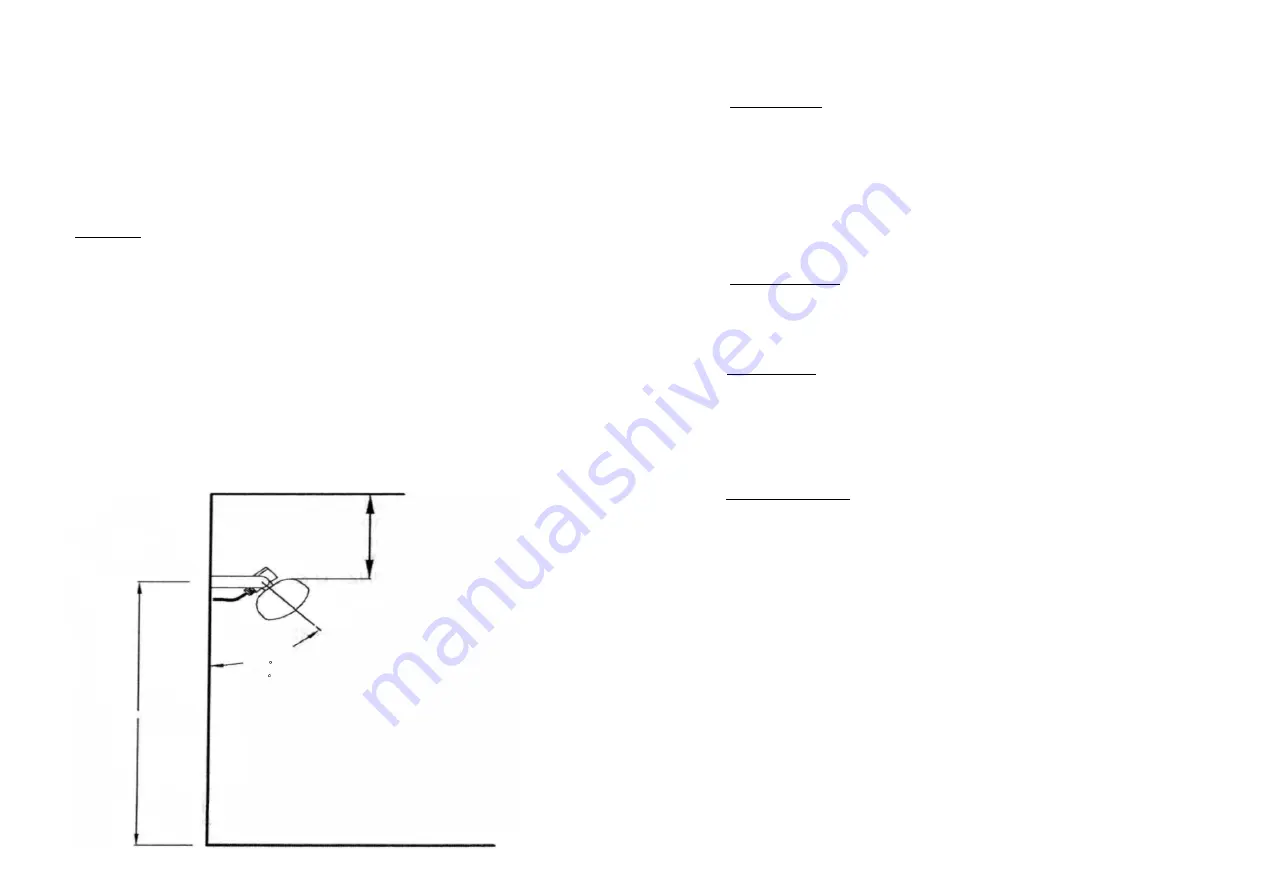
• This unit should be mounted at a minimum of 1800mm above ground level (see
drawing below) with a minimum air gap of 500mm maintained above the heater
and the ceiling or canopy.
• A safety distance of 1 mtr should always be left in front of the heater.
• Ensure that there is no possibility of inflammable material coming into contact with
the heater.
500mm M i n im u n
1800mm Minimum
4 5
m i n
9 0
m a x
Wall mounting
Remove the bracket from the back of the heater by unscrewing the 2 x M8
bolts.
Before drilling any holes ensure that the wall is solid and that there are no
water pipes or electrical wires in the area where you are placing the heater.
Secure the bracket to the wall then refit the heater to the bracket using the 2 x
M8 bolts.
The heater must be mounted at an angle of between 45 and 90 deg. (See
drawing opposite)
Parasol mounting
Use the supplied bracket for clamping to a parasol arm. You must ensure the
canvas / material of the parasol is at least 500mm away from the back of the
heater and can not come into contact with high winds.
Maintenance
The heater contains no moving parts and therefore very little maintenance is
required other than to ensure that there is not an excessive build-up of dust or
dirt on the reflectors or lamp, which can cause overheating and premature
lamp failure. To clean the heater, isolate it from the mains electricity supply,
allow it to cool and then wipe with a damp cloth.
Lamp replacement
The lamp used in the fitting is robust and if knocks and shock vibrations are
avoided, has an approximate lifespan of 5000 hours.
Lamp replacement must only be carried out by a competent person:
1. Isolate the heater from the power supply and wait until it has cooled down.
2. Remove both end caps by undoing the 2 socket head screws at each end.
3. Remove the guard and end reflectors.
4. Unclip the lamp from the spring clips at each end, allowing the emitter to
move forward clear of the back reflector.
5. Unclip the reflector from the heater casing.
6. Disconnect the emitter wires from the terminals located in the electrical
box on the rear of the heater, and then remove the lamp.
7. Insert the wires of the new lamp through the holes in the heater body to
the electrical box and reconnect them into the terminals. Ensure that the
terminals are tightened correctly to make a good electrical connection.
8. Re-assemble making sure all the parts are replaced and the guard is in
position


