Chapter 1, About the ERV-750: Installing the ERV-750 on Existing Equipment
E.H. Wachs
Part No. 79-MAN-01, Rev. 3-0409
13
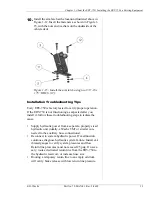
10.
Install the arm latch at the location illustrated above in
Figure 1-12. Insert the fasteners as shown in Figure 1-
15, with the nuts and washers on the underside of the
vehicle deck.
Figure 1-15. Install the arm latch using two 3/8”-16 x
1.75” HHCS (12).
Installation Troubleshooting Tips
Every ERV-750 is factory tested to verify proper operation.
If the ERV-750 is not functioning as expected after you
install it, follow these troubleshooting steps to isolate the
cause.
•
Supply hydraulic power from a separate, properly sized
hydraulic unit (ideally, a Wachs TM7 or similar con-
nected to the auxiliary hose connections).
•
Reconnect to system hydraulic power. If malfunction
continues, diagnose hydraulic system failure. Install cal-
ibrated gauges to verify system pressures and flow.
Return line pressures must not exceed 25 psig. If neces-
sary, route a dedicated return line from the ERV-750 to
the hydraulic reservoir, or increase hose size.
•
Routing a temporary return line to an empty oil drum
will verify brake release with low return line pressure.
Summary of Contents for ERV-750
Page 2: ...ERV 750 Extended Reach Valve Operator Part No 79 MAN 01 Rev 3 0409 E H Wachs...
Page 18: ...ERV 750 Extended Reach Valve Operator 14 Part No 79 MAN 01 Rev 3 0409 E H Wachs...
Page 22: ...ERV 750 Extended Reach Valve Operator 18 79 MAN 01 E H Wachs...
Page 40: ...ERV 750 Extended Reach Valve Operator 36 Part No 79 MAN 01 Rev 3 0409 E H Wachs Wiring...
Page 43: ......
Page 44: ...600 Knightsbridge Parkway Lincolnshire IL 60069 847 537 8800 www ehwachs com...


