background image

BA 1404 en – Edition 2.7 * 1404b330.fm

3-43

Operation

Notice!

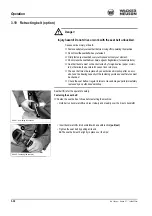
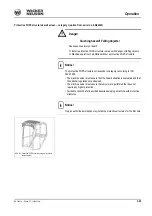
When entering or leaving the cab, the door must be locked in the arrester!

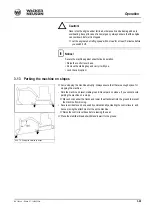
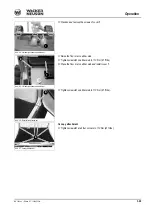
Raise control lever base 

5

 with handle 

A

to position 

B

The gas strut keeps the control lever base in the top position

Caution!

Do not use handle

A

 on the control lever base as a support to ease your 

entrance to the cab:

Use the entrance handholds on the cabin

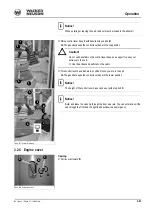
Fold control lever base 

5

down to position 

C

once you are in the cab

The gas strut keeps the control lever base in the lower position

Notice!

The height of the control lever base can be set with stop bolt

D

Notice!

Enter and leave the cab only through the door as a rule. You can enter and exit the 
cab through the front and the right-hand window in an emergency.

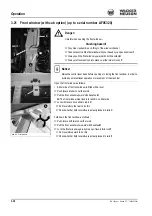
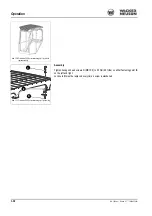
3.24 Engine cover

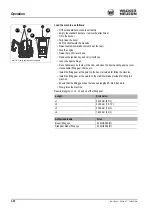
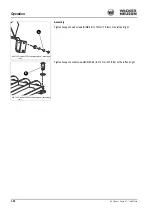
Opening:

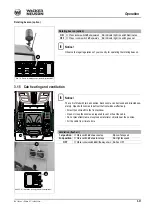
Pull lever 

A

 toward 

B

Abb. 107: Control lever base

A

7

8

5

B

D

A

5

C

Abb. 108: Engine cover lock

L

R

S

A

B

Summary of Contents for E09-01

Page 1: ...Machine model E09 01 1404 Edition 2 7 Order no 1000164553 Language en Operator s Manual Track excavator 1404...

Page 2: ...hout prior permission in writing from the manufacturer The cover features the machine with possible optional equipment Photographs and graphics are symbolic representations and may differ from the act...

Page 3: ...1 Disposal 2 1 Designated use and exemption from liability 2 2 General conduct and safety instructions 2 3 Organizational measures 2 3 Selection and qualification of personnel basic responsibilities...

Page 4: ...16 When the engine has started 3 16 Engine warm up 3 16 Jump starting the engine supply battery 3 17 Starting machine travel 3 18 Drive levers 3 18 Hydraulic brake 3 19 Stabilizer blade as a parking b...

Page 5: ...vel signal option 3 61 Machine operation 3 62 General safety instructions 3 62 Control levers ISO controls overview 3 63 Control lever on the left 3 63 Boom swivel controls 3 63 Auxiliary hydraulics 3...

Page 6: ...r from serial no AG03171 5 13 Air intake 5 13 Replacing air filter elements 5 14 Replacing the cabin air filter 5 16 V belt 5 17 Checking V belt tension 5 17 Tightening the V belt alternator 5 18 Chec...

Page 7: ...w 5 38 Maintenance label 5 42 Explanation of symbols on the maintenance label 5 42 Technical data Chassis 6 1 Engine 6 1 Hydraulic system 6 2 Travel gear and swivel unit 6 3 Stabilizer blade 6 3 Opera...

Page 8: ...1 6 BA 1404 en Edition 2 7 Ba1404en2_7IVZ fm Table of contents...

Page 9: ...Adding hydraulic oil 5 21 Air filter 5 12 5 14 Battery 5 31 Biodegradable oil 5 22 Bleeding the fuel system 5 4 Check the oil level 5 6 Checking the coolant level 5 9 Checking the engine oil level 5 6...

Page 10: ...rest adjustment 3 34 Horizontal adjustment 3 34 Weight adjustment 3 33 Shatter protection 3 59 Starting aid 3 17 T Technical data 6 1 Chassis 6 1 Coolant compound table 6 7 Dimensions 6 8 Electrical s...

Page 11: ...hine do not only depend on your skill but also on maintenance and servicing of the machine This is why regular maintenance and ser vicing is absolutely necessary Extensive maintenance and repair work...

Page 12: ...hine outside views 1 Lights 2 Boom light 3 Handhold 4 Auxiliary hydraulics 5 Lifting eye tie down point 6 Door arrester 7 Door handle and lock 8 Rotating beacon 9 Rear light 10 Exhaust pipe 11 Lubrica...

Page 13: ...e permanently drives the gear pump whose oil flow is sent to a hydraulic motor Operating hydraulics The diesel engine drives the joint gear pump for the work hydraulics The oil flow of this pump depen...

Page 14: ...peration of Wacker Neuson quickhitch systems requires this quickhitch mount Easy Lock quickhitch 19 kg 41 8 lbs Backhoe bucket 250 mm 9 8 wide 30 kg 66 1 lbs 23 l 0 8 ft3 Mechanical quickhitch 31 kg 6...

Page 15: ...nd work environment The most important points are the operator s qualification and power of judgement A well trained operator following the Operator s Manual and maintenance plan ensures a long servic...

Page 16: ...gsstelle Fachausschuss Bauwesen Landsberger Str 309 80687 Munich Germany Distinguishing EU number 0515 Notified body involved in procedure T V S D Industrie Service GmbH Westendstr 199 D 80686 Munich...

Page 17: ...ion HYDRAULIC EXCAVATOR Model Model year CEE no EEC no Output Serial no Max payload GWR Operating weight Front GAWR Transport weight Rear GAWR Version Type label indications from serial no AG03934 Mac...

Page 18: ...Neuson components for example Easy Lock offset bucket rollbar have numeric serial numbers only Cabin number The type label is located at the upper left of the cab frame 1 2 3 AD 51001 D Abb 4 Positio...

Page 19: ...e category I The type label is located inside the light cover on the left Type label for protective FOPS structure category II The type label is located on the right hand side of the protective screen...

Page 20: ...2 7 1404b110 fm Introduction Overview of adhesive labels The following states signs and symbols which are not unequivocally comprehensible They do not contain explanatory text and are not explained in...

Page 21: ...ning This label shows the forward travel direction Location On either side of the travel gear Meaning The reservoir contains hydraulic oil see chapter 5 4 Engine cooling system on page 5 8 Location Un...

Page 22: ...w Meaning Label shows the valve position in which the ISO or SAE controls are selected see chapter 3 33 Changeover valve for SAE ISO controls option on page 3 67 Location Inside the cabin Meaning This...

Page 23: ...BA 1404 en Edition 2 7 1404b110 fm 1 13 Introduction Overview of safety labels...

Page 24: ...gine cover Meaning Caution rotating fan Stop the engine before opening the engine cover Stay clear of the engine compartment if the fan is still running Caution danger due to rotating and moving parts...

Page 25: ...nt Meaning Caution serious danger hazard 1 Always use the handles to open and close the front window 2 Always lock the front window with both locks Location On the front window Meaning Optical warning...

Page 26: ...stability do not overload the machine and use only attachments that have been released by the manufacturer Always work on firm ground Follow the instructions given in the Operator s Manual During mach...

Page 27: ...ion Inside the cab on the side Meaning Caution danger of serious or fatal injury Stay clear of the machine s work range during operation Location On either side of the boom Meaning Bear in mind the pe...

Page 28: ...ht under the tracks Location On the front side of the engine cover 1 8 Fire extinguisher A fire extinguisher is neither included in the machine s standard equipment nor is it availa ble as an option f...

Page 29: ...t The environment is in danger if environmentally hazardous material for example waste oil is not subject to proper use or disposal 2 2 Warranty Warranty claims can be brought forward to your Wacker N...

Page 30: ...out proper authority and by using spare parts equipment attachments and optional equipment that have not been checked and released by Wacker Neuson Wacker Neuson will not be liable for damage resultin...

Page 31: ...t to job organi zation work sequences or the persons entrusted with the work supplement the Operator s Manual by corresponding instructions including those relevant to super vising and reporting dutie...

Page 32: ...el on the machine and clearly and unequivo cally define the individual responsibilities of the personnel for operation set up mainte nance and repair Define the machine operator s responsibilities als...

Page 33: ...work shift for visible damage and malfunc tions Report any changes incl changes in working behavior to the competent organi zation person immediately If necessary stop the machine immediately and loc...

Page 34: ...achments to the ground Before starting work check whether all safety devices are properly installed and functional Before starting machine travel or before taking up work Ensure that visibility is suf...

Page 35: ...flying fragments Explanation of abbreviations ROPS Roll Over Protective Structure TOPS Tip Over Protective Structure FOPS Falling Objects Protective Structure 2 7 Checks when reversing the machine Car...

Page 36: ...f the bores on the attachment Check again before starting work Raise the control lever base before installing attachments on the stick Be careful when coupling attachments to the machine injury hazard...

Page 37: ...life of machines are heavily dependent on maintenance It is therefore in the interest of the machine owner to perform the mandatory maintenance The manufacturer requires the owner to perform maintenan...

Page 38: ...ect state with appropriate load bearing capacity Stay clear of suspended loads Have loads fastened and crane operators guided by experienced persons only The person guiding the operator must be within...

Page 39: ...ar protectors 2 14 Warning of special hazards Electrical energy Use only original fuses with the specified current rating Switch off the machine immediately disconnect the battery and rectify the malf...

Page 40: ...as take appropriate measures for the protection of the driver and the machine 2 15 Battery When handling the battery observe the specific safety instructions and regulations relevant to accident preve...

Page 41: ...op work immediately if a hydraulic hose moves back and forth This could be a cause for a pressure accumulator malfunction Contact your Wacker Neuson dealer and have the error repaired immediately Clos...

Page 42: ...y instructions Caution Always observe the following instructions Do not raise the machine with the boom Do not perform any movements with the machine during hammer operation Working with the cylinders...

Page 43: ...40 18 or 40 A used for identifying the control elements means fig no 40 control element no 18 or position A in fig no 40 Figures carry no numbers if they are placed to the left of the text The symbol...

Page 44: ...3 2 BA 1404 en Edition 2 7 1404b320 fm Operation 3 1 Cabin overview 5 27 22 11 20 12 3 4 19 14 6 17 16 25 7 21 15 10 24 13 8 23 26 9 1 2 2...

Page 45: ...st left 10 Armrest right 11 Washer system reservoir 12 Radio option 13 Operator seat backrest adjustment 3 33 14 Seat belt lock 3 34 15 Heating controller option 3 31 16 Throttle 3 9 17 Fuse box 6 4 1...

Page 46: ...n 3 3 Instrument panel overview 1 up to serial number WNCE0901PPAL02193 2 starting from serial number WNCE0901KPAL02194 28 32 31 29 30 33 34 36 35 40 41 47 38 42 43 46 45 44 39 37 30 33 34 36 38 50 48...

Page 47: ...ed 39 Fuel tank capacity 3 11 40 Hour meter 3 12 41 Not assigned 42 Ventilation option 3 32 43 Washer system option 3 33 44 Working lights 3 30 45 Rotating beacon 3 31 46 Roof lights option 3 30 47 Hy...

Page 48: ...operation The machine may only be used in technically perfect condition in accordance with its desig nated use and the instructions set forth in the Operator s Manual and only by safety conscious per...

Page 49: ...to operation or starting the engine No Question 1 Enough fuel in the tank 5 2 2 Coolant level OK 5 9 3 Water drained from the fuel prefilter 5 5 4 Engine oil level OK 5 6 5 Oil level in hydraulic oil...

Page 50: ...tion illuminate 2 Indicator lights for engine oil pressure and alternator charge function gone out 3 10 3 Accelerator pedals working correctly 3 18 No Question 1 Attachments lowered to the ground 3 62...

Page 51: ...as lever 16 the speed is set to be continuous Position A idling speed Position B max engine speed 1 0 2 3 Abb 43 Preheating start switch 25 Position Function Power consumer 0 Insert or remove the star...

Page 52: ...r Neuson service center The V belt is malfunctioning or there is an error in the charging circuit of the alternator if the indicator light illuminates with the engine running The battery is no longer...

Page 53: ...the key is in this position Control light green speed level 2 display 2 starting from serial number WNCE0901KPAL02194 Comes on when speed level 2 is selected Coolant temperature display 2 Indicates th...

Page 54: ...perating hours with the engine running Maintenance meter display 2 Counts the remaining engine operating hours down to the next maintenance work due If less than 10 hours are displayed the wrench symb...

Page 55: ...e so the battery can recover before trying again Procedure Caution Actuating the preheating system too long can damage the preheater Never preheat the engine more than 20 seconds After you have comple...

Page 56: ...d hold it in this position until the engine starts If the engine does not start after 10 seconds Interrupt the start procedure and try again after about 1 minute If the engine still does not start aft...

Page 57: ...edure is automatically cancelled if no key requiring coding is detected within 15 seconds Several keys requiring coding can be inserted one after another in the preheating start switch Each key must t...

Page 58: ...less energy in cold conditions Therefore ensure that the battery is always well charged When the engine has started Check whether the indicator lights go out Letting the engine warm up At cold tempera...

Page 59: ...Drive the jump starting vehicle close enough to the machine so that the jump leads can reach to connect the two batteries Let the engine of the jump starting vehicle run First connect one end of the r...

Page 60: ...cause serious injury or death Slowly and carefully actuate the drive levers pedals The stabilizer blade side is the front side Raise the attachment and the stabilizer blade The machine can be moved ei...

Page 61: ...duce travel speed with the drive levers accelerator pedals and not with the engine speed control of the engine Stabilizer blade as a parking brake The stabilizer blade is used as a parking brake Press...

Page 62: ...ll attachment Performing machine travel diagonally on slopes is prohibited Stones and the humidity in the upper layer of the ground can drastically affect machine traction and stability The machine ca...

Page 63: ...e stabilizer blade uphill Raise the boom about 20 30 cm 8 12 in off the ground and position it straight ahead at the center of the machine Do not exceed a maximum gradient angle of 15 Downhill machine...

Page 64: ...er 10 pile up material to create a level surface that can be used as a platform for the machine 3 9 Stabilizer blade operation Caution When the stabilizer blade is lowered too deeply into the ground i...

Page 65: ...lever base 4 Set the stabilizer blade in the required position Raise the stabilizer blade lever B is to be pulled back Lower the stabilizer blade lever B to be pushed forward Notice Check the positio...

Page 66: ...se the stabilizer blade to about 1 2 cm about 0 4 0 8 Pull out pins A on either side Turn in the stabilizer blade extensions B on either side Insert pins A on either side Increasing the width of the s...

Page 67: ...ty Retract or extend the telescopic travel gear completely Raise the boom 20 30 cm 8 12 in off the ground and position it straight ahead at the center of the machine In an emergency lower the boom imm...

Page 68: ...er base 4 Raise the vehicle using the stabilizer blade and boom so far that no contact with the earth exists and so that there are no foreign objects in the travel gear during retraction or extension...

Page 69: ...27 Operation 8 Bring the travel gear in the required position Wide track width Lever B to be pushed forward Narrow track width Lever B to be pulled back 9 Raise the control lever base 10 Bring lever A...

Page 70: ...ng the upper carriage Align the upper carriage with the travel gear Raise lever 2 and put it in position A Locking the upper carriage Position the upper carriage straight ahead Upper carriage and trav...

Page 71: ...ou Lock the cab option 3 13 Parking the machine on slopes Avoid stopping the machine abruptly Always ensure that there is enough space for stopping the machine Park the machine on level stable ground...

Page 72: ...r roof light illuminate Interior light Abb 76 Light system switches symbolic representation 44 Boom light ON Press switch 44 down the indicator light in switch 44 comes on OFF Press switch 44 up the i...

Page 73: ...equired to vent or heat the cabin Do not place flammable or explosive material or objects near the nozzles Air the cabin from time to time Abb 79 Switch for rotating beacon symbolic representation 45...

Page 74: ...system if the reservoir is empty otherwise this can damage the electric pump Tank for washer system The tank filler inlet is located at the rear left in the cab Notice Add only clean faucet water Add...

Page 75: ...ch will not damage the window panels when work ing with the machine Notice Adjust the seat to the operator s weight before putting the machine into operation Adjust the seat suspension correctly to en...

Page 76: ...tightly Do not place the seat belt over hard edged or fragile items tools rulers glasses pen carried inside your clothes Never buckle up 2 persons children with one seat belt Check seat belts regularl...

Page 77: ...end The seat belt must always be tightly in place over the hips Unfastening the seat belt Safety belt 14 to be removed as follows Hold the seat belt Press red switch C on buckle B Latch A is released...

Page 78: ...le latch cannot lock into place The seat belt must be replaced by an authorized workshop after an acci dent and the bearing capacity of the fastening points and seat fixtures must be checked Check the...

Page 79: ...p the seat belt slowly 3 20 Emergency exit with cab option You can enter and exit the cabin through the side and front windows in an emergency Danger The front and the right of the machine have neithe...

Page 80: ...oid any unintentional operation or movement of the machine Open the front window as follows Either side of the front window is fitted with a lever Push levers A down on either side Pull the front wind...

Page 81: ...the recesses as you open and close it Raise the control lever base before opening or closing the front window in order to avoid any unintentional operation or movement of the machine Opening closing t...

Page 82: ...l The front window is stored at the rear cab wall Close the lower front window in the reverse order 3 22 Door with cab option Danger Close secure the door and the side window when driving and working...

Page 83: ...right R The door is unlocked Opening the door from the inside Press the lever on the inside left on door lock C down Securing an open door Press the door against bracket D of arrester E with an audib...

Page 84: ...k C to access the cab Exit Parking the machine see Parking the machine on page 3 28 Use handle A on the A pillar Use track C to leave the cab Notice You can climb and get off the track only if the tra...

Page 85: ...o the cab Use the entrance handholds on the cabin Fold control lever base 5 down to position C once you are in the cab The gas strut keeps the control lever base in the lower position Notice The heigh...

Page 86: ...in lock S to the right R Engine cover unlocked 3 25 Battery master switch Notice Do not disconnect the battery while the engine is running Notice Power supply is interrupted directly after the battery...

Page 87: ...to restricted field of vision on the job site Can cause serious injury or death Do not allow anyone to stay in the danger zone Use suitable visual aids if necessary for example a camera mirrors guide...

Page 88: ...er use machine parts or attachments superstructures as a climbing aid Adjusting the mirrors Adjust the mirrors in order to Ensure sufficient visibility from the operator seat onto the job site Ensure...

Page 89: ...nsure that no one is dangerously close to the excavator Caution The maximum admissible load of the towing bracket is 2330 daN 5238 lbf Use towing bracket A Secure shackle B with the shackle pin and a...

Page 90: ...r sound of him Ensure that the crane and the lifting gear cables chains have sufficient lifting capacity Raise the machine only if the standard bucket is empty Stay clear of suspended loads It is esse...

Page 91: ...to 110 Nm 81 ft lbs Place the floor mat on either side and install cover 1 Tighten screws B on either side to 110 Nm 81 ft lbs Canopy attachment Tighten screws B at all four corners to 110 Nm 81 ft l...

Page 92: ...ab and close the doors and the engine cover Use suitable lifting gear chains etc Install the lifting gear at the point on the boom provided for lifting the machine Install the lifting gear at the poin...

Page 93: ...rs and the engine cover Mount extension A to the lifting eyes B until serial numbers AF05320 M16 wrench gap extension 12 mm starting from serial numbers AG02423 M20 wrench gap extension 14 mm Mount th...

Page 94: ...hocks to prevent it from rolling Place the access ramps at the smallest possible angle Ensure that the grade does not exceed 15 27 Use access ramps with an antiskid surface only Ensure that the loadin...

Page 95: ...he stabilizer blade and the boom Firmly tie down the excavator at the lifting eyes A onto the platform with belts or chains of appropriate size Before transporting the machine through heavy rain close...

Page 96: ...ive structure replaced Notice Check the cab canopy and all protective structures once a day for damage Definition of FOPS levels Level I Protection against small falling objects bricks small pieces of...

Page 97: ...The protective FOPS structure corresponds to category I according to ISO 3449 1992 The machine owner must ensure that the hazard situation is evaluated and that the national regulations are observed T...

Page 98: ...head screws A M6 8 8 to 10 Nm 7 ft lbs on the left and right Tighten hexagon socket screws B M20 8 8 to 410 Nm 302 ft lbs on the left and right Abb 124 Protective FOPS structure category I assembly a...

Page 99: ...FOPS structure Notice The protective FOPS structure corresponds to category II according to ISO 3449 1992 The machine owner must ensure that the hazard situation is evaluated and that the national re...

Page 100: ...screws C M8 10 9 to 35 Nm 26 ft lbs on either fastening point E on the left and right Lock nuts D must be replaced every time a screw is slackened Abb 126 Protective FOPS structure category II symbol...

Page 101: ...Danger Accident hazard in conditions of restricted visibility due to rain snow fall dust etc Causes serious injury or death Stop machine operation immediately Notice The shatter protection canopy opt...

Page 102: ...top and park the machine Lower the boom and the stabilizer blade to the ground Stop the engine Remove the starting key and carry it with you Raise the control lever base Install remove shatter protect...

Page 103: ...l signal option A driving signal sounds as soon as at least one of the tracks moves Danger Accident hazard during forward backward machine travel Danger of serious crushing causing death or serious in...

Page 104: ...hine or the building can collapse causing severe injury or damage Do not use the impact force of the attachment to perform demolition work Demolished parts can cause injury or damage to property or th...

Page 105: ...t hazard Notice Always perform smooth control movements Boom swivel controls Danger The pedal is not locked by raising the control lever base Caution Risk of injury due to unintentional actuation of t...

Page 106: ...he control lever base Caution Risk of injury due to unintentional actuation of the pedal Actuate the pedal carefully otherwise the boom is swivelled earlier than required In order to avoid unintention...

Page 107: ...mergency lowering 1 Turn the starting key to position 1 2 Lower both control lever bases 3 Push the right hand control lever 6 forward until the boom is fully lowered to the ground 4 Return the contro...

Page 108: ...the control lever is actuated slowly the upper carriage rotates slowly Rotate the upper carriage to the left as follows Push the left control lever 5 to the left A The upper carriage rotates to the le...

Page 109: ...er of the directional valve Control lever on the left Control lever on the right Abb 138 Control lever on the left SAE controls D C A B 5 Position Lever Function A Forward Boom is lowered B To the rig...

Page 110: ...lve The changeover valve switches from ISO to SAE controls and vice versa Tighten wing nut J after changing the control mode Caution No machine travel or operation if wing nut J is malfunctioning Imme...

Page 111: ...e lines Release the pressure Release the pressure in the sections of the system and hydraulic lines that are to be opened before starting setup or repair work for example fitting removing an attachmen...

Page 112: ...ury by following the information below Stop the engine Raise the control lever base Remove the starting key Re equip attachments only with suitable tools Do not align components with your fingers or y...

Page 113: ...d onto the quickhitch by means of the lock mechanism You must be able to see the lock on either side of the mounting bore of the attachment Re equip as follows Approach the machine to the attachment P...

Page 114: ...off and cause serious injury or death Do not allow anyone to stay in the danger zone Do not use damaged attachments Check pin F must be fully retracted Otherwise repeat the lock cycle until check pin...

Page 115: ...ickhitch 3 Move the attachment inward completely 4 Unlock switch D and press in position 1 until 3rd quarter 2013 switch without lock ing element The quickhitch is enabled and the buzzer sounds 5 Pres...

Page 116: ...6 Release the stabilizer blade lever and foot operated push button E The quickhitch closes Check pin F must be fully retracted 7 Press switch D to position 2 The quickhitch is disabled and the buzzer...

Page 117: ...osition 1 until 3rd quarter 2013 switch without locking element The quickhitch is enabled and the buzzer sounds 3 Press and hold the foot operated push button E and pull the stabilizer blade lever bac...

Page 118: ...ets can also be used for shovel bucket operation Danger Do not tilt the bucket fully back in shovel bucket operation see Fig 158 otherwise the bucket base can touch and damage the stick Connections fo...

Page 119: ...ly connect the coupling on the connection Turn back the lock again away from lock ball B Attachments Notice Please refer to the Operator s and maintenance manual of the attachment manufacturer for usi...

Page 120: ...eel Lubricate lubrication points again that were immersed in water for a longer time in order to expel the old grease Do not immerse the live ring and upper carriage in the water Operation in salt wat...

Page 121: ...rce by lowering the machine Do not use the machine s falling force for excavating Retracting attachments Ensure that the bucket does not hit the stabilizer blade as you retract attachments for driving...

Page 122: ...same time align bucket E until reaching the required digging depth and the flat side of the bucket is parallel to ground Pull bucket E parallel to the ground toward the excavator if possible at the s...

Page 123: ...hen planning and performing digging work we recommend that you observe the follow ing points Exits from pits must be outside the digging line and as level as possible Dig by removing adjacent strips i...

Page 124: ...82 BA 1404 en Edition 2 7 1404b340 fm Operation Slowly dump out the bucket The machine is pushed backward Reverse slowly Repeat this procedure until the tracks reach firm ground Reverse the machine aw...

Page 125: ...stabilizer blade Grading Lower the stabilizer blade to the ground see chapter 3 9 Stabilizer blade operation on page 3 22 Set the depth of the layer you want to remove with the stabilizer blade lever...

Page 126: ...Always use stabilizer blade B for stabilization during excavation work Ensure that stabilizer blade B never touches piston rod A If you perform deep excavations with stabilizer blade B at the front en...

Page 127: ...lfunctioning fuel injector Malfunctioning cutoff solenoid Malfunctioning fuse Engine starts but does not run smoothly or faultless Fuel grade does not comply with specifications 5 35 Dirty fuel filter...

Page 128: ...5 35 Engine oil consumption too high Oil level too high 5 6 Worn oil scraper rings Machine inclination too high max 15 Wrong SAE grade Engine smoke Blue Oil level too high 5 6 Machine inclination too...

Page 129: ...ebris can be blown into your face Therefore wear safety glasses protective masks and clothing when using compressed air Daily servicing and maintenance and maintenance according to maintenance plan A...

Page 130: ...the left in driving direction Danger All work involving fuel carries an increased Fire and poisoning hazard Do not refuel in closed rooms Never perform work on the fuel system near open flames or spar...

Page 131: ...ner Stationary fuel pumps General Only refuel from stationary fuel pumps Fuel from barrels or cans is usually dirty Even the smallest particles of dirt can cause Increased engine wear Malfunctions in...

Page 132: ...ing the engine again after it has been out of operation for a longer period of time Bleed the fuel system as follows Raise the control lever base Remove the starting key Fill the fuel tank Turn the st...

Page 133: ...ll type cock B to the OFF mark Fuel supply is interrupted Unscrew thread D Drain the water in the water separator into a suitable container The indicator ring returns to the base of the water separato...

Page 134: ...stopping a warm engine wait at least 5 minutes before checking Checking the oil level Park the machine on level ground Stop the engine Raise the control lever base Let the engine cool down Open the e...

Page 135: ...ine damage add the engine oil slowly so it can go down with out entering the intake system Clean the area around oil filler cap B with a lint free cloth Open filler cap B Pull out oil dipstick A and w...

Page 136: ...oolant level at regular intervals Refer to the maintenance plans in the appendix for the intervals If coolant must be added frequently check the cooling system for leaks and or con tact a Wacker Neuso...

Page 137: ...es after stopping the engine Wear protective gloves and clothing Open filler cap B to the first notch and release the pressure Ensure that the coolant temperature is sufficiently low so you can touch...

Page 138: ...re in the radiator Carefully open cap B to the first notch and fully release the pressure Open filler cap B Add coolant up to the lower edge of the filler inlet radiator Close filler cap B Start the e...

Page 139: ...steel and aluminum mills chemical plants and other nonferrous metal plants Replace the air filter element after 50 operating hours at the latest General instructions for air filter maintenance Store...

Page 140: ...et the engine cool down Open the engine cover Remove dirt and dust from the air filter element and the area around the air filter Turn the lower housing section D to the right A Remove the lower housi...

Page 141: ...elements must be replaced If Service red mark is displayed on dirt indicator A According to the maintenance plan Caution Air filter elements degrade prematurely when in service in acidic air for longe...

Page 142: ...ion and cover E including dust valve D has been removed Clean the parts with a clean lint free cloth do not use compressed air Check the new outside air filter B for damage and carefully insert it in...

Page 143: ...ve D has been removed Clean the parts with a clean lint free cloth do not use compressed air Remove the cloth from the air supply Check the new inside air filter C for damage and carefully insert it i...

Page 144: ...ective clothing Carefully clean the filter with compressed air Do not aim the compressed air at the skin or at other people Do not use compressed air for cleaning your clothing The machine is equipped...

Page 145: ...ws Stop the engine Raise the control lever base Remove the starting key and carry it with you Disconnect the battery or the battery master switch Open the engine cover Let the engine cool down Careful...

Page 146: ...ve the starting key and carry it with you Disconnect the battery or the battery master switch Open the engine cover Let the engine cool down Slacken fastening screws 1 of cover 2 Remove cover 2 Slacke...

Page 147: ...cover Disconnect the battery or the battery master switch Let the engine cool down Slacken fastening screws 1 of cover 2 Remove cover 2 Slacken fastening screw 3 of alternator 4 Use a suitable tool H...

Page 148: ...the pressure inside the reservoir Wear protective equipment Wear safety glasses to protect the eyes If oil contacts the eye flush imme diately with clean water and seek medical treatment Notice In or...

Page 149: ...n a warm engine the oil level must be about at the middle of the sight glass Add hydraulic oil if the oil level is lower Adding hydraulic oil 9 Open breather filter B carefully to release the pressure...

Page 150: ...dable oil ensure that the remaining amount of initial biodegradable oil does not exceed the indications of the manufacturer of biodegradable oil Do not add mineral oil the content of mineral oil shoul...

Page 151: ...them have them replaced with new ones Never use an unprotected light or open flame to check for minor leaks Have damaged flexible lines replaced by a Wacker Neuson service center only Do not remove pr...

Page 152: ...val 1 Bucket cylinder 2 Daily 2 Stick cylinder 2 Daily 3 Boom cylinder 2 Daily 4 Boom 2 Daily 5 Stabilizer blade cylinder 2 Daily 6 Stabilizer blade 2 Daily 7 Stick 3 Daily 8 Joint rod 1 Daily 9 Swive...

Page 153: ...lubrication Serious crushing hazard causing death or serious injury Do not rotate the upper carriage Stop and park the machine see chapter on page 5 25 1 Park the machine on firm level and horizontal...

Page 154: ...must ensure that it can be hitched cor rectly by removing all dirt on either claw of the quickhitch Perform visual checks for possible malfunctions damage or cracks Remove all dirt on and around movin...

Page 155: ...to allow the tracks to sag freely 1 Park the machine on firm level and horizontal ground 2 Raise the machine evenly and horizontally by means of the boom and stabilizer blade 3 Place the tracks so tha...

Page 156: ...at idling speed and slowly moving the machine forward and reverse and switching it off again Check the tension of the tracks again If it is not correct Adjust again Should the tracks still be slack a...

Page 157: ...connect the negative battery terminal from the battery before starting repair work on the electrical system Dispose of used batteries properly Servicing and maintenance at regular intervals Before per...

Page 158: ...engine with the battery connected When connecting the battery ensure that the poles are not inverted Always disconnect the battery before performing welding work or connecting a quick battery charger...

Page 159: ...thing or the machine Do not use open flames near open battery cells avoid sparks close by and do not smoke otherwise the gas that is also produced during normal bat tery operation not only during batt...

Page 160: ...t use flammable liquids such as gasoline or diesel Cleaning with compressed air Work carefully Wear safety glasses and protective clothing Do not aim the compressed air at the skin or at other people...

Page 161: ...is at a standstill Injury hazard Stop the engine before cleaning it Caution When cleaning the engine with a water or steam jet The engine must be cold and do not point the jet directly at electric sen...

Page 162: ...of time The following measures must be taken if the machine is out of service for more than 30 days Putting into operation again Remove anticorrosion agent from the piston rods Charge install and con...

Page 163: ...M 2610 Korea GB252 China Radiator Coolant Distilled water antifreeze ASTM D4985 reddish 12 Year round 4 l 1 06 gal Distilled water antifreeze ASTM D6210 violet 13 Washer system Cleaning solution Water...

Page 164: ...wing intervals Notice Please refer to the maintenance plan on page 5 38 for additional maintenance Engine oil grade Ambient temperature C C 20 15 10 5 0 5 10 15 20 25 30 35 40 SAE 10W SAE 20W SAE 10W...

Page 165: ...l grades for the hydraulic system depending on temperature Hydrau lics oil grade Ambient temperature HVLP1 C 20 15 10 5 0 5 10 15 20 25 30 35 40 50 ISO VG32 ISO VG46 ISO VG68 F 4 5 14 23 32 41 50 59 6...

Page 166: ...changes check oil levels after test run Engine oil 1 Engine oil filter 2 Fuel filter 3 Air filter element according to dirt indicator 4 Coolant Hydraulic oil filter insert 5 Hydraulic oil 6 Hydraulic...

Page 167: ...or dirt Check battery electrolyte Add distilled water if necessary Check electric connections bearing play and function of alternator and starter Check preheating system and electric connections Press...

Page 168: ...g assemblies components see Maintenance label on page 5 42 Stabilizer blade Swiveling console Swiveling cylinder Boom Stick Attachments Hydraulic quickhitch option see Hydraulic quickhitch Easy Lock o...

Page 169: ...nts with acidic air such as acid production facilities steel and aluminum mills chemical plants and other nonferrous metal plants 5 Replace the hydraulic oil filter insert the first time after 50 o h...

Page 170: ...an the fuel prefilter Radiator Check the coolant level Radiator Drain and add new coolant Engine Check valve clearance Adjust if necessary Engine Check the engine oil level Engine Changing engine oil...

Page 171: ...BA 1404 en Edition 2 7 1404b560 fm 5 43 Maintenance DIN 51 502 DIN 51 825 1000156007 1...

Page 172: ...5 44 BA 1404 en Edition 2 7 1404b560 fm Maintenance...

Page 173: ...el engine Number of cylinders 3 Displacement 1116 cm 68 cu in Nominal bore and stroke 76 x 82 mm 2 9 x 3 2 in Power 13 2 kW at 2200 rpm 17 7 hp at 2200 rpm Max torque 65 8 Nm at 1600 rpm 48 5 ft lbs a...

Page 174: ...2200 rpm 17 7 hp at 2200 rpm Max torque 65 8 Nm at 1600 rpm 48 5 ft lbs at 2200 rpm Max engine speed without load 2375 25 rpm Idling speed 1300 50 min 1 1 300 50 rpm fuel injection system Indirect in...

Page 175: ...1 in Height 215 mm 8 in Max lift over under subgrade 235 270 mm 9 11 in Work hydraulics 1404 ET16 Control valve 9 sections Main pressure limiting valve for boom bucket stick 200 6 0 bar 2 901 87 0 psi...

Page 176: ...ed current A Protected circuit F2 10 A Fuse relay indicator cutoff solenoid F3 10 A Boom working light fuse F4 15 A Cabin working light fuse F5 10 A Safety valves horn driving signal option speed leve...

Page 177: ...ments Precise indications on the vibration degrees cannot be made for the machine Determination of vibration level for the three vibration axes Under typical operating conditions use the average vibra...

Page 178: ...condition Remove large rocks or obstacles Fill up ditches and holes Provide a machine and enough time to keep the job site in good condition Use an operator seat according to the ISO 7096 requirements...

Page 179: ...ons for all machines Read the original guide lines This chapter summarizes part of the legal regulations However its aim is not to replace the original references Other parts of this document are base...

Page 180: ...Technical data 6 11 Dimensions 1462 4 10 3648 12 1065 3 6 1250 4 1 1300 4 3 2283 7 6 990 3 3 980 3 3 230 9 230 9 215 8 5 235 9 3 270 10 6 3606 11 10 Abb 218 Machine dimensions 1300 4 3 990 3 3 287 11...

Page 181: ...10 Max digging depth 2240 mm 7 4 Stick length standard 940 mm 3 1 Long stick length option 1100 mm 3 7 Max vertical digging depth 1640 mm 5 5 Max digging height 3390 mm 11 2 Max tilt out height 2370...

Page 182: ...chine The authorized lift capacity specified in the table must never be exceeded The lowest value applies Notice The indications are only approximate values Attachments uneven ground and soft or bad g...

Page 183: ...ad nor 87 of the hydraulic lift capacity is exceeded Abb 220 Lift capacity table A max 3 0 m 9 10 2 0 m 6 7 B Across stabilizer blade Across side 360 Across stabilizer blade Across side 360 Across sta...

Page 184: ...tic tilt load nor 87 of the hydraulic lift capacity is exceeded Abb 221 Lift capacity table A max 3 0 m 9 10 2 0 m 6 7 B Across stabilizer blade Across side 360 Across stabilizer blade Across side 360...

Page 185: ...ity is exceeded Abb 222 Lift capacity table A max 3 0 m 9 10 2 0 m 6 7 B Across stabilizer blade Across side 360 Across stabilizer blade Across side 360 Across stabilizer blade Across side 360 Lowered...

Page 186: ...c lift capacity is exceeded Abb 223 Lift capacity table A max 3 0 m 9 10 2 0 m 6 7 B Across stabilizer blade Across side 360 Across stabilizer blade Across side 360 Across stabilizer blade Across side...

Page 187: ...at have already been delivered and that will not be implemented on these machines Technical data dimensions and weights are only given as an indication Responsibility for errors or omissions not accep...

Page 188: ...Wacker Neuson Linz GmbH Flughafenstr 7 A 4063 H rsching Phone 43 0 7221 63000 Fax 43 0 7221 63000 2200 E mail office linz wackerneuson com www wackerneuson com Order no 1000164553 Language en...

Reviews: