background image

Appendix

Page  55

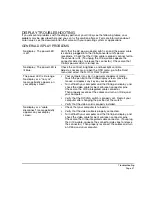
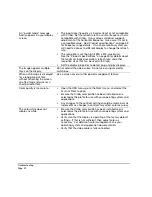
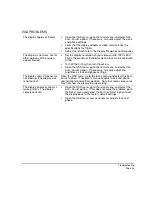
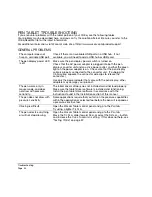
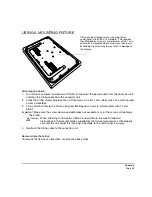
USING A MOUNTING FIXTURE

Attaching to a fixture:

1.

Turn off your computer and power off Cintiq.  Disconnect the power cable from the converter unit, 
and then the Cintiq cable from the converter unit.

2.

Close the Cintiq stand and place the unit face down on a flat, soft surface (such as a cloth spread 
across a desktop).

3.

Firmly attach Cintiq to the fixture using four M4 Regular screws (4 mm diameter with 0.7 mm 
pitch).

Important: Make sure the screw clearance depth does not exceed 6 mm, or the screws will damage 

the Cintiq.

4.

Reattach the Cintiq cable to the converter unit.

Removal from the fixture:

To remove the fixture at a later time, reverse the above steps.

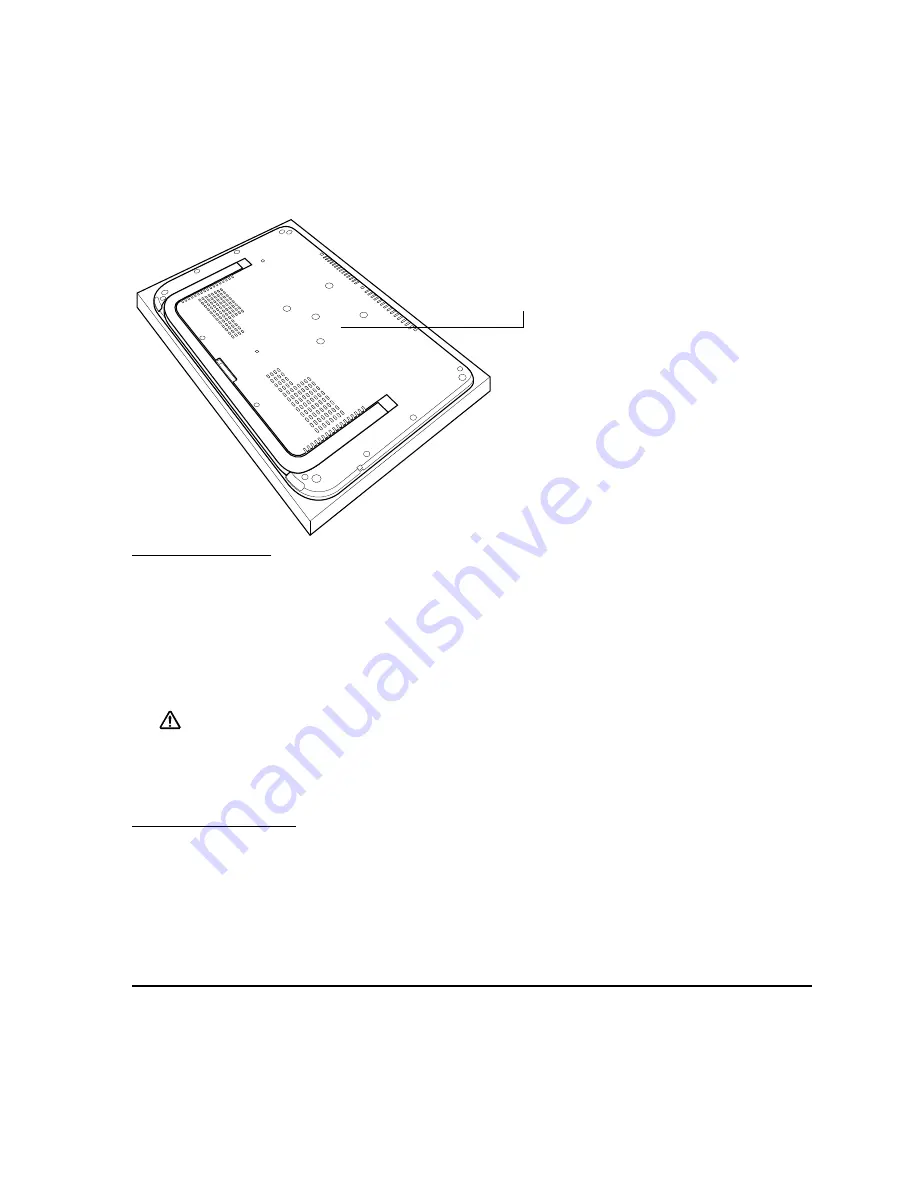
Cintiq can be attached to any mounting fixture 
conforming to the VESA 75 standard.  This requires 
four M4 Regular screws (4 mm diameter with 0.7 mm 
pitch) with a clearance depth of no more than 6 mm.  
Exceeding the screw length may result in damage to 
the display.

Caution

When attaching Cintiq onto a VESA standard fixture, be sure to follow all 
instructions in the documentation supplied by the fixture manufacturer.  If improperly 
secured, the unit could fall, resulting in damage to the unit or physical injury.

Summary of Contents for Cintiq 12 WX DTZ-1200W

Page 1: ...Installation Guide Hardware Manual Model DTZ 1200W...

Page 2: ...e applicable Wacom product DuoSwitch is a trademark and Cintiq and Wacom are registered trademarks of Wacom Co Ltd Adobe Reader and Photoshop are either registered trademarks or trademarks of Adobe Sy...

Page 3: ...setting up the Cintiq pen display To learn about the many features of your product see Cintiq pen display components on page 8 Follow all instructions carefully when installing your product See Insta...

Page 4: ...by Wacom for the usage in a normal office environment only and there was no particular inspection with regards to its compatibility in medical and military application areas In addition the interacti...

Page 5: ...ck when the casings are open This will also void your warranty and Wacom shall have no responsibility to repair or replace the product Warning If the LCD screen has been damaged DO NOT touch any liqui...

Page 6: ...ct from the AC power source Caution Do not expose Cintiq to high voltage electrostatic discharges or to a build up of an electrostatic charge on the LCD screen This may result in a temporary discolora...

Page 7: ...ation 16 Software installation 17 WORKING WITH YOUR CINTIQ 18 Using the Grip Pen 18 Basic pen operations 19 Pen display controls 21 Using the ExpressKeys 22 Using the Touch Strips 23 Setting up your w...

Page 8: ...ablet PC Input Panel 57 Uninstalling Cintiq 58 Product specifications 59 Cintiq 12WX model DTZ 1200W general specifications 59 Display 60 Pen tablet 61 Converter unit 61 Power adapter 61 Grip Pen mode...

Page 9: ...o install these applications review the instructions that came with those CDs or DVDs Retain the package box for use when storing or shipping Cintiq Cintiq 12WX model DTZ 1200W pen display with attach...

Page 10: ...s entered a power management mode in which video signals are not sent Status LED Lights blue when the pen is in the active area of the pen display and the pen tip eraser or side switch are pressed The...

Page 11: ...y Rotation pivot Allows rotating the Cintiq See Rotating the tablet on page 26 Important Always store the pen display on a stable surface or in its original packing carton when not in use Do not bend...

Page 12: ...ust the display settings See Adjusting the display on page 31 DVI VGA digital analog switch Set this switch for the video connection you will be using For DVI move switch left toward the connector For...

Page 13: ...se that display to verify the video card is operating correctly Although you can connect Cintiq to either a DVI or VGA video card connecting to a DVI video card generally results in optimum performanc...

Page 14: ...matching connector on the converter unit When fully seated the connector will snap into place See C on the next page 5 Connect the power adapter to the converter unit Then connect the adapter s power...

Page 15: ...ou are using Use only the converter unit and power adapter that came with Cintiq use of an improper converter or power adapter may damage the unit Do not connect or disconnect the video or power cable...

Page 16: ...s to the pen display Select the number corresponding to Cintiq B Click ADVANCED SETTINGS C Select the MONITOR tab and click PROPERTIES D Select the DRIVER tab and click UPDATE DRIVER An update driver...

Page 17: ...s not support the Cintiq s native resolution of 1280 x 800 pixels check with your graphics card manufacturer for a driver update Each Cintiq LCD panel is produced under stringent quality standards Pro...

Page 18: ...CABLE INSTALLATION 1 First plug the USB cable into the USB connector located on the converter unit 2 Plug the other end of the cable into an available USB port on your computer or into a USB hub Next...

Page 19: ...u to position the screen cursor without having to drag your pen across the display screen surface Be sure to check the Read Me file for updated information If you have trouble installing Cintiq see Tr...

Page 20: ...is reported as you press down on the eraser By default the eraser function is set to ERASE DuoSwitch side switch Make sure the programmable switch is in a convenient location where you can toggle it w...

Page 21: ...screen with enough pressure to register a click Tip You can make navigating with the pen easier by configuring Windows to select when the pen is over an icon and to launch the icon with a single click...

Page 22: ...pen responds to the nuance and inflection of your hand movements enabling you to create natural looking pen and brush strokes within applications that support this feature To draw with pressure select...

Page 23: ...rform frequently used functions or keystrokes By default the ExpressKeys emulate keyboard modifier keys See Using the ExpressKeys on page 22 A Display Toggle function is also available for use on mult...

Page 24: ...our other displays Press button 4 on your pen display to use the pen to pan move the image within the active application window In Photoshop and many other graphics applications the ALT CTRL and SHIFT...

Page 25: ...ther end of the Touch Strip to continuously scroll This is useful for scrolling through long documents or web pages See the electronic Software User s Manual for detailed information on customizing th...

Page 26: ...hole or in part mouse induced repetitive stress symptoms injuries or conditions Individual results may vary Always obtain competent medical advice to determine the most appropriate treatment for your...

Page 27: ...tand gently fold the stand back into the closed position until the latch catches the stand When using the integrated display stand make sure that it is opened wide enough to prevent the Cintiq from ti...

Page 28: ...body it will move on the rotation pivot ATTACHING THE ACCESSORY FEET If you do not want to use the rotation pivot you can install the optional rubber feet that came with your product at any time Simpl...

Page 29: ...T icon You can begin customizing the pen display after opening the control panel See Customization basics on page 28 Note User specific preferences are supported After logging in each user can customi...

Page 30: ...tely but you can always click DEFAULT to return to the factory settings Note Application specific settings are for advanced users This topic is covered in the Software User s Manual Displays the Softw...

Page 31: ...ll appear in the list 4 Click on the CALIBRATE button to activate the calibration screen 5 Hold the pen and position your head as you normally do when working with the pen display Use the pen tip to c...

Page 32: ...panel select the CALIBRATE tab 2 If you are working with multiple displays be sure the option corresponding to Cintiq is selected in the MONITOR menu 3 Click on the CALIBRATE button to activate the ca...

Page 33: ...ell as clock and phase Auto sync will function between the supported horizontal and vertical frequency ranges See Product specifications on page 59 for details If Cintiq does not automatically synchro...

Page 34: ...up ENTER button Press to choose the highlighted menu option Note All settings are automatically saved when the OSD menu closes and will be used the next time the unit receives a similar video signal...

Page 35: ...buttons to select a setting for adjustment Press the ENTER button to choose the highlighted setting Note that some settings may not be available when in DVI mode Use the up or down buttons to increas...

Page 36: ...tions that enable you to customize the OSD menu See next page Image menu options are as follows SCALING Enables you to choose how the image is displayed when working at resolutions below 1280 x 800 1...

Page 37: ...he color settings will invalidate the Cintiq color profile OSD Control menu options are as follows VERTICAL Adjusts the vertical position of the OSD menu window HORIZONTAL Adjusts the horizontal posit...

Page 38: ...hen these power saving functions are in effect the screen display is darker than usual Depending on the specifications and settings of your computer and video card the power light may only change to o...

Page 39: ...ated software driver Wacom periodically updates the software driver to maintain compatibility with new products 5 Check the FAQs Frequently Asked Questions on the Wacom web site for your region 6 If y...

Page 40: ...nto a USB hub try plugging it directly into the USB port on your computer Be sure that the USB port to which you are connecting has not been disabled It may be necessary to check your system BIOS sett...

Page 41: ...LET INFO column as you test the ExpressKeys If you have more than one Cintiq unit connected to your system be sure to select the unit you are testing from the TABLET INFO column 2 Test the ExpressKeys...

Page 42: ...PRESSURE value should change PRESSURE should change from approximately 0 with no pressure applied to approximately 100 when full pressure is applied For the optional Airbrush move the fingerwheel forw...

Page 43: ...r LED is lit orange No display or a no sync message briefly appears on your display screen Your computer may be in a power management mode Touch the pen tip to the Cintiq display screen move the mouse...

Page 44: ...d the video cable Do not use an input selector switch box When a still image is displayed for a long period of time without refreshing the screen an after image remains for a short period of time Use...

Page 45: ...Open the OSD menu go to the IMAGE menu and select the AUTO ADJUST option If necessary manually adjust the brightness clock and phase settings The display and LCD panel are not lined up The display siz...

Page 46: ...intiq cable squeeze the connector side clips to release the connector Use only the power adapter that came with the pen display other adapters may damage your product The pen works only in mouse mode...

Page 47: ...OFF position in order to turn off double click assist You have to press hard with the pen when clicking or drawing Open the Wacom Tablet control panel and go to the PEN tab Move the TIP FEEL slider t...

Page 48: ...n page 29 The screen cursor moves but does not jump to the pen tip location on the display screen and does not follow the pen tip when the pen is moved across the display Make sure the Wacom tablet dr...

Page 49: ...nd or at some location near the pen display but not on the display Leaving your pen on the display may interfere with screen cursor positioning when using other input devices The screen cursor moves e...

Page 50: ...blet preferences a follows Single user In the TABLET PREFERENCE FILE UTILITY dialog box click the REMOVE button under MY PREFERENCES to delete the preferences for the current user Multiple users Click...

Page 51: ...rtain that all settings are at their factory defaults Use the Wacom Tablet Utility to work with your preferences Close any open applications Open the main APPLICATIONS folder Then open the WACOM TABLE...

Page 52: ...se your HOME Open the LIBRARY and PREFERENCES folders Then remove the following preferences COM APPLE INK FRAMEWORK PLIST COM APPLE INK INKPAD PLIST COM APPLE INK INKPAD SKETCH 3 Go back to SYSTEM PRE...

Page 53: ...u think your Wacom product is not working properly contact the Wacom support staff for the area where your product was purchased See the Wacom tablet Read Me file located on the Wacom Pen Tablet Drive...

Page 54: ...da Central and South America Europe Middle East and Africa Japan Asia Pacific English China Korea Taiwan Worldwide Web http www wacom com productsupport Software updates Worldwide Web http www wacom e...

Page 55: ...Be especially careful of getting the display tablet ExpressKeys Touch Strips converter unit or pen buttons tip and eraser wet they contain sensitive electronic parts that will fail if liquids enter t...

Page 56: ...the pen stand or lay it flat on your desk To maintain the sensitivity of your pen do not store the tool in a container where it will rest on its tip or eraser Warning Choking hazard Prevent children...

Page 57: ...eed 6 mm or the screws will damage the Cintiq 4 Reattach the Cintiq cable to the converter unit Removal from the fixture To remove the fixture at a later time reverse the above steps Cintiq can be att...

Page 58: ...r functions To customize your gestures select the FLICKS tab in the PEN AND INPUT DEVICES control panel Digital Ink in Microsoft Office 2007 Use your Wacom pen to full advantage with the enhanced digi...

Page 59: ...is not visible right click on the taskbar select TOOLBARS and TABLET PC INPUT PANEL To customize the Input Panel 1 First open the Input Panel and then click on TOOLS in the menu bar 2 Select OPTIONS t...

Page 60: ...or XP x64 select ADD OR REMOVE PROGRAMS In the ADD OR REMOVE PROGRAMS window choose WACOM TABLET and click on the REMOVE button 3 Follow the prompts to remove the tablet driver If prompted enter your...

Page 61: ...X v10 4 or later Stand Flat on desktop incline 30 to 65 degrees from vertical Interface cables DVI I to VGA DVI I to DVI D USB Cover plate Tempered AG etching glass with AR film back side Operating te...

Page 62: ...pical Display colors 16 7 million colors Pixels 1280 x 800 Response time Tr Tf 25 ms typ Luminance 180 cd m2 typ Contrast ratio 600 1 typ OSD manual control Brightness Contrast Clock Phase Vertical po...

Page 63: ...evels 1024 levels Communication interface USB Dimensions W x D x H 148 0 x 112 0 x 27 6 mm 5 83 x 4 41 x 1 09 in excluding foot pads Weight 0 3 kg 0 66 lb Video input DVI or VGA DVI incl DDC CI DDC 2B...

Page 64: ...ker stroke ZP 600 Classic Pen This pressure sensitive pen has the same feature set as the Cintiq Grip Pen but with a slimmer profile that does not include a rubberized grip ZP 300E Replacement nibs St...

Page 65: ...wacom eu Or visit http shop wacom eu You can also contact your local dealer distributor or technical support using the appropriate number for your region To purchase parts and accessories in Australia...

Page 66: ...uipment generates uses and can radiate radio frequency energy and if not installed and used in accordance with the instructions may cause harmful interference to radio communications However there is...

Page 67: ...D 2 0 IEC61000 4 6 2006 ED 2 2 IEC61000 4 8 2001 ED 1 1 IEC61000 4 11 2004 ED 2 0 IEC 62301 2005 1Ed Based on the results of these tests Wacom declares that the above mentioned device conforms to the...

Page 68: ...been handled or stored other than in accordance with Wacom s storage instructions Any descriptions drawings specifications samples models bulletins or similar material used in connection with the sale...

Page 69: ...echnical Support in Asia Pacific except Japan and China Detailed Asia Pacific Limited Warranty policy and product registration may be found online at http www wacom asia com To obtain technical suppor...

Page 70: ...ware The customer may not copy change transfer or edit the software without prior written agreement from WACOM The only exceptions to this are necessary procedures for creating a back up copy and the...

Page 71: ...t Should one of the provisions of these licence conditions be or become void the validity of the other provisions shall not be affected in full or in part Should a provision be invalid the legally per...

Page 72: ...l Sale of Goods is explicitly excluded Krefeld is the sole place of jurisdiction for all claims arising from this contractual relationship and all disputes between the parties resulting from the forma...

Page 73: ...in exchange for your defective unit Note The delivery time for the exchange unit varies between 2 and 5 work days depending on the country it is shipped to Pick up service of the defective unit may be...

Page 74: ...Appendix Page 72 This page intentionally left blank...

Page 75: ...9 1513 Fax 81 3 5309 1514 WACOM CHINA CORPORATION WACOM KOREA CO LTD Unit 2807 28th Floor SK Tower 25th Floor DMC iaan Sangam 2nd Complex 1653 No 6 Jia Jianguomenwai Avenue Sangam dong Mapo gu Seoul K...

Page 76: ...Installation Guide Hardware Manual Wacom Co Ltd UE 0387 B...

Reviews: