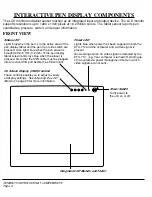
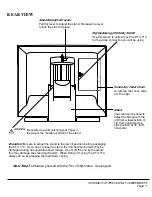


WORKING WITH THE DTU-710
Page 16
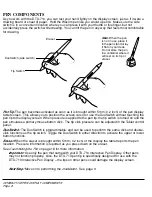
USING THE PEN
As you work with the DTU-710, you can rest your hand on the tablet surface – just as if it were a
drawing board or sheet of paper.
Holding the Pen:
Hold the pen as you would a normal pen or pencil. Make sure the side switch* is in a
convenient location where you can press it with your thumb or forefinger, but won’t accidentally press it
while drawing. You can tilt the pen in any way that feels most comfortable for drawing.
Pointing and Selecting:
Move the pen above the DTU-710 display screen to position the screen
cursor. The pen tip needs to be within 5 mm (0.2 inch) of the pen display tablet surface; you do not
need to touch the tablet surface to move the screen cursor. The cursor jumps to the location where you
place the pen (absolute positioning). Press the pen tip on the display screen to make a selection.
Note:
You will need to calibrate the pen display tablet to correctly align the screen cursor with
the pen tip. (See
Calibrating the DTU-710
on page 19.) If the screen cursor does not jump to a
position close to the pen tip when you place the pen on the display screen, then the pen tablet
driver may not be installed or is not loading. Install the pen tablet driver software if necessary.
Otherwise, refer to
Troubleshooting
on page 28.
Clicking:
Tap the display screen once with the pen tip, or touch the pen to the display screen with
enough pressure to generate a primary mouse click.
Tip:
You can make navigating with the pen easier by configuring Windows to select when the
pen is over an icon and to launch the icon with a single click. To turn on this feature:
Windows XP, 2000, or Me. Open a folder, select the T
OOLS
pull-down menu, and F
OLDER
O
PTIONS
.... From the G
ENERAL
tab select the option S
INGLE
-
CLICK
TO
OPEN
AN
ITEM
(
POINT
TO
SELECT
).
Windows 98SE. Open a folder, select the V
IEW
pull-down menu, and F
OLDER
O
PTIONS
....
From the G
ENERAL
tab select the W
EB
STYLE
option.
Double-Clicking:
Press the upper side switch (Windows) or lower side switch (Macintosh), or quickly
tap the display screen twice in the same place with the pen tip. Double-clicking is easier when the pen
is perpendicular to the tablet screen. To fine-tune the double-click area, see
Adjusting Double-Click
on
page 20.
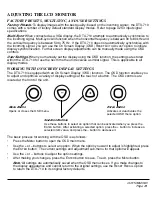
Using the Side Switch:
The pen is equipped with a DuoSwitch*. This switch has two programmable
functions that can be selected by rocking the switch in either direction. You can use the DuoSwitch
whenever the pen tip is within 5 mm (0.2 inch) of the pen display tablet surface; you do not need to
touch the pen tip to the tablet in order to use the switch.
Dragging:
Select an object, then slide the pen tip across the display screen to move the object.
Drawing with Pressure:
The pen responds to the nuance and inflection of your hand movements,
enabling you to create natural-looking pen and brush strokes within applications that support this
feature. To draw with pressure, select a pressure-sensitive tool from your application’s tool palette.
As you draw on the screen surface, use various amounts of downward pressure on the tip of the pen.
Press lightly for thin lines or softer color. Press harder for thick lines or dense color.
Erasing:
In supporting applications, the pen’s eraser works like the eraser on a pencil. In text
applications, use the eraser to select text, then lift the eraser from the tablet to delete the text.
Important:
Use only the pen that came with your DTU-710, or a Wacom pen that was
specifically designed for an interactive pen display or Tablet PC. Other pens could damage the
display screen.
* Some product configurations include a pen model without a side switch.
DTU-710_Manual.fm Page 16 Monday, August 30, 2004 3:49 PM


