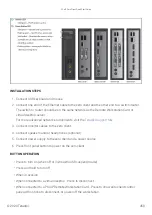
INSTALLATION STEPS
1. Connect USB keyboard and mouse.
2. Connect one end of the Ethernet cable to the zero client and the other end to a switch/router.
The switch or router should be on the same network as the Remote Workstation Card or
virtual desktop server.
For more advanced network environments, visit the
3. Connect monitor cables to the zero client.
4. Connect speakers and/or headphones (optional).
5. Connect power supply to the zero client and a power source.
6. Press front panel button to power on the zero client.
BUTTON OPERATION
• Press to turn on (when off or in WoL/WoUSB suspend mode)
• Press and hold to turn off
• When in-session
• When connected to a virtual desktop - Press to disconnect.
• When connected to a PCoIP Remote Workstation Card - Press to show zero client control
panel with options to disconnect, or power off the workstation.
PCoIP Zero Client Quick Start Guide
© 2020 Teradici
450
Summary of Contents for Cintiq Pro 32
Page 50: ...Peering Zero Clients to Remote Workstation Cards 2020 Teradici 50...
Page 224: ...OSD Reset page Resetting Your Tera2 PCoIP Zero Client 2020 Teradici 224...
Page 262: ...OSD Discovery page Configuring SLP Discovery 2020 Teradici 262...
Page 267: ...OSD Management page Clearing the Management State 2020 Teradici 267...
Page 275: ...OSD Network page Configuring IPv4 Network Settings 2020 Teradici 275...
Page 281: ...OSD IPv6 page Configuring IPv6 Network Settings 2020 Teradici 281...
Page 290: ...OSD Power page Configuring Power Settings 2020 Teradici 290...
Page 344: ...Configuring User Interface 2020 Teradici 344...
Page 377: ...OSD Event Log page Viewing Event Logs 2020 Teradici 377...


