background image

15

15

Interactive pen display

Contents

Index

Index

Contents

7. Turn on your computer.

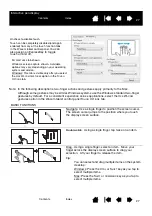
For Windows: The interactive pen display will automatically install as a default monitor.  (Some models 
may not include a color profile.)  To  identify the unit as a pen display and install the color calibration 
profile:

For Macintosh, a color profile is added to your color management system during the driver software 
installation process.  (Some models may not include a color profile.)  To activate this color profile for use 
with the pen display, you may need to select the pen display profile in the system’s ColorSync Utility 
control panel.  For details, see the color management information in your operating system and 
application documentation.

A)  Open the system C

ONTROL

 P

ANEL

 folder.

For  Windows 8, Windows 7, and Vista (DTK-2241 only), under A

PPEARANCE


AND


P

ERSONALIZATION

 select A

DJUST

 S

CREEN

 R

ESOLUTION

.

For Windows XP (DTK-2241 only), open the D

ISPLAY

 P

ROPERTIES

 control panel and select the 

S

ETTINGS

 tab.

If you have more than one monitor, click I

DENTIFY


MONITORS

 to determine which display 

corresponds to the pen display.  Select the number corresponding to the pen display.

B)  Click A

DVANCED

 S

ETTINGS

....

C)  Select the M

ONITOR

 tab and click P

ROPERTIES

.

D)  Select the D

RIVER

 tab and click U

PDATE

 D

RIVER

....  An update driver dialog or Wizard will appear.

E)  Insert the Installation CD. If the Wacom tablet installation menu displays, close it.

Windows 8, Windows 7 and Vista:

Select B

ROWSE


MY


COMPUTER


FOR


DRIVER


SOFTWARE

.

Enter the drive letter for the Installation CD and click N

EXT

.

After installation is complete, close any open control panel windows.

Windows XP:

The Wizard will ask if Windows can search for software.  Choose N

O

NOT


THIS


TIME

 and click 

N

EXT

.

Select I

NSTALL


FROM


A


LIST


OR


SPECIFIC


LOCATION

 (A

DVANCED

), and click N

EXT

.

Select D

ON

T


SEARCH

. I 

WILL


CHOOSE


THE


DRIVER


TO


INSTALL

 and click N

EXT

.

Select the pen display option and click H

AVE

 D

ISK

....  Enter the letter of your CD-ROM drive 

(e.g., 

E

:\), and click OK.

Follow the prompts.  (If the H

ARDWARE

 I

NSTALLATION

 dialog box displays, click C

ONTINUE


A

NYWAY

.)  After installation is complete, click F

INISH

 and close any open control panel 

windows.

Summary of Contents for DTK-2241

Page 1: ...en Display DTH 2242 Pen and Touch Display 1 1 Installation Using the pen Working with Display Toggle Customizing the ExpressKeys Application specific settings Troubleshooting Product specifications Te...

Page 2: ...to the users of the manual is simultaneous with the introduction into the market of the applicable Wacom product DuoSwitch is a trademark and Wacom is a registered trademark of Wacom Co Ltd Adobe Rea...

Page 3: ...anel 38 Control panel overview 39 Calibrating the pen display 41 Customizing the pen 42 Adjusting tip feel and double click 42 Advanced tip pressure settings 43 Customizing pen buttons 44 Customizing...

Page 4: ...4 4 Interactive pen display Contents Index Index Contents Japan and China 79 GLOSSARY 80 INDEX 82 Wacom international offices 85...

Page 5: ...The following information is not included with this product information about your specific computer hardware or operating system or information about your application software Your best source for th...

Page 6: ...navigation controls to move through the manual Go to front page Go to table of contents Go to index Go back to previous view Page back or page forward Adobe Reader provides additional tools for using...

Page 7: ...or application Note Not all product models are available in all regions For illustrations of the items included with your pen display see the Quick Start Guide included in the product box PRECAUTIONS...

Page 8: ...ideo signal is present Glows orange when no video signal is detected e g your computer is turned off or starting up or has entered a power management mode in which video signals are not sent USB ports...

Page 9: ...ansportation and storage Security slot Allows easy attachment of a security cable Pen storage compartment Store by inserting one end of the pen into either side of the compartment Then gently press ot...

Page 10: ...nt lever and swing stand out to desired incline Release lever to lock the stand in place To close the stand pull up on the adjustment lever and gently move stand back into closed position until the la...

Page 11: ...the tether are shown on page 9 DuoSwitch side switch Be sure the programmable switch is in a convenient location where you can toggle it with your thumb or forefinger but not accidentally press it wh...

Page 12: ...the video card installation before connecting the pen display If you have another display that is compatible with your video card you can use that display to verify the video card is operating correc...

Page 13: ...nector See B in the LCD monitor cabling diagram 4 Connect the power adapter to the pen display See C in the LCD monitor cabling diagram 5 Connect the adapter power cable and plug into an AC outlet See...

Page 14: ...VI D to DVI I cable or VGA to DVI I cable DVI or VGA video card DVI I IN Computer C DC input To AC outlet Power adapter D Caution Make sure your video card has a DVI or VGA connector Only use a power...

Page 15: ...TINGS tab If you have more than one monitor click IDENTIFY MONITORS to determine which display corresponds to the pen display Select the number corresponding to the pen display B Click ADVANCED SETTIN...

Page 16: ...roubleshooting Notes Each interactive pen display LCD panel is produced under very stringent quality standards Production techniques cannot guarantee an absolutely perfect display and some panels may...

Page 17: ...d as a pen tablet USB cable installation Software installation USB CABLE INSTALLATION Plug the square end of the USB cable into the USB port of the interactive pen display Plug the other end into an a...

Page 18: ...n approximately beneath the pen tip Lift the pen tip and place it on the display screen surface in a different location The screen cursor should again jump to the new position This is known as absolut...

Page 19: ...ntain a good posture at all times Minimize awkward postures and repetitive movements that cause discomfort Change your position if you feel any discomfort due to your work position Note regarding RSI...

Page 20: ...lt the pen in any way that feels most comfortable For information on changing the pen settings see Customizing the pen display POSITIONING To position the screen cursor move the pen slightly above the...

Page 21: ...indows 8 Windows 7 and Vista from the ORGANIZE pull down menu choose FOLDER AND SEARCH OPTIONS From the GENERAL tab select SINGLE CLICK TO OPEN AN ITEM POINT TO SELECT For Windows XP from the TOOLS pu...

Page 22: ...se various amounts of downward pressure on the tip of the pen WORKING WITH MULTIPLE MONITORS When you are working with the pen display and additional monitors on the same system the screen cursor move...

Page 23: ...position as well as pitch and phase Auto sync will function between the supported horizontal and vertical frequency ranges See the Product information for details If the pen display does not automatic...

Page 24: ...ntrol button button 2 to open the OSD menu see Front view on page 8 2 Use ExpressKeys 1 through 4 to select and change the settings 3 Press the hardware control button again to close the OSD menu and...

Page 25: ...manually make to the color settings will invalidate the color profile Some models may not include a color profile SCALING options include FULL Resizes the image to fill the whole screen ASPECT Resizes...

Page 26: ...at works best for you Take care to prevent accidental touches on the display screen when making gestures For example if your small finger touches the display screen surface when zooming or scrolling y...

Page 27: ...an item Drag Using a single finger select an item Move your finger across the display screen surface to drag your selection Lift your finger to release the item Tip You can select and drag multiple i...

Page 28: ...surface Using a smooth motion move your fingers together in parallel Scroll up by moving your fingers in an upward motion Scroll down by moving your fingers in a downward motion Scroll left by moving...

Page 29: ...display screen and keep them at least 25 mm 1 inch apart Note The rotate gesture may work differently depending on the application you are working with Rotation may work smoothly in 90 degree increme...

Page 30: ...ack command in most browsers and picture viewers by swiping to the left Tips Swiping is similar to using the right and left arrow keys in document viewers Use the swipe gestures to page forward or bac...

Page 31: ...ightly apart swipe down Flip 3D Windows Your first swipe opens Flip 3D Swipe down again to close Flip 3D Swipe left or right to move through the open windows Use a single finger tap to select Expos Ma...

Page 32: ...l tab You can then adjust settings as needed Swipe down again to dismiss the diagram or click anywhere outside of the diagram This gesture can be customized See Choosing custom multi touch functions T...

Page 33: ...touch on your pen display and computer Select the TOUCH icon in the TOOL list Then select an appropriate tab to customize and change settings using the available options See also Navigating with mult...

Page 34: ...s standard gestures or Wacom gestures The default is to use Windows gestures This is a global option and will apply to all of your applications Tip Choose USE WACOM GESTURES for a consistent experienc...

Page 35: ...ures are available when selected So that you may work in different ways some functions such as a right click can be performed using different actions or gestures Position the screen cursor over a touc...

Page 36: ...ate information for touch sensitive product models 3 With the DIAGNOSTICS dialog box open touch the display screen surface with first one then with two fingers Each time you touch the display screen s...

Page 37: ...w power saving parameters When the power saving function is in effect the screen display is darker than usual The table below shows power consumption for both the DTK 2241 and the DTH 2242 Computer mo...

Page 38: ...anel use the pen on the pen display Windows 8 From the Windows 8 Start screen click the WACOM TABLET PROPERTIES tile If you are using the Windows 8 Classic Desktop press the Windows key on your keyboa...

Page 39: ...s Tool Tips are available for most control panel items Simply position the screen cursor over an item and let it rest there in a few moments the Tool Tip will pop up Additionally your keyboard tab and...

Page 40: ...cted to the computer Settings can only be viewed or changed for an attached pen display or tablet A pen display or tablet cannot be deleted from the control panel list unless it is attached to the com...

Page 41: ...e list 4 Click CALIBRATE to activate the calibration screen 5 Hold the pen and position yourself as you normally do when working with the pen display Use the pen tip to click on the center of the cros...

Page 42: ...display screen with your pen tip to test the current tip feel setting Use the CURRENT PRESSURE bar to determine how hard you must press on the pen to reach maximum pressure Displays the tip FEEL DETAI...

Page 43: ...ble you to change the tip pressure sensitivity and click threshold settings independently In the PEN tab these settings are adjusted simultaneously with the TIP FEEL slider Using your pen tip make sev...

Page 44: ...tip must be set to CLICK in order to draw in most graphics applications You can change the SIDE SWITCH MODE to fit the way you like the pen to work when using click functions To access the SIDE SWITC...

Page 45: ...perform a modifier keystroke or other function Note The defaults shown are for the DTU 2242 Use the dropdown menus to select functions to perform when the ExpressKeys are pressed ExpressKey functions...

Page 46: ...e selections may display a submenu for additional options Note The menu closes after you make a selection To close the Radial Menu without making a selection click on the X located at the center of th...

Page 47: ...ulate keystrokes Select this option to display the DEFINE KEYSTROKE dialog box Enter a keystroke or keystroke combination in the KEYS entry box Keystroke combinations can include letters numbers funct...

Page 48: ...ging with the pen tip across the pen display screen active area Choose one or more modifier key options Select the appropriate CLICKS box if you want a left middle or right mouse click to occur when y...

Page 49: ...press the button and continue painting with the same size brush until the button is released PRECISION MODE Changes the mapping around the current pen tip position such that you must move the pen twic...

Page 50: ...T PC SETTINGS and PEN AND INPUT DEVICES control panels Windows XP Tablet Edition TABLET AND PEN SETTINGS control panel DISABLED Disables the button function APPLICATION DEFINED Reports only the button...

Page 51: ...TO OTHER DISPLAYS is selected and you press the pen button the screen cursor is toggled from your pen display to another active pen display or monitor If additional displays are attached to the syste...

Page 52: ...ame settings in all applications When application specific settings are added to the APPLICATION list the ALL icon changes to ALL OTHER and an application icon is displayed for the newly added applica...

Page 53: ...you have created application specific settings applications that have not been customized in this manner will use the TOOL settings for ALL OTHER Tip First customize settings for one application When...

Page 54: ...Then in the APPLICATION list select the application you want to remove from the list 2 Click on the APPLICATION list s button In the dialog box that appears click DELETE to confirm your selection The...

Page 55: ...Your problem may be described there and you can try the solution offered 3 Check the product FAQs Frequently Asked Questions on the Wacom website for your region 4 If you are having a compatibility c...

Page 56: ...that the video card is operating correctly 3 Verify that the tablet portion of your pen display and pen are working Press the pen tip against the display and verify that the status LED lights blue If...

Page 57: ...te When testing your pen buttons if a button is set to RADIAL MENU or OPEN RUN that function will occur when the button is pressed In this case you may want to change that button s function before tes...

Page 58: ...e and turn on the pen display and your computer Verify that the video card is properly installed A cable disconnect go to power save message appears briefly on your display screen Check that your comp...

Page 59: ...nu and select the RESET option Be sure the color profile has been installed and is selected as the profile for use with your operating system and applications Some models may not include a color profi...

Page 60: ...to the maximum native resolution that can be used with your pen display See the Product information for details Turn off the pen display then turn it back on Open the OSD menu and select the AUTO ADJ...

Page 61: ...for use with your pen display other adapters may cause damage to your product The pen works only in mouse mode and does not draw or write with pressure sensitivity The driver software for the tablet p...

Page 62: ...e you are using the pen that originally came with your pen display Other pens may not function properly on the pen display Be sure to press the side switch when the pen tip is within 5 mm 0 2 inch of...

Page 63: ...sleep When you are not using the pen remove it from the pen display surface or the pen display will continue to send data keeping the computer awake The screen cursor jumps back when using your regula...

Page 64: ...load properly basic touch movement will be recognized but other actions and gestures will not Install the driver software The pen display does not reliably recognize multi finger touch If you hold yo...

Page 65: ...to access the Start screen Windows 7 Open the utility by clicking the START icon and selecting ALL PROGRAMS Select WACOM TABLET and WACOM TABLET PREFERENCE FILE UTILITY Then delete the tablet prefere...

Page 66: ...ts Use the Wacom tablet Utility to work with your preferences Close any open applications Open the main APPLICATIONS folder Then open the WACOM TABLET folder and run the WACOM TABLET UTILITY It is a g...

Page 67: ...on 2 From the GO menu choose your HOME Open the LIBRARY and PREFERENCES folders Remove the following preferences COM APPLE INK FRAMEWORK PLIST COM APPLE INK INKPAD PLIST COM APPLE INK INKPAD SKETCH 3...

Page 68: ...nnot solve the problem and you think your Wacom product is not working properly contact the Wacom support staff for the area where your product was purchased When you call you should be at your comput...

Page 69: ...en available from the Internet USA Canada Central and South America Europe Middle East and Africa Japan Asia Pacific English China Korea Taiwan Worldwide Web http www wacom com productsupport Software...

Page 70: ...of your LCD screen surface and pen Keep the pen display and pen in a clean dry place and avoid extremes in temperature Room temperature is best The pen display and pen are not made to come apart Taki...

Page 71: ...amage the pen nib when inserting or removing the pen from the storage compartment To maintain the sensitivity of your pen do not store the tool in a container where it will rest on its tip Clasp the o...

Page 72: ...to a different mounting platform 1 Turn off your computer and power off the pen display Then disconnect all cables from between the unit and your computer 2 Protect the display screen surface by sprea...

Page 73: ...ard or select the Windows icon in the Charms bar to access the Start screen 2 Choose UNINSTALL A PROGRAM or ADD OR REMOVE PROGRAMS 3 Select WACOM TABLET and click on the REMOVE button Windows 7 Vista...

Page 74: ...tton under ALL USER PREFERENCES Administrator rights are required to delete preferences for all users Relaunch any currently open tablet aware applications that you may be running To back up your pref...

Page 75: ...To remove one of multiple tablets from the driver in the Wacom tablet control panel select the pen display or tablet icon to be deleted and click on the button next to the TABLET list A pen display or...

Page 76: ...ions To customize your gestures select the FLICKS tab in the PEN AND INPUT DEVICES control panel Digital Ink in Microsoft Office 2007 Use your Wacom pen to full advantage with the enhanced digital mar...

Page 77: ...n Click on the Tablet PC Input Panel icon located on the Windows taskbar If the icon is not visible right click on the taskbar select TOOLBARS and TABLET PC INPUT PANEL To customize the Input Panel 1...

Page 78: ...ories in the USA or Canada call 1 888 884 1870 toll free or visit Wacom s website at http www direct wacom com USA only To purchase parts and accessories in Europe call 49 0 180 500 03 75 or send an e...

Page 79: ...lso contact Wacom Technical Support WACOM TECHNICAL SUPPORT IN ASIA PACIFIC EXCEPT JAPAN AND CHINA Detailed Asia Pacific Limited Warranty policy and product registration may be found online at http ww...

Page 80: ...delay in brush strokes in some graphics applications Double click speed The maximum time that can pass between clicks and still be accepted as a double click Journal A Microsoft Windows application t...

Page 81: ...al Menu A hierarchical menu in radial format Each level of the menu consists of eight menu slices which may contain various features and options to choose from You can customize the buttons of your pe...

Page 82: ...Ergonomics 19 ExpressKeys using 24 Factory presets 23 Features pen 11 pen display 8 Front view pen display 8 Functions button 47 General problems troubleshooting 61 Holding the pen 20 Incline adjustin...

Page 83: ...0 Precautions 7 Preferences managing 74 Pressure sensitivity working with 22 Product information 78 Radial Menu customizing 46 using 46 Rear view pen display 9 Requirements system 12 Settings applicat...

Page 84: ...84 84 Interactive pen display Contents Index Index Contents...

Page 85: ...1 3 5337 6709 Fax 81 3 5337 6514 WACOM CHINA CORPORATION WACOM KOREA CO LTD Unit 2807 28th Floor SK Tower 25th Floor DMC iaan Sangam 2nd Complex 1653 No 6 Jia Jianguomenwai Avenue Sangam dong Mapo gu...

Reviews: