background image

6

7

Instructions for use 

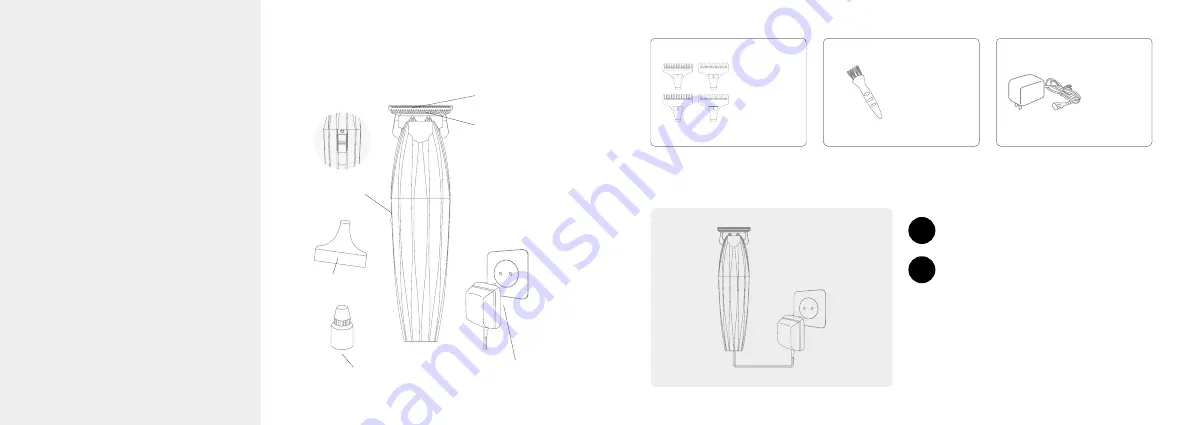
COMPONENTS:

LOWER 

BLADE

UPPER 

BLADE

ON/OFF 

BUTTON

CHARGER

PROTECTIVE

OF BLADES

LUBRICATING 

OIL

· Input voltage of AC/DC adapter 100-240 V
· Frequency 50/60Hz, 0,2 A
· Power 10 W
· Speed 7000 rpm
· DC motor
· 1800 mAh lithium battery
· 150 min usage time
· Charging time 2.5 hours
· 3Cr13 steel blades
· 4 combs 1,5 / 3 / 6 / 9 / 9 mm
· Cutting lengths 0.2 mm
· Lifetime 500 hours
· DC motor
· Weight 171 g
· Noise <68 dB
· Slat temperature <50ºC
· Includes lubricant and brush

BDN Cosmetics S.L. · C/ de la Mora 22 

08918 Badalona, Spain

Technical specifications 

Nixe Black Silver 

Cutting Machine 

(MODEL TW003)

How to load the machine

4 COMBS

BRUSH

UNIVERSAL 

VOLTAGE 

CHARGER

Connect the charger cable to the connector 

at the bottom of the cutting machine.

1

Connect the power plug to the mains. The 

indicator light on the cutting machine will 

illuminate red. When the light changes to 

green, charging is complete.

2

Before using the machine for the first time, fully 

charge the battery. Once the battery is charged, do 

not keep the machine connected to the mains for 

any longer. Turn the button to the ON position and 

you can start using it.

Summary of Contents for Nixe

Page 1: ...USER MANUAL MODEL TW003 VERSION 202210 Nixe Black Silver Hair Trimmer...

Page 2: ...04 English 14 Fran ais 24 Deutsch 34 Espa ol 44 Italiano 54 Portugu s...

Page 3: ...if they have been given supervision or instruction concerning use of the appliance in a safe way and understand the hazards involved Children should not play with the cutting machine 5 This appliance...

Page 4: ...rush BDN Cosmetics S L C de la Mora 22 08918 Badalona Spain Technical specifications Nixe Black Silver Cutting Machine MODEL TW003 How to load the machine 4 COMBS BRUSH UNIVERSAL VOLTAGE CHARGER Conne...

Page 5: ...er the desired cutting area 3 Press the off button when you have finished the job 4 Removal of the blades Removal and installation of the blades Remove the screws with a screwdriver loosen and remove...

Page 6: ...u do not think you are qualified to do so 3 Installation of the blades The blade spring A must be aligned with the top of the blade B Then fit the two fixed screws and hold them tight 1 2 Blade mainte...

Page 7: ...r failure to follow the manufacturer s instructions The battery and the blade are quick wear parts and are excluded from the warranty Guarantee Date of acquisition Signature and stamp of the sales out...

Page 8: ...de connaissances s ils ont re u une supervision ou des instructions concernant l utilisation de l appareil en toute s curit et s ils comprennent les risques encourus Les enfants ne doivent pas jouer a...

Page 9: ...rend un lubrifiant et une brosse BDN Cosmetics S L C de la Mora 22 08918 Badalona Espagne Sp cifications techniques Tondeuse Nixe Black Silver MOD LE TW003 Comment charger la machine BROSSE CHARGEUR L...

Page 10: ...coupe souhait e 3 Appuyez sur le bouton d arr t lorsque le travail est termin 4 D montage des lames D montage et installation des lames Retirez les vis l aide d un tournevis desserrez et retirez la t...

Page 11: ...qualifi pour le faire 3 Installation des lames Le ressort de la lame A doit tre align avec la partie sup rieure de la lame B Ensuite placez les deux vis fixes et maintenez les serr es 1 2 Entretien d...

Page 12: ...les dommages r sultant d une utilisation incorrecte du produit ou du non respect des instructions du fabricant La batterie et la lame sont des pi ces d usure rapide et sont exclues de la garantie Gara...

Page 13: ...is verwendet werden wenn sie beaufsichtigt oder in die sichere Verwendung des Ger ts eingewiesen wurden und die damit verbundenen Gefahren verstehen Kinder sollten nicht mit der Schneidemaschine spiel...

Page 14: ...sel BDN Cosmetics S L C de la Mora 22 08918 Badalona Spanien Technische Daten Nixe Black Silver Schneidemaschine MODELL TW003 So laden Sie die Maschine B RSTE UNIVER SAL SPAN NUNGSLADE GER T Schlie en...

Page 15: ...die Ausschalttaste wenn Sie die Arbeit beendet haben 4 Abnehmen der Klingen Aus und Einbau der Klingen Entfernen Sie die Schrauben mit einem Schraubendreher l sen Sie den Schneidkopf und nehmen Sie i...

Page 16: ...f hlen 3 Instalaci n de las cuchillas Die Blattfeder A muss auf die Oberseite des Blattes B ausgerichtet sein Setzen Sie dann die beiden festen Schrauben ein und halten Sie sie fest 1 2 Wartung der K...

Page 17: ...tellers entstehen Der Akku und die Klinge sind schnelle Verschlei teile und sind von der Garantie ausgeschlossen B rgschaft Datum des Erwerbs Unterschrift und Stempel der Verkaufsstelle Nehmen Sie das...

Page 18: ...encia y conocimiento siempre que hayan recibido supervisi n o instrucciones sobre el uso del aparato de forma segura y entiendan los riesgos asociados Los ni os no deben jugar con la m quina de corte...

Page 19: ...DE VOLTAJE UNIVERSAL Conecte el cable del cargador en el conector situado en la base de la m quina Conecte el enchufe a la corriente El indicador de la m quina de corte se ilumina en color rojo y la p...

Page 20: ...1 2 Uso de la m quina de corte Antes de utilizar la m quina deposite unas gotas de aceite lubricante en las cuchillas 1 Accione el bot n de encendido para poner en marcha las cuchillas 2 Pase la m qu...

Page 21: ...cado para hacerlo 3 Instalaci n de las cuchillas El resorte de la cuchilla A debe estar alineado con la parte superior de la cuchilla B Luego coloque los dos tornillos fijos y mant ngalos presionados...

Page 22: ...RECARGA ES NORMAL 3 4 Este documento de BDN Cosmetics S L tiene validez como certificado de garant a del producto Todas las reclamaciones deben realizarse a BDN Cosmetics S L C de la Mora 22 08918 Ba...

Page 23: ...nza e conoscenza a condizione che abbiano ricevuto supervisione o istruzioni per l uso dell apparecchio in modo sicuro e che comprendano i pericoli connessi I bambini non devono giocare con la macchin...

Page 24: ...i taglio 0 2 mm Durata 500 ore Motore CC Peso 171 g Rumore 68 dB Temperatura delle lamelle 50 C Include lubrificante e spazzola 4 PETTINI Come caricare la macchina Collegare il cavo del caricabatterie...

Page 25: ...macchina sull area di taglio desiderata 3 Al termine del lavoro premere il pulsante di spegnimento 4 Rimozione delle lame Rimozione e installazione delle lame Rimuovere le viti con un cacciavite allen...

Page 26: ...ssere qualificati per farlo 3 Installazione delle lame La molla della lama A deve essere allineata con la parte superiore della lama B Inserire quindi le due viti fisse e tenerle strette 1 2 Manutenzi...

Page 27: ...cata osservanza delle istruzioni del produttore La batteria e la lama sono parti soggette a usura rapida e sono escluse dalla garanzia Garanzia Data di acquisizione Firma e timbro del punto vendita No...

Page 28: ...ia e conhecimentos se lhes tiver sido dada supervis o ou instru es relativas utiliza o do aparelho de uma forma segura e compreender os perigos envolvidos As crian as n o devem brincar com a m quina d...

Page 29: ...COMPONENTES Como carregar a m quina 4 PENTES ESCOVA CARREGADOR UNIVERSAL DE VOLTAGEM Ligar o cabo carregador ao conector na parte inferior da m quina de corte 1 Ligar a ficha rede el ctrica A luz ind...

Page 30: ...a o da m quina de corte Antes de utilizar a m quina colocar algumas gotas de leo lubrificante sobre as l minas 1 Prima o bot o de ligar desligar para ligar as l minas 2 Passar a m quina sobre a rea de...

Page 31: ...est qualificado para o fazer 3 Instala o das l minas A mola da l mina A deve ser alinhada com a parte superior da l mina B Depois encaixar os dois parafusos fixos e mant los apertados 1 2 Manuten o da...

Page 32: ...ia das instru es do fabricante A bateria e a l mina s o pe as de desgaste r pido e est o exclu das da garantia Garantia Data de aquisi o Assinatura e carimbo do ponto de venda N o desmontar o produto...

Page 33: ...22 PAP wadprofessional com VISIT US...

Reviews: