background image

Using the 151PowerDAC mini

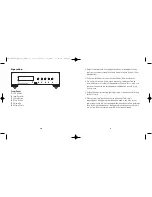
Power

The power switch is located on the back panel of the Wadia 151PowerDAC mini.
Depress the power switch (circle) to turn the power “off”. Please make sure
the Wadia 151PowerDAC mini is turned off when making all digital and
speaker connections.

Input

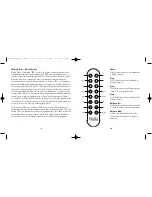
The Input button will cycle to the next input with each push of the button.
(Coax 1, Coax 2, TOSLINK, and USB)

Phase

The Phase button inverts the polarity of the signal.

Mute

The Mute button will mute the volume to zero, hit the button again and the volume
will revert to its previous setting.

Volume

Volume on the Wadia 151PowerDAC mini is controlled with the volume ‘+’ and
‘-‘ buttons on the front panel. The buttons maybe continuously held for quicker
volume setting. To increase the volume press ‘+’, ‘-‘ to decrease the volume.

15

Important Safety Instructions

To get the best performance from your 151PowerDAC mini, and for your
own safety, please read and follow these important safety instructions.

• Read these instructions.

• Keep these instructions.

• Heed all warnings.

• Follow all instructions.

• Do not use this apparatus near water.

• Clean only with dry cloth.

• Do not block any ventilation openings. Install in accordance with the

manufacturer's instructions.

• Do not install near any heat sources such as radiators, heat registers,

stoves, or other apparatus (including amplifiers) that produce heat.

• Do not defeat the safety purpose of the polarized or grounding-type plug.

A polarized plug has two blades with one wider than the other. A
grounding type plug has two blades and a third grounding prong. The
wide blade or the third prong are provided for your safety. If the provided
plug does not fit into your outlet, consult an electrician for replacement
of the obsolete outlet.

6

151PowerDAC_Manual_Print_10-27-10:Layout 1  10/28/10  11:17 AM  Page 12

Summary of Contents for 151 PowerDAC mini

Page 1: ... channel into 4 Ohms Distortion THS N 1kHz 1 Watt 0 03 0 09 1kHz 45 W 0 11 Signal to Noise Ratio 103dB signal on 105dB signal off Frequency Response 20Hz to 20kHz 0 7dB Power Requirements AC 100 240VAC 50 60Hz Dimensions HWD 2 7 x 8 x 8 in 6 86 x 20 32 x 20 32 cm Weight 6 lbs 2 72kg Accessories Included Aluminum Remote Heavy Duty Power Cord 151PowerDAC manual mini 151PowerDAC_Manual_Print_10 27 10...

Page 2: ...nited States for all warranty replacements Special shipping methods or services will not be covered by Wadia 7 This product is only warranted in the country of original sale by Wadia Thank You All of us at Wadia Digital would like to say thank you and congratulations for purchasing the Wadia 151PowerDAC mini Digital Integrated Amplifier We sincerely believe that your Wadia 151PowerDAC mini is an i...

Page 3: ...r water or salt spray 4 During the warranty period Wadia will repair or exchange a defective Wadia 151PowerDAC mini with a similar available product at no cost to the owner for labor materials and shipping charges from Wadia Table of Contents Installation Connections Operation Appendices Wadia Digital a Brief History 4 Important Safety Instructions 6 Getting Started 8 Features 8 Unpacking 9 Access...

Page 4: ...opment In the early 1980 s these engineers became intrigued by the emerging compact disc technology Disappointed with the sound quality of early CD players they examined the workings and designs of these early components and found them to be unsophisticated when compared with the technology available in other areas of digital design In response they founded Wadia Digital a company based on the phi...

Page 5: ... music ClockLink proprietary jitter reduction technology SwiftCurrent current to voltage conversion technology First outboard Digital to Analog converter First to apply glass fiber optics to home audio First to recognize jitter as a source of audible distortion First to perfect digital volume control First high end CD player competitive with expensive separates First company to provide bit perfect...

Page 6: ...nt Safety Instructions To get the best performance from your 151PowerDAC mini and for your own safety please read and follow these important safety instructions Read these instructions Keep these instructions Heed all warnings Follow all instructions Do not use this apparatus near water Clean only with dry cloth Do not block any ventilation openings Install in accordance with the manufacturer s in...

Page 7: ...r or sold with the apparatus When a cart is used use caution when moving the cart apparatus combination to avoid injury from tip over Unplug this apparatus during lightning storms or when unused for long periods of time Refer all servicing to qualified service personnel Servicing is required when the apparatus has been damaged in any way such as power supply cord or plug is damaged liquid has been...

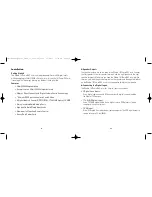
Page 8: ...rce DVD player or laptop computer with optical output 1 USB Input Use a USB cable from a desktop or laptop computer The USB input accepts a sample rate up to 24 bit 96kHz 13 Installation Getting Started The Wadia 151PowerDAC mini is an integrated amplifier with 4 digital inputs with upsampling to 24 bit 384kHz Despite its small size the 151PowerDAC mini is bursting with technology to bring you the...

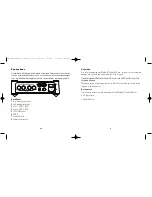
Page 9: ...g accessories are included with the Wadia 151PowerDAC mini AC power cord Remote Control 9 Connections Avoid static discharge to the inputs or outputs To prevent static shocks touch any grounded surface such as the chassis of any component that uses a grounded 3 prong plug before connecting or removing a cable Back Panel 1 Right speaker terminals 2 Left speaker terminals 3 Coax 1 S PDIF RCA 4 Coax ...

Page 10: ...covered under warranty In certain circumstances a surge protector can prevent this type of damage If needed we recommend a high quality conditioner surge protection device to avoid the degradation in sound typical with inexpensive strip devices 11 Installing Battery in Remote Control The Wadia 151PowerDAC mini remote control requires two AAA batteries To install the batteries remove the battery co...

Reviews: