11
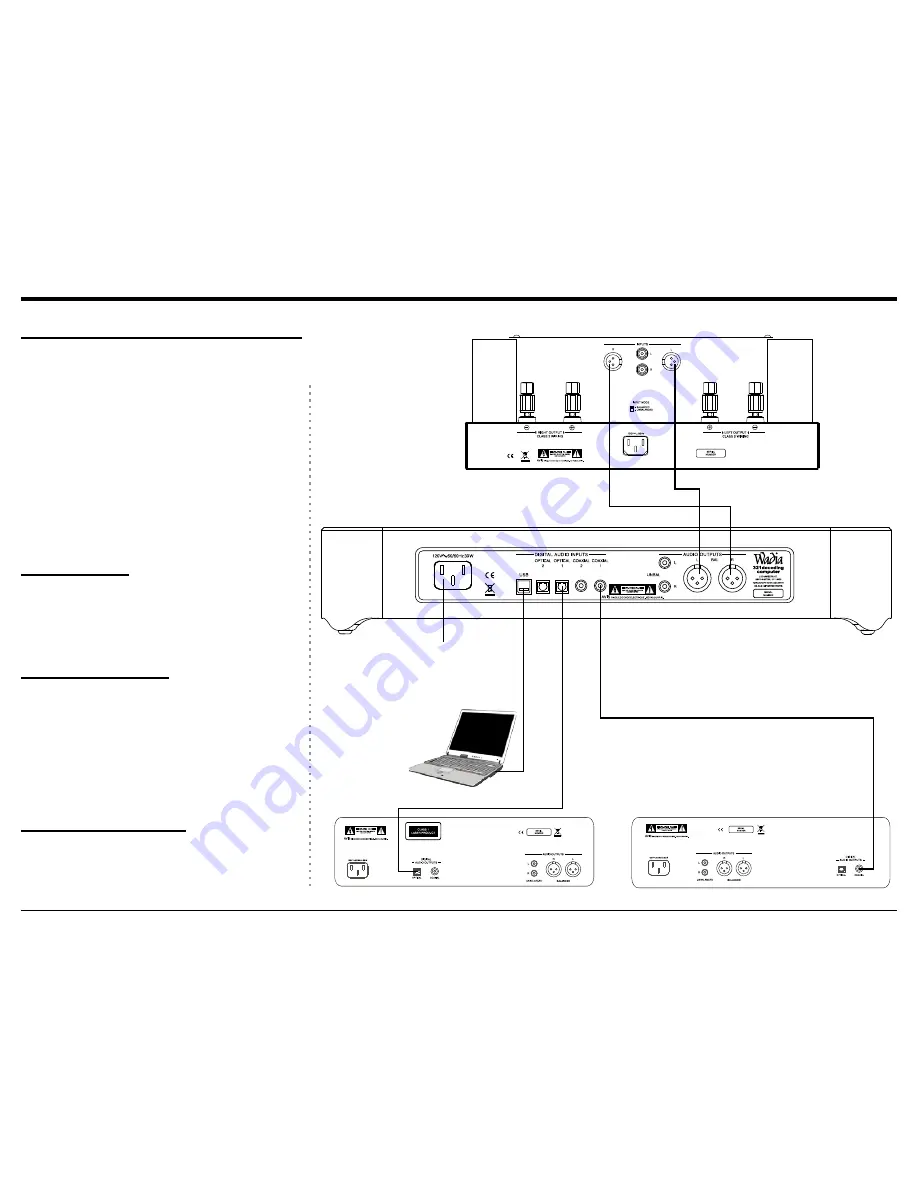
Connecting to a Power Amplifer
The 321 may also be used as the Main Audio Pream-
plifier connected directly to a Power Amplifier. Folow
the connection instructions below and diagram on this
page.
This is an example of a typical audio system. Your
system may vary from this, however the actual com-
ponents would be connected in a similar manner. For
additional information refer to “Connector and Cable
Information” on page 5.
Notes: 1. The Output Connection Balanced or Unbal
-
anced may be used simultaneously.
2. For additional information on Power Ampli
-
fier requirements when the Wadia 321 is con-
nected directly to a Power Amplifier, refer to
page 6,
1
Note.
Audio Connections:
1. Connect balanced audio cables from the 321 AU-
DIO OUTPUTS (Right and Left) connectors to the
balanced Input connectors on the Power Amplifier.
Note: If two Power Amplifiers are used, connect the
unbalanced AUDIO OUTPUTS (L&R) to the
unbalanced Inputs on the second Amplifier.
Digital Audio Connections:
2. Connect a Digital Optical Cable from the 321
DIGITAL AUDIO INPUTS OPTICAL 1 connector
to the CD Player Digital Optical Output connector.
3. Connect a Digital Coaxial Cable from the 321
DIGITAL AUDIO INPUTS COAXIAL 1 connec-
tor to the Server Digital Coaxial Output connector.
4. Connect a USB cable with (type A to type B) con
-
nectors from the 321 DIGITAL AUDIO INPUT
USB connector to the Computer USB connector.
AC Power Cords Connections:
5. Connect the 321 AC Power Cord to a live AC
outlet.
Connecting to a Power Amplifier
POWER AMPLIFIER
CD PLAYER
SERVER
Connect to
AC Outlet
Computer


