background image

Wadia 7 CD TRANSPORT

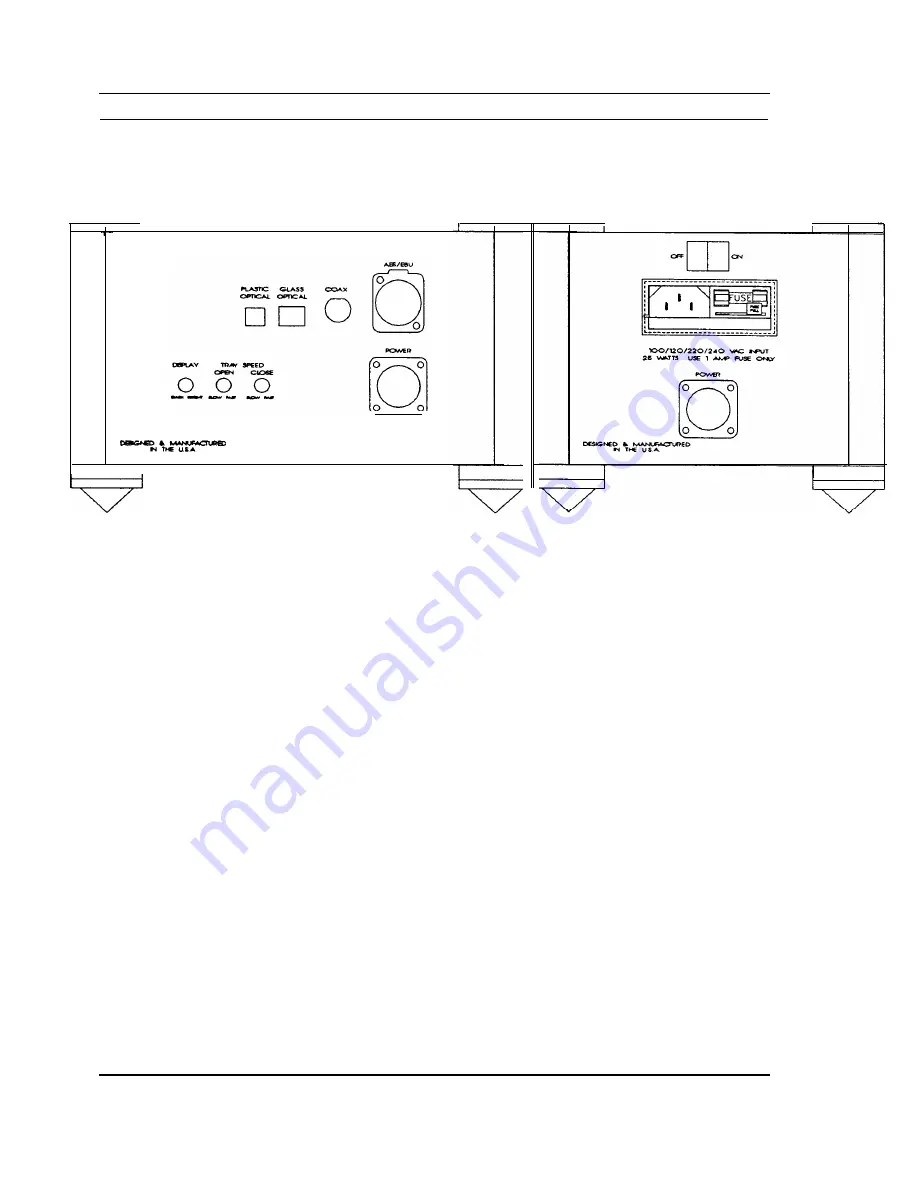
REAR PANELS

POWER ON 

/

 OFF: 

On the rear of the Wadia 7 Power Supply is a switch that turns the Wadia 7

Compact Disc Transport on and off. The switch must be in the ON position for the product to function.
The Wadia 7 is designed to be left on at all times. Like all digital audio products, best performance is
achieved only after the product has been on for 72 or more hours. Do not turn the power on unless
the Transport is not connected to another component in the system, or unless the amplifier is either
turned off or not connected to the loudspeakers.

On the rear of the Wadia 7 Power Supply you will find the umbilical cord which attaches the power
suply to the Wadia 7 Compact Disc Transport. On the rear of the Wadia 7 Compact Disc Transport is
the connector to which the umbilical cord will be attached.

14

Summary of Contents for 7

Page 1: ...INFORMATION AND OPERATING MANUAL VWia 7 CD TRANSPORT DIGITAL CORPORATION ...

Page 2: ......

Page 3: ...ceiving antenna of the radio or television l Relocate the CD Player with respect to the radio or television l Move the CD Player away from the radio or television l Plug the CD Player into a different outlet so that the CD Player and radio or television are on different branch circuits If necessary the user should consult the dealer or an experienced radio television technician for additional sugg...

Page 4: ......

Page 5: ...CTIONS 6 FRONT PANEL 8 FRONT PANEL CONTROLS 9 REMOTE CONTROL I0 REAR PANEL I4 UNPACKING I6 SET UP AND INSTALLATION I6 BASIC OPERATION I 7 DISC PRECAUTIONS 7 AC POWER CONNECTION I7 CARE AND MAINTENANCE 7 SERVICE I7 WARRANTY I8 SPECIFICATIONS I9 ...

Page 6: ...rtant safety instructions 1 2 3 4 5 6 7 Before operating the Wadia 7 Compact Disc Transport please read all operating and safety instructions Keep all operating and safety instructions for future reference Always heed all warnings and cautions on the product and in the Owner s Manual Always follow all instructions for the operation and use of the Wadia 7 Compact Disc Transport Never use the Wadia7...

Page 7: ...eaning the Wadia 7 Compact Disc Transport always disconnect the power supply cord Use a soft cloth and if necessary dampen the cloth with plain water Never apply water or any other cleaner directly to the chassis 12 The Wadia 7 Compact Disc Transport is meant to be turned on and left on at all times However if this product won t be used for a long period of time you should turn it off and disconne...

Page 8: ...Transport is simple and elegant with only two push buttons two LED indicators and a display window All other functions are accessed through the remote control 0 v 0 7 Al 0 7 I TpHIca 09 0 W 0 m C D T R A N S P O R T 97 I I I I 0 w 0 7 Al I J lwia DIGITAL P O W E R S U P P L Y I ...

Page 9: ...ided in the display window TRACK This part of the display shows the number of the track being played After inserting a disc and before play it shows the total number of tracks on a disc INDEX Before play this part of the display is blank If a disc being played has indexes this part of the display shows the indexes within the track being played beginning with 1 and increasing throughout the track I...

Page 10: ... N T R O L The Remote Control for the Wadia 7 CD Transport also includes the remote control commands for the Wadia 9 Decoding Computer the Wadia 10 Glass Optical Interface and the Wadia 5 PowerDAC In this manual we will only discuss the buttons associated with the control of the Wadia 7 CD Transport 10 ...

Page 11: ... pressing the PROGRAM button again or pressing the STOP button prior to beginning playback will erase the programmed contents from memory DELETE This button is the opposite of normal programming Pressing this button while a program is being entered erases the entire entered program To play an entire disc except for specific tracks that you do not want to hear press this button and then the numeric...

Page 12: ...tton opens the disc drawer pressing it again closes the drawer Pressing this button while a compact disc is playing stops play clears any previously programmed sequence of tracks and opens the drawer STOP Pressing this button while a Compact Disc is playing stops PLAY When play is stopped the CHECK button can be utilized to review a sequence of programmed tracks Pressing this button twice clears a...

Page 13: ...to search for a specific point in time You may want to press PAUSE as this will still allow the use of the Time Search function Press the TIME SEARCH button The display windows Time indicator will change to 4 dashes with the first dash blinking By pressing the following numeric keys 0 1 0 5 in that order the transport will immediately access the point designated and will begin playback If you have...

Page 14: ...formance is achieved only after the product has been on for 72 or more hours Do not turn the power on unless the Transport is not connected to another component in the system or unless the amplifier is either turned off or not connected to the loudspeakers On the rear of the Wadia 7 Power Supply you will find the umbilical cord which attaches the power suply to the Wadia 7 Compact Disc Transport O...

Page 15: ...BNC to RCA adapter is provided with the Wadia 7 Compact Disc Transport for those who would like to experiment with a number of coaxial cables prior to having one terminated with a BNC connector The AES EBU format is provided through an XLR type connector When using this method of digital transmission be sure that the pin configuration on the associated equipment matches that of the Wadia 7 Compact...

Page 16: ...ointed feet into the bottoms of the four corner posts on the Wadia 7 Power Supply 6 Turn the Wadia 7 Compact Disc Transport and its Power Supply upright and place them in the desired location Eight bases are provided to be placed underneath the four pointed feet for the protection of the furniture upon which the product is to be placed 6 Connect one end of the power supply cord to the receptical o...

Page 17: ... immediately if it becomes wet CARE AND MAINTENANCE To clean the Wadia 7 Compact Disc Transport use a soft cloth moistened with plain water Don t apply water dusting sprays solvents abrasives or cleaning fluids directly to the chassis Make sure that the remote sensor window on the front of the product and the remote control s projection lens are kept clean and dust free When the remote control s b...

Page 18: ...dia s option replace a defective Wadia 7 with a similar available product at no cost to the owner for labor materials and shipping charges from Wadia Digital River Falls Wisconsin 4 Wadia Digital shall not under any circumstances be liable for any incidental or consequential damages arising from the loss of property or other damage or losses due to the failure of a Wadia 7 Compact Disc Transport W...

Page 19: ...uracy EIAJ CP 340 Specification Glass Fiber Optic 850 nm 16dBm EIAJ Standard Plastic Fiber Optic 665 nm 15 _ 21 dBm S PDIF Coaxial via BNC Connector 0 5V p p 75 ohms AES EBU Standard via XLR Connector 3V p p 110 ohms 2 Toroidal Transformers 100 120 220 240 VAC Enclosure Weight Dimensions Airborne computer quality aluminum plate Detuned for Lenz s Law and package parasitic resonances Side panel ski...

Page 20: ......

Page 21: ......

Page 22: ...624 TROY STREET RIVER FALLS WI 54022 715 426 5900 FAX 715 426 5665 ...

Reviews: