11
Connecting to a Power Amplifer
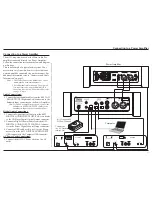
The di122 may also be used as the Main Audio Pre-
amplifier connected directly to a Power Amplifier.
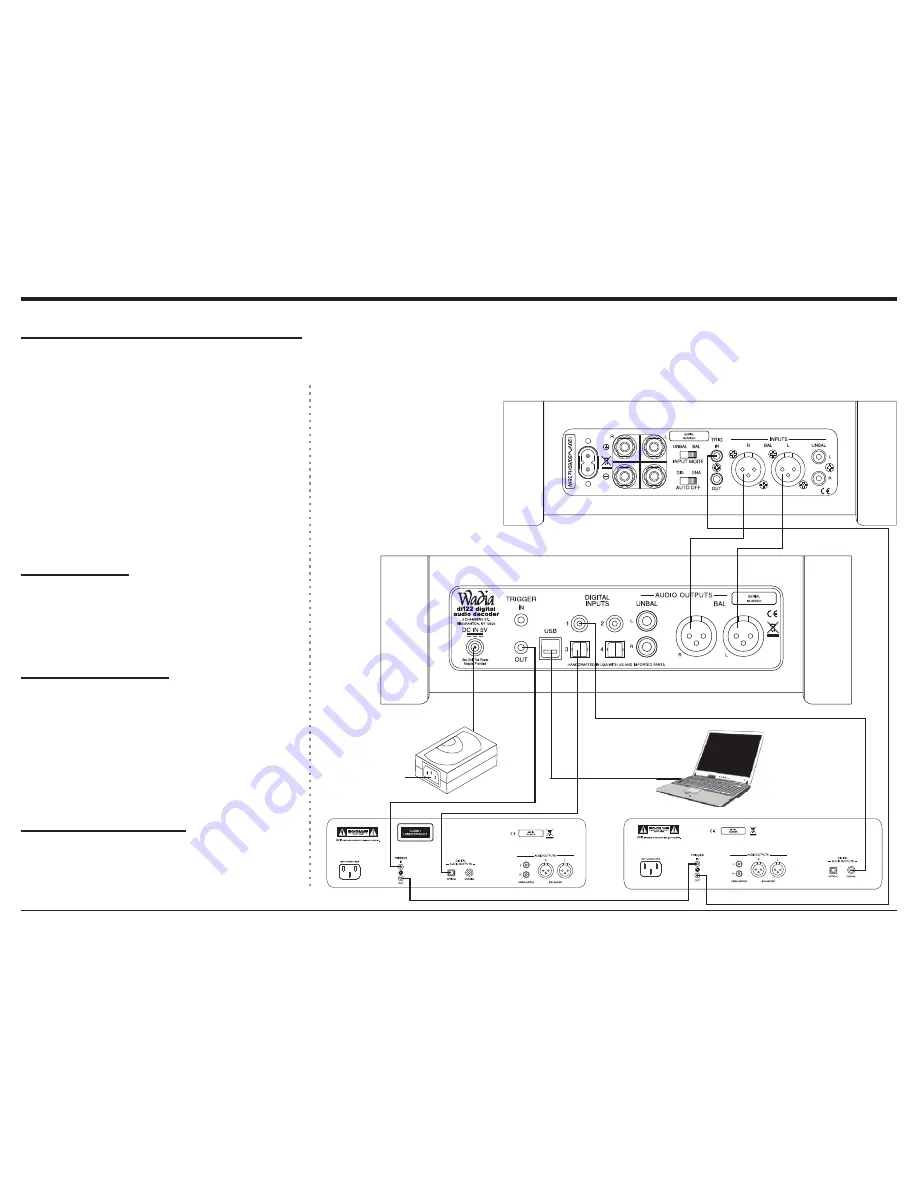
Follow the connection instructions below and diagram
on this page.
This is an example of a typical audio system. Your
system may vary from this, however the actual com-
ponents would be connected in a similar manner. For
additional information refer to “Connector and Cable
Information” on page 5.
1RWHV7KH2XWSXW&RQQHFWLRQ%DODQFHGRU8QEDO
-
DQFHGPD\EHXVHGVLPXOWDQHRXVO\
)RUDGGLWLRQDOLQIRUPDWLRQRQ3RZHU$PSOL
-
fier requirements when the Wadia di122 is
FRQQHFWHGGLUHFWO\WRD3RZHU$PSOLILHUUHIHU
WRSDJH
1
1RWH
$XGLR&RQQHFWLRQV
1. Connect balanced audio cables from the di122 AU-
',228738765LJKWDQG/HIWFRQQHFWRUVWRWKH
balanced Input connectors on the Power Amplifier.
1RWH,IWZR3RZHU$PSOLILHUVDUHXVHGFRQQHFWWKH
XQEDODQFHG$8',22873876/ 5WRWKH
XQEDODQFHG,QSXWVRQWKHVHFRQG$PSOLILHU
'LJLWDO$XGLR&RQQHFWLRQV
2. Connect a Digital Optical Cable from the di122
DIGITAL AUDIO INPUTS OPTICAL 1 connector
to the CD Player Digital Optical Output connector.
3. Connect a Digital Coaxial Cable from the di122
DIGITAL AUDIO INPUTS COAXIAL 1 connec-
tor to the Server Digital Coaxial Output connector.
&RQQHFWD86%FDEOHZLWKW\SH$WRW\SH%FRQ
-
nectors from the di122 DIGITAL AUDIO INPUT
USB connector to the Computer USB connector.
$&3RZHU&RUGV&RQQHFWLRQV
5. Connect the di122 AC Power Cord to a live AC
outlet.
Connecting to a Power Amplifier
di122 supplied AC/
DC Power Supply
Connect to a
live AC Outlet
DOZD\V2Q
12 >:/G3@
SERVER
Computer
mputer
3RZHU$PSOL¿HU

