background image

EN

Operation

CFX28 – CFX65DZ

14

7.3

Connecting the cooler

Connecting to a battery


(Vehicle or boat)

The cooler can be operated with 12 V or 24 V

g

.

A

For safety reasons the cooler is equipped with an electronic system to 
prevent the polarity reversal. This protects the cooler against short-circuiting 
when connecting to a battery. 

Plug the 12/24 V connection cable (fig.

1

2, page 7) into the device 

DC voltage socket and also into a 12 V or 24 V cigarette lighter socket.

Connecting to a 100–240 V AC mains


(E.g. in the home or office)

D

The coolers have an integrated multi-voltage power supply with priority circuit 
for connecting to an AC voltage source of 100–240 V. The priority circuit 
automatically switches the cooler to mains operation, if the device is 
connected to a 100–240 V AC mains, even if the 12/24 V connection cable 
is still attached.

Plug the 100 – 240 V connection cable (fig.

1

3, page 7) into the device 

AC voltage socket and connect it to the 100 – 240 V AC voltage mains.

NOTICE! Danger of damage!

Disconnect the cooler and other consumer units from the battery 
before you connect the battery to a quick charging device.
Overvoltage can damage the electronics of the device.

DANGER! Danger of electrocution!

Never handle plugs and switches with wet hands or if you are 
standing on a wet surface.

If you are operating your cooler on board a boat from a mains 
connection of 100–240 V

w

, you must install a residual current 

circuit breaker between the 100–240 V

w

 mains and the 

cooler.
Seek advice from a trained technician.

Summary of Contents for CoolFreeze CFX28

Page 1: ...CoolFreeze CFX28 CFX35 CFX40 CFX50 CFX65 CFX65DZ CFX 28 CFX 35 CFX 40 CFX 50 CFX 65 CFX 65 DZ Compressor Cooler Instruction Manual...

Page 2: ......

Page 3: ...ope of delivery 7 4 Accessories 8 5 Intended use 8 6 Function description 9 6 1 Scope of functions 9 6 2 Operating and display elements 9 7 Operation 12 7 1 Before initial use 12 7 2 Energy saving tip...

Page 4: ...nt in an illustration In this case item 5 in figure 1 on page 3 DANGER Safety instruction Failure to observe this instruction will cause fatal or serious injury WARNING Safety instruction Failure to o...

Page 5: ...as well as by persons with diminished physical sensory or mental capacities or a lack of experience and or knowledge providing they are supervised or have been taught how to use the device safely and...

Page 6: ...ooling device is not suitable for transporting caustic materials or materials containing solvents 2 2 Operating the device safely D DANGER Do not touch exposed cables with your bare hands This especia...

Page 7: ...fluid Never immerse the device in water Protect the device and the cable against heat and moisture 3 Scope of delivery Item Quantity Description 1 1 Cooler 2 1 Connection cable for 12 24 Vg connectio...

Page 8: ...o be used in household and similar applications such as staff kitchen areas in shops offices and other working environments farm houses clients in hotels motels and other residential type environments...

Page 9: ...l inclination of 30 for example when used on boats 6 1 Scope of functions Power supply with priority circuit for connecting to the AC mains Three level battery monitor to protect the vehicle battery D...

Page 10: ...ressor is on LED lights up orange Compressor is off LED flashes orange display switched off automatically due to low battery voltage 3 ERROR LED flashes red Device is switched on but not ready for ope...

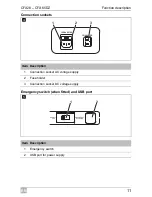
Page 11: ...switch when fitted and USB port Item Description 1 Connection socket AC voltage supply 2 Fuse holder 3 Connection socket DC voltage supply Item Description 1 Emergency switch 2 USB port for power sup...

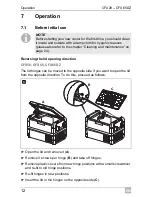
Page 12: ...and remove it A Remove 3 screws per hinge B and take off hinges Remove plastic covers from new hinge positions with a small screwdriver and re fit to old hinge positions Re fit hinges in new positions...

Page 13: ...e units then appear in the display for a few seconds The display flashes several times before it returns to the current temperature 7 2 Energy saving tips Choose a well ventilated installation locatio...

Page 14: ...V The priority circuit automatically switches the cooler to mains operation if the device is connected to a 100 240 V AC mains even if the 12 24 V connection cable is still attached Plug the 100 240 V...

Page 15: ...k on once the battery has been recharged to the restart voltage level A In HIGH mode the battery monitor responds faster than at the levels LOW and MED see the following table NOTICE Danger of damage...

Page 16: ...select the battery monitor mode Digital display will be as follows Lo LOW d MED Hi HIGH The selected mode then appears in the display for a few seconds The display flashes several times before it retu...

Page 17: ...ent ventilation so that the heat that generated during operation can dissipate Ensure that the ventilation slots are not covered Make sure that the device is sufficiently far away from walls and other...

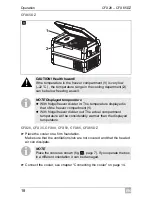
Page 18: ...temperature in the freezer compartment 1 is very low 22 C the temperature range in the cooling department 2 can be below freezing as well NOTE Displayed temperature With fridge freezer divider in The...

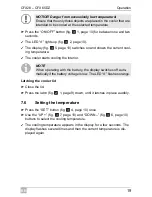
Page 19: ...rature Press the SET button fig 3 4 page 10 once Use the UP fig 3 7 page 10 and DOWN fig 3 6 page 10 buttons to select the cooling temperature The cooling temperature appears in the display for a few...

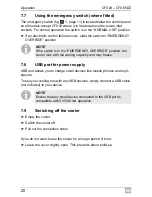
Page 20: ...rt allows you to charge small devices like mobile phones and mp3 players To use your cooling box with any USB devices simply connect a USB cable not included to your device I 7 9 Switching off the coo...

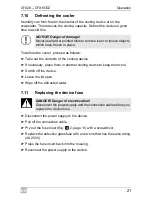
Page 21: ...lid open Wipe off the defrosted water 7 11 Replacing the device fuse D Disconnect the power supply to the device Pull off the connection cable Pry out the fuse insert fig 4 2 page 11 with a screwdriv...

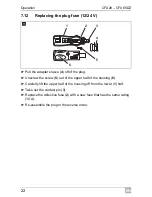
Page 22: ...f the plug Unscrew the screw 5 out of the upper half of the housing 6 Carefully lift the upper half of the housing off from the lower 1 half Take out the contact pin 3 Replace the defective fuse 2 wit...

Page 23: ...the transparent cover with a screwdriver 1 Unscrew the PCB mounting screws 2 Pull out the plug from the PCB 3 Replace the defective light PCB with a new one Fit new PCB using reverse of removal instru...

Page 24: ...act the manufacturer s branch in your country see the back of the instruction manual for the addresses or your retailer For repair and guarantee processing please include the following docu ments when...

Page 25: ...orange display is switched off Battery voltage is too low Test the battery and charge it as needed When operating from the 12 24 V socket cigarette lighter The ignition is on and the device is not wo...

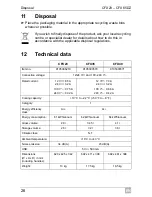
Page 26: ...303571 Connection voltage 12 24 Vg and 100 240 Vw Rated current 12 Vg 6 5 A 24 Vg 3 2 A 100 Vw 0 75 A 240 Vw 0 32 A 12 Vg 7 0 A 24 Vg 3 2 A 100 Vw 0 86 A 240 Vw 0 42 A Cooling capacity 10 C to 22 C 50...

Page 27: ...Vw 0 37 A Cooling capacity 10 C to 22 C 50 F to 8 F Category 1 Energy efficiency class A A Energy consumption 66 kWh annum 69 kWh annum 115 kWh annum Gross volume 50 l 65 l with divider 61 l without...

Page 28: ...48 22 414 32 00 48 22 414 32 01 Mail info dometic pl RUSSIA Dometic RUS LLC Komsomolskaya square 6 1 107140 Moscow 7 495 780 79 39 7 495 916 56 53 Mail info dometic ru SLOVAKIA Dometic Slovakia Sales...

Reviews: