Charging process of the automatic charger
PerfectCharge IU812
20
➤
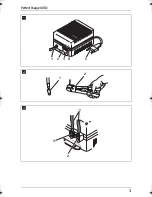
Fit wire sleeves to the ends of cables which you wish to connect to the
IU0U automatic charger (fig.
2
1, page 3).
➤
Use crimping tongs (fig.
2
2, page 3) and make sure the the wire
sleeves are fitted tightly (fig.
2
1, page 3).
➤
Connect the cables (fig.
3
1, page 3) to the two terminals on the front
side as follows:
– Positive terminal (fig.
3
2, page 3): red cable
– Negative terminal (fig.
3
3, page 3): black cable
➤
Connect the battery to the IU0U automatic charger:
– Positive terminal of the battery: red cable
– Negative terminal of the battery: black cable
➤
Connect the 230 V mains power cable to a 230 V socket.
✓
The IU0U automatic charger now charges the battery.
7
Charging process of the automatic
charger
I phase (fig.
5
A, page 4)
The empty battery is charged with constant current of 8 A at the beginning of
the charging process. The green “Charging” LED goes on.
U0 phase (fig.
5
B, page 4)
The phase of constant charging voltage with decreasing charging current
begins once the charging voltage is at approximately 14.4 V.
U phase, (fig.
5
C, page 4)
The IU0U automatic charger switches to the lower retention voltage of 13.6 V
if the charging current falls below 1 A or the maximum charging time
(15 hours) is exceeded. The battery is fully charged, the green LED goes out.
I
Note:
To avoid battery overcharging, retention voltage is switched to
15 hours after switching on the IU0U automatic charger,
irrespective of the charging current.
808-012.book Seite 20 Freitag, 12. Dezember 2008 7:54 19


