background image

User’s Manual—Read before using this equipment

6

©2015 Wagan Corporation. All Rights Reserved.

Wagan Tech and 

wagan.com

 are trademarks used by Wagan Corporation.

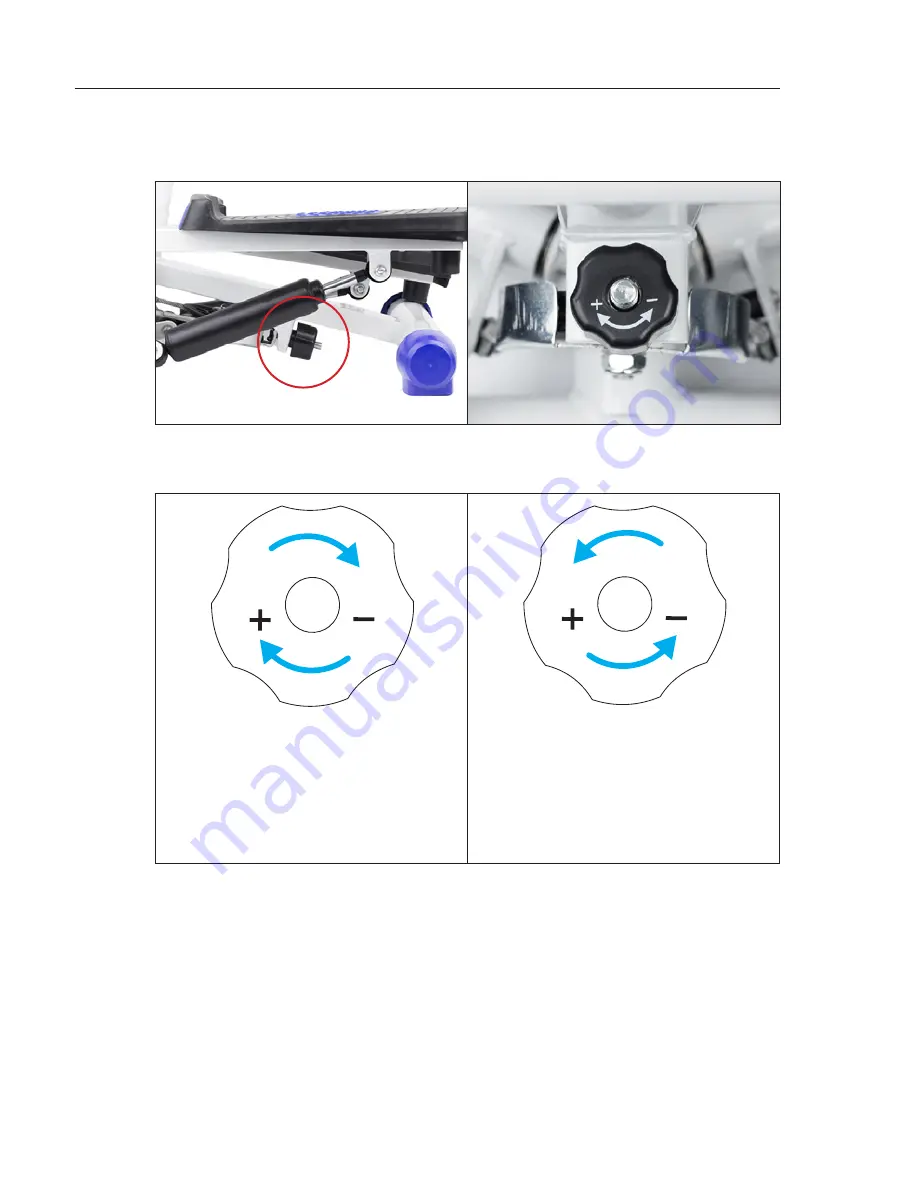
HEIGHT ADJUSTMENT KNOB

1.  Locate the height adjustment knob underneath the base of the equipment.  

2.  Turn the knob slowly in clockwise direction. Make sure the steel cable is 

set in the groove of wheel. 

Turning the knob 

CLOCKWISE


increases the step height. If the height 

adjustment knob is tightened as far 

as possible, the pedals will provide 

the largest stepping range available.

 Turning the knob 

COUNTER-

CLOCKWISE

 to decrease the step 

height. If the height adjustment knob is 

loosened so that it is barely screwed 

in, the pedals will provide the smallest 

stepping range for your workout.

3.  One of the pedals will be automatically lifted up as the height 

adjustment knob is tightened. 

Hint: Lift up one of the stepper pedals 

manually before tightening the height adjustment knob.

4.  Once the height adjustment knob has been properly adjusted, test out 

the stepper by stepping on each pedal in an alternating fashion.

5.  Adjust the height adjustment knob according to how high you would 

prefer the steps to be.

Summary of Contents for 9732

Page 1: ...Item No 9732 Pivot Stepper User s Manual Please visit our website for the latest information on this product...

Page 2: ...nd or functions described in this instruction manual may have changed since its printing and we will not be able to provide separate notice of any changes and or improvements made to the product Note...

Page 3: ...othes fit properly while using this device Loose or poor fitting clothing can cause a dangerous condition by becoming entangled in the equipment s moving parts 6 If you feel any pain dizziness nausea...

Page 4: ...agan 3 www wagan com PARTS DIAGRAM 6 3 10 8 8 8 10 2 10 1 A 5 4 7 8 10 9 1 Base 2 Lower tube 3 Upper tube 4 Handle bar 5 LCD meter 6 Meter bracket 7 Handle bar cover 8 Bolts for tube 1 9 Bolts for han...

Page 5: ...A 2 1 8 8 2 10 10 1 1 Run the Power Cable A connected to the Base 1 through the Lower Tube 2 2 Connect the Lower Tube 2 to the Base 1 with the supplied Bolts for Tube 8 and Washers 10 3 10 8 8 10 2 A...

Page 6: ...Meter Bracket 6 onto the top of the Upper Tube 3 then slide the LCD Meter 5 onto the bracket from the back to the front 4 7 9 3 7 Connect the Handle Bar 4 to the Upper Tube 3 with the supplied Bolts f...

Page 7: ...pedals will provide the largest stepping range available Turning the knob COUNTER CLOCKWISE to decrease the step height If the height adjustment knob is loosened so that it is barely screwed in the pe...

Page 8: ...er one month of use The Pivot Stepper is excellent whether used at home or in the office For example even exercising during a break at work would produce great results Rather than feeling fatigued or...

Page 9: ...n Tap the MODE button until the function you would like to have displayed is selected Scan When the display is set on the SCAN function the workout tracker will be changed every 5 seconds to display T...

Page 10: ...reset the tracking for all functions 1 Remove the battery cover on the back of the LCD Meter 5 2 Replace the battery with the same type Ensure that the battery is correctly positioned and proper conta...

Page 11: ...This warranty is in lieu of all warranties expressed or implied and no representative or person is authorized to assume any other liability in connection with the sale of our products There shall be...

Page 12: ...CA 94544 U S A Tel 1 510 471 9221 U S Canada Toll Free 1 800 231 5806 customerservice wagan com www wagan com 2015 Wagan Corporation All Rights Reserved Wagan Tech and wagan com are trademarks used b...

Reviews: