3
ASP 30
Ø6
G 1/4”
Ø10
38
Ø16
18
85,5
40,5
35,5
23,5
16,5
~ 148
3 x M8
~ 87,5
C
A
B
CA
E
D
F
C_ASP30_00002
Operating manual
editiOn 03 /2013
oPerATIoN
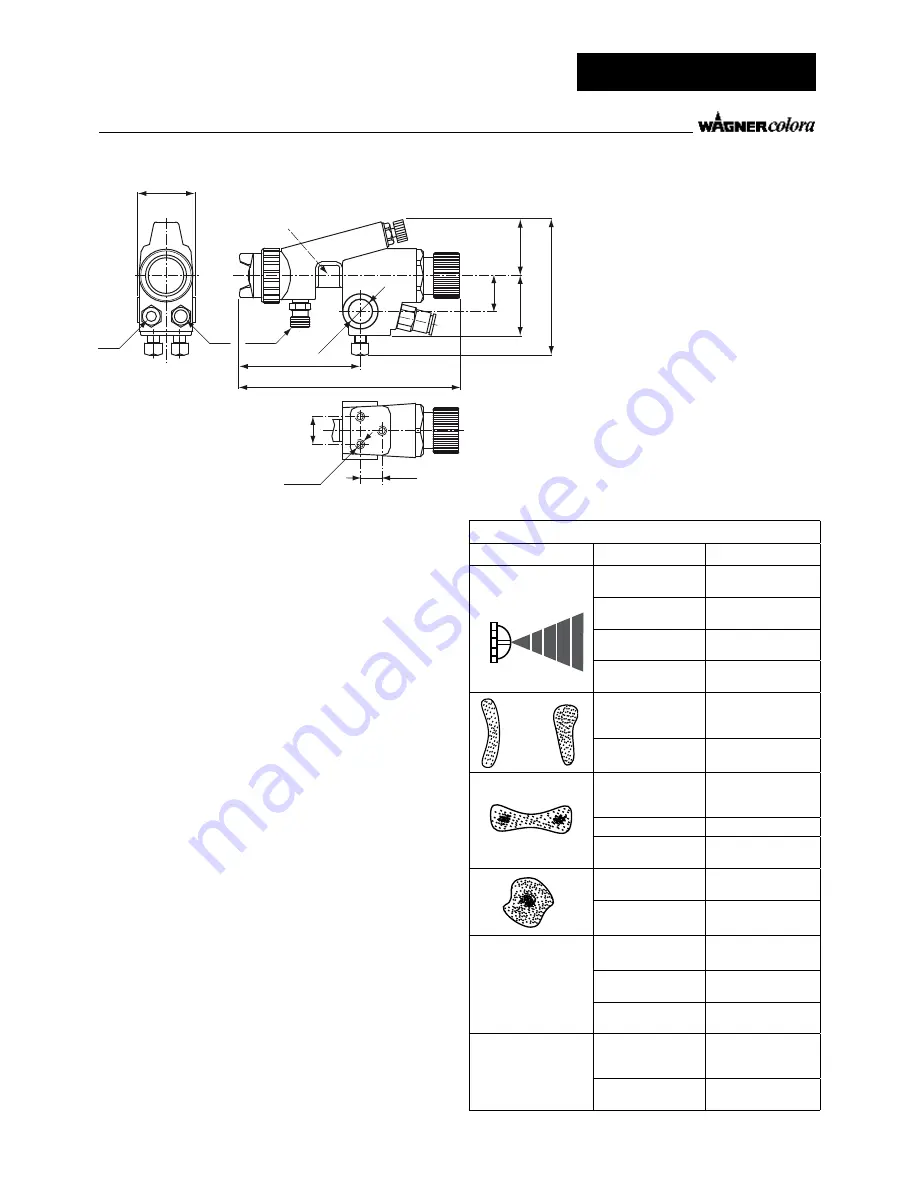
Install and operate the spray gun according to above figure.
Verify the cleanness of fluid and air hoses before connection.
Check that all connections are tight.
Keep the spray gun clean and lubricate moving parts at
regular intervals.
Lubricants for surface-treatment equipment must
not
contain silicon
.
In the event of leakage around the paint needle, tighten the
packing screw (see F in the above figure) . After tightening,
check that the spring is still able to push forward the fluid
needle.
For short standstill periods, for instance over a night, it will
suffice to clean the paint nozzles and the air cap on the outside;
for longer standstill periods the gun must be flushed through
immediately with appropriate solvent.
If a two-component paint is used, however, the
flushing
operation must be done no later than the pot-life time
(refer
to data sheet from the paint manufacturer).
When cleaning the air cap and the paint nozzle, use a soft
brush or rag dipped in solvent. Do not place the whole gun in
solvent to avoid damaging.
Never use iron or steel wire to clean air holes and ducts in the
nozzles.
Switch the on/off pneumatic control valve in advance to
compensate, if needed, the response time of the gun.
Recommended size for control valve: 3-way, G 1/4“.
CoNNeCTIoNS ANd CoNTroLS
A
Atomizing air hose connection (AA).
B
Paint hose connection.
C
Control air hose connection (CA).
d
Fan width adjustment.
Clockwise turning result in a round jet and
counter-clockwise turning in a wider fan.
e
Paint flow adjustment.
Clockwise turning result in a smaller
paint flow and counter-clockwise turning
increases the flow. The fluid flow is
regulated in the first instance by the choice
of paint nozzle and paint pressure.
f
Paint needle packing adjusting screw.
TrouBLe SHooTING
CAuSe
SoLuTIoN
Fluttering paint
Insufficient paint in the
supply bin
Refill the material bin
Blocked gun fluid
passage
Clean to remove the
blockage
Worn or loose fluid
nozzle
Replace or tighten
Worn or loose needle
seal packing
Replace or tighten
or
Paint build-up on
nozzle or un air cap
Clean fluid nozzle or
air cap (do NOT use
metallic object)
Dirty or damaged fluid
nozzle
Clean or replace fluid
nozzle
Insufficient paint
Increase
paint flow or reduce
atomizing air pressure
Too low paint viscosity
Increase viscosity
Too high atomizing air
pressure
Reduce atomizing air
pressure
Too high paint viscosity
Reduce viscosity
Too low atomizing air
pressure
Increase atomizing air
pressure
Dripping from fluid
nozzle
Partial seizing of the
needle
Lubricate needle
Too tight fluid needle
packing screw
Adjust
Worn fluid nozzle or
needle
Replace parts
Loss of paint from the
seal packing screw
(See F)
Loose fluid needle
packing screw
Tighten and check
fluid needle for free
movement
Dry or worn needle seal
packing
Replace or lubricate
All manuals and user guides at all-guides.com


