background image

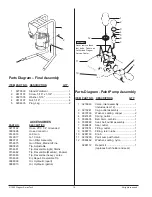
© 1995 Wagner Spray Tech

5

All rights reserved.

NOTE: Do not use more than 100 feet of extension

cord.  If you need to paint further than 100
feet from your power source, use more paint
hose, not more extension cord.  Shorter
extension cords will ensure maximum electri-
cal power for proper operation.

GROUNDING INSTRUCTIONS

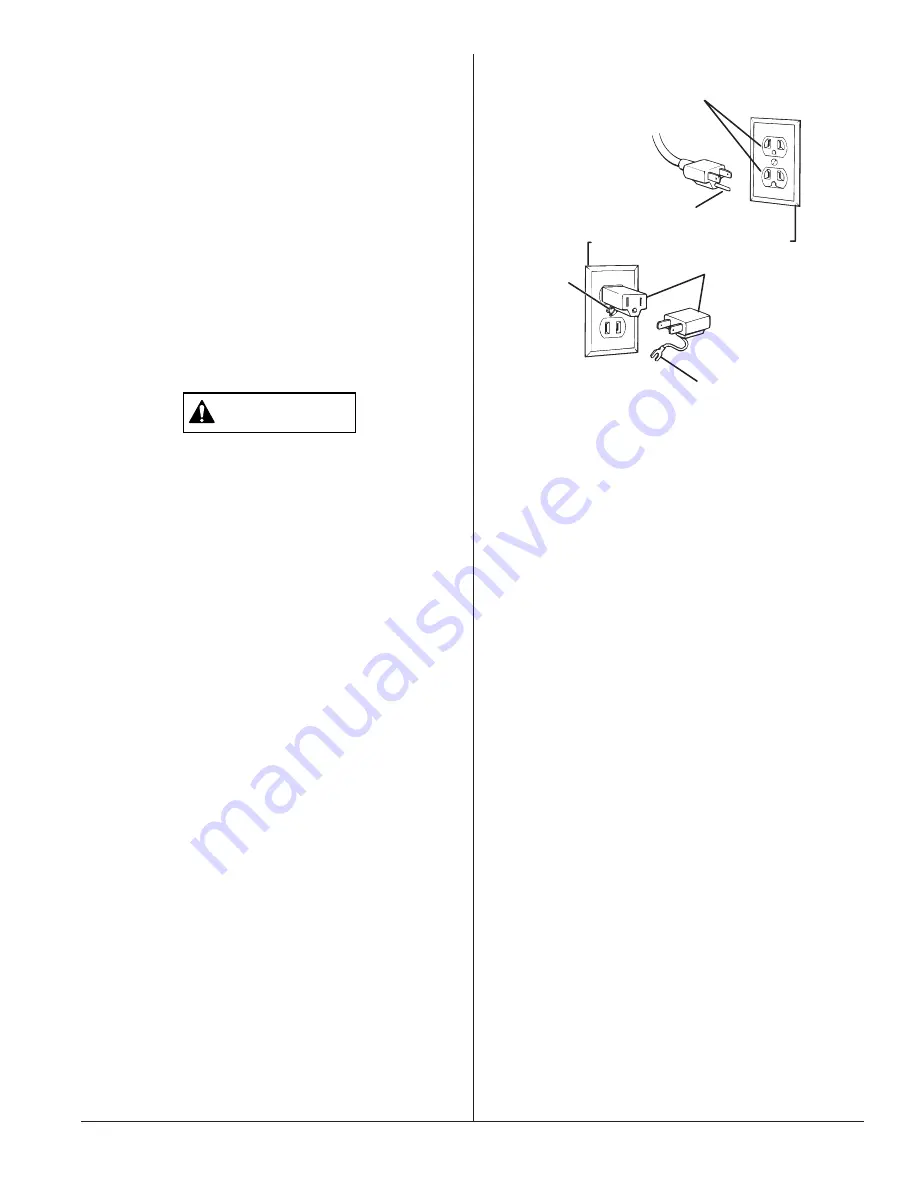
This product must be grounded. In the event of an
electrical short circuit, grounding reduces the  risk of
electric shock by providing an escape wire for the electric
current. This product is equipped with a cord having a
grounding wire with an appropriate grounding plug. The
plug must be plugged into an outlet that is properly
installed and grounded in accordance with all local codes
and ordinances.

WARNING

Improper installation of the grounding plug can result
in a risk of electric shock.

If repair or replacement of the cord or plug is necessary,
do not connect the green grounding wire to either flat
blade terminal. The wire with insulation having a green
outer surface with or without yellow stripes is the ground-
ing wire and must be connected to the grounding pin.

Check with a qualified electrician or serviceman if the
grounding instructions are not completely understood, or
if you are in doubt as to whether the product  is properly
grounded.  Do not modify the plug provided.  If the plug
will not fit the outlet, have the proper outlet installed by a
qualified electrician.

This product is for use on a nominal 120 volt circuit and
has a grounding plug that looks like the plug illustrated
below. A temporary adapter which looks like the adapter
illustrated in the figure below may be used to connect this
plug to a 2 pole receptacle as shown if a properly
grounded outlet is not available. The  temporary  adapter
should be used only until a properly grounded outlet as
shown below can be installed by a qualified electrician.
The green colored rigid  ear lug or the grounding wire
extending from the adapter must be connected to a
permanent ground such as a properly grounded outlet
box cover. Whenever the adapter is used, it must be held
in place by a metal screw.

Grounded Outlet

Grounding Pin 

Tab for Grounding Screw 

Adapter

Metal Screw

Cover fo grounded outlet box 

Summary of Contents for 0278712C

Page 1: ...er toll free if you have any comments or problems with this Wagner product Call us first for answers fast Wagner Technical Service 1 800 880 0993 Hours Weekdays 8 00 4 30 Central Time Spray Store temp...

Page 2: ...bracket Suction set and return tube Spray gun and filter Spray tip and gasket 25 1 4 diameter pressure hose The following are located in the literature set with the registration card Spare Outlet Spr...

Page 3: ...on See a physician immediately NOTE TO PHYSICIAN Injection into the skin is a traumatic injury It is important to treat the injury surgically as soon as possible DO NOT delay treatment to research tox...

Page 4: ...our coating s supplier WARNING HAZARDOUS VAPORS Paints solvents insecti cides and other materials may be harmful if inhaled causing severe nausea fainting or poisoning Use a respirator or mask wheneve...

Page 5: ...h or without yellow stripes is the ground ing wire and must be connected to the grounding pin Check with a qualified electrician or serviceman if the grounding instructions are not completely understo...

Page 6: ...place Never trigger the gun unless the tip is in either the spray or the unclog position Always engage the gun safety switch before removing replacing or cleaning tip 2 Thread the spray tip onto the g...

Page 7: ...e gun unless the tip is completely turned to either the spray or the unclog position ALWAYS engage the gun safety switch before removing replacing or cleaning tip Attaching the paint hose 1 Attach the...

Page 8: ...into the sprayer This will wet the moving parts and break loose any old paint residue 6 Put the palm of your hand over the inlet Turn the pressure control knob clockwise to its maximum setting You sh...

Page 9: ...even strokes Keep your arm moving at a constant speed and keep the spray gun at a constant distance from the surface The best spraying distance is 10 to 12 inches between the spray tip and the surfac...

Page 10: ...r than in a fine spray Most latex paints and stains will require very high pressure which is why the sprayer is built to deliver up to 2 500 psi when needed Good spray pattern Paint tailing pattern If...

Page 11: ...rew the filter housing using an adjustable wrench on the nut at the bottom of the housing 6 Remove the filter Do not lose the spring and the sealing washer located in the bottom of the filter housing...

Page 12: ...and begin spraying Long term storage WARNING Do not allow paint to build up on the motor or the motor will overheat Do not allow flammable sol vents to come in contact with the motor or they could ign...

Page 13: ...to its lowest setting 7 Turn the PRIME SPRAY knob to PRIME 8 Trigger the gun to remove any pressure which may still be in the hose 9 Lock the gun by turning the gun safety switch so that it is parall...

Page 14: ...Replace the large suction tube onto the inlet valve NOTE Proper cleaning and oiling of the pump after use are the most important steps you can take to insure proper operation after storage 14 Turn the...

Page 15: ...mp assembly parts diagram for the proper replacement part number 4 Remove the seat and ball assembly using a six millimeter allen wrench 5 Clean all parts thoroughly If the ball or seat show any sign...

Page 16: ...1995 Wagner Spray Tech 16 All rights reserved...

Page 17: ...heated 2 The extension cord is too long or is too small a gauge 3 Paint has built up on the motor 4 The motor was started while the sprayer was under pressure 5 The sprayer was sitting in the hot sun...

Page 18: ...0047485 Spring outlet 1 5 0093635 Ball 6mm carbide 1 6 0090348 Seat ball outlet assembly 1 7 0089494 Seal outlet 1 8 0270551 Fitting outlet 1 9 0088715 Fitting return tube 1 10 0288748 Knob 1 11 02702...

Page 19: ...turn hose 1 11 0327226 Clamp 1 12 0270363 Tubing return 1 3 4 5 6 7 2 8 1 11 12 9 10 Parts Diagram G 06 Spray Gun ITEM PART NO DESCRIPTION 1 0293004 G 06 gun assembly includes items 2 through 7 2 0089...

Page 20: ...FOR A PARTICULAR PURPOSE IS LIMITED TO 30 DAYS FOR PROFESSIONAL RENTAL USE AND ONE YEAR FOR HOME USE FROM DATE OF PURCHASE WAGNER SHALL NOT IN ANY EVENT BE LIABLE FOR ANY INCIDENTAL OR CONSEQUENTIAL...

Reviews: