background image

20


servicing / repairs at the unit

ps 3.21

10 

ServIcINg

10.1 

geNerAl ServIcINg

Servicing of the unit should be carried out once annually by the 

WAGNER service.

1.   Check  high-pressure  hoses,  device  connecting  line  and 

plug for damage.

2.   Check the inlet valve, outlet valve and filter for wear.

10.2 

hIgh-preSSure hoSe

Inspect  the  high-pressure  hose  visually  for  any  notches  or 

bulges, in particular at the transition in the fittings. It must be 

possible to turn the union nuts freely.

i

The risk of damage rises with the age of the high-

pressure  hose.  Wagner  recommends  replacing 

high-pressure hoses after 6 years.

11 

repAIrS AT The uNIT

Switch the unit OFF.
Before  all  repair  work:  Unplug  the  power  plug 

from the outlet.

i

Make  sure  to  check  for  grounding  continuity 

after  service  is  performed  on  any  electrical 

components.
Use  an  ohmmeter  to  determine  that  there  is 

continuity between accessible dead-metal parts 

of  the  product  and  the  grounding  blade  of  the 

attachment plug.

11.1 

relIef vAlve

Attention

The valve housing (4) should not be repaired.  If 

worn,  it  should  always  be  replaced  with  a  new 

one.

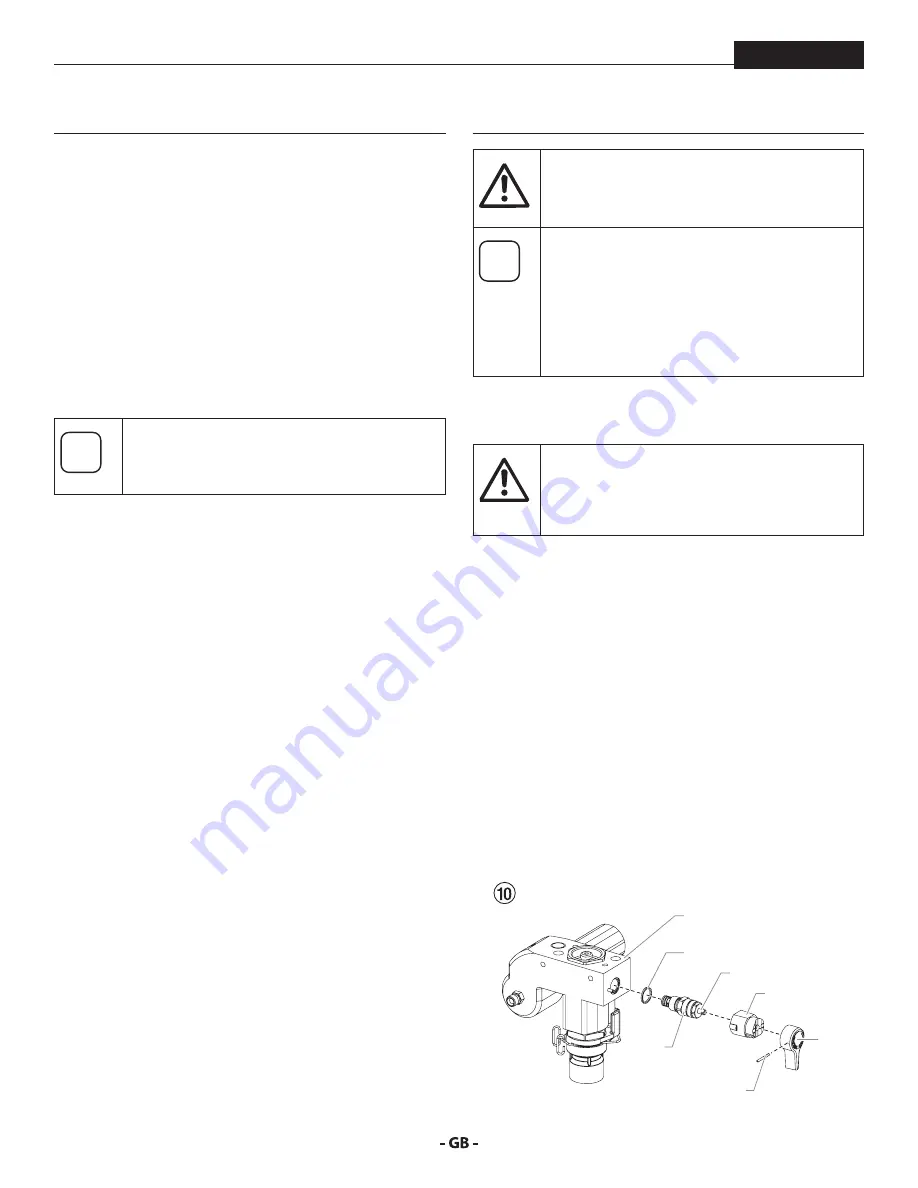
1.  Use a drift punch of 2 mm to remove the grooved pin (Fig. 

10, Item 1) from the relief valve handle (2).

2.  Remove the relief valve handle (2) and cam base (3).
3.  Using  a  wrench,  remove  the  valve  housing  (4)  from  the 

pump manifold (6).

4.  Ensure that the seal (5) is seated correctly, then screw the 

new valve housing (4) completely into the pump manifold 

(6). Tighten securely with a wrench.

5.  Align the cam base (3) with the hole in the pump manifold 

(6). Lubricate the cam base with grease and slide on the 

cam base.

6.  Bring the hole in the valve shaft (7) and in the relief valve 

handle (2) into alignment.

7.  Insert the grooved pin (1) to secure the relief valve handle 

in position.

3

7

4

1

2

6

5

Summary of Contents for 0552863F

Page 1: ...0218 Form No 0552863F prospray 3 21 owner s manual wagner group com gb MODEL 0552478...

Page 2: ...m the doctor about the coating material or solvent used The operating instructions state that the following points must always be observed before starting up 1 Faulty units must not be used 2 Secure W...

Page 3: ..._____________ 16 8 Cleaning the unit shutting down ___ 17 8 1 Cleaning unit from outside______________________17 8 2 Suction filter__________________________________17 8 3 Cleaning the high pressure f...

Page 4: ...by this equipment can pierce the skin and underlying tissues leading to serious injury and possible amputation Do not treat a spraying injury as a harmless cut In case of injury to the skin through co...

Page 5: ...essure hose immediately Never repair defective high pressure hoses yourself Electrostatic charging of spray guns and the high pressure hose is discharged through the high pressure hose For this reason...

Page 6: ...arts that emit sparks and can ignite vapors The equipment and objects in and around the spray area must be properly grounded to prevent static sparks Use only conductive or earthed high pressure fluid...

Page 7: ...prevention and operation Pulling the trigger causes a recoil force to the hand that is holding the spray gun The recoil force of the spray gun is particularly powerful when the tip has been removed a...

Page 8: ...circuits caused by water ingressing into the electrical equipment Never spray down the unit with high pressure or high pressure steam cleaners Work or repairs at the electrical equipment These may on...

Page 9: ...ingmaterialscannotbetakeninbysuction they must be diluted in accordance with the manufacturer s instructions Two component coating material The appropriate processing time must be adhered to exactly W...

Page 10: ...ing force to a crankshaft The crankshaft moves the pistons of the material feed pump up and down The inlet valve is opened automatically by the upwards movement of the piston The outlet valve is opene...

Page 11: ...position vertical PRIME k circulation Lever position horizontal SPRAY p 6 Oil button 7 Oil level gauge 3 5 Explanatory diagram PS 3 21 8 ON OFF switch 9 Control panel indicators 10 Pressure control k...

Page 12: ...re hose 3 to the coating material outlet on the pressure gauge Fig 3 Item 4 3 Screw the spray gun 5 with the selected tip onto the high pressure hose 4 Tighten the union nuts at the high pressure hose...

Page 13: ...tor is solid yellow the sprayer is operating between 1 4 MPa 14 bar and 12 MPa 120 bar A solid yellow pressure indicator means The sprayer is at the proper pressure setting for spraying stain lacquer...

Page 14: ...ntil the cleaning agent exudes from the return hose 6 Close the relief valve valve position SPRAY p spray 7 Pull the trigger of the spray gun 8 Spray the cleaning agent from the unit into an open coll...

Page 15: ...s 25 to 30 cm between the spray tip and the surface 25 30 cm A B Keep the spray gun at right angles to the surface This means moving your entire arm back and forth rather than just flexing your wrist...

Page 16: ...ng i The risk of damage rises with the age of the high pressure hose Wagner recommends replacing high pressure hoses after 6 years i Use only Wagner original high pressure hoses in order to ensure fun...

Page 17: ...gh pressure hose and the spray gun into an open container 5 Immerse suction hose with return hose into a container with a suitable cleaning agent 6 Turn the pressure control knob counterclockwise to m...

Page 18: ...e screw the new or cleaned filter into the pump manifold 9 Screw in filter housing 1 and tighten it as far as possible with the strap wrench 1 4 3 2 5 8 4 Cleaning Airless spray gun i Clean the spray...

Page 19: ...g incorrect 3 Volume too low 4 Coating material viscosity too high 1 Pressure setting too low 1 Pressure switch defective 2 Transducer defective Measures for eliminating the malfunction 1 Check voltag...

Page 20: ...rformed on any electrical components Use an ohmmeter to determine that there is continuity between accessible dead metal parts of the product and the grounding blade of the attachment plug 11 1 Relief...

Page 21: ...inlet valve ball 4 inlet valve seat 5 and O ring 6 10 Clean all the parts with the corresponding cleaning agent Check the inlet valve housing 1 inlet valve seat 5 and inlet valve ball 4 for wear and...

Page 22: ...installation tool included with the replacement packings for the piston 3 from above onto the piston 14 Lubricate installation tool and piston 3 with machine grease 15 Guide piston 3 through the lower...

Page 23: ...gram Capacitor Assembly P N 0522054 Black White Blue Black P N 0516360 P N 0516360 Motor Red Black Red Black Potentiometer Power Cord EMI Filter Ground Ground PC Board Assembly Pressure Transducer Bla...

Page 24: ...2 Servicing and cleaning of Airless hard metal tips Standard tips If a different tip type has been fitted then clean it according to manufacturer s instructions The tip has a bore processed with the g...

Page 25: ...0556 053 45 cm G thread Order no 0556 076 60 cm F thread Order no 0556 054 60 cm G thread Order no 0556 077 Tip marking Bore mm Spray width at about 30 cm removal of spray object Pressure 100 bar 10...

Page 26: ...10 20 30 40 50 60 80 0 013 0 33 0 013 0 33 0 013 0 33 0 013 0 33 0 013 0 33 0 013 0 33 0 013 0 33 100 120 150 190 225 270 330 red red red red red red red 0553113 0553213 0553313 0553413 0553513 055361...

Page 27: ...120 150 190 225 270 120 150 190 225 270 300 330 120 150 190 225 270 120 150 190 225 270 300 190 225 270 white white white white white white white white white white white white white white white white...

Page 28: ...0m Spraypack consisting of basic unit 2311659 Airless gun AG 14 NPS 1 4 incl Trade Tip 2 nozzler holder F thread and Trade Tip 2 Fine Finish 410 2311660 2311853 TempSpray H 226 ideal for dispersions m...

Page 29: ...r No cleaning necessary during work stoppage or change of location because the paint in the pump cannot dry out or leak Better protection Simple assembly Suitable for the following models Diaphragm Pu...

Page 30: ...Spare parts diagram PS 3 21 GB Accessories illustration 30 3 1 5 7 9 2 4 6 8...

Page 31: ...pressure hoses 1 4 x 1 4 6 0034 950 Metex Reuse Reuse for pre filtering of coating material in vessel Place suction pipe in the reuse 0034 952 Sieve package 5 pcs for paint 0034 951 Sieve package 5 pc...

Page 32: ...main assembly 32 28 30 29 31 32 33 34 35 48 50 49 51 52 53 54 1 19 18 25 55 6 26 21 22 23 24 20 44 45 46 47 7 5 9 10 11 8 27 2 3 4 37 36 40 38 39 41 42 43 14 15 16 17 12 13 0558 466 110V 6 m 0290 281...

Page 33: ...assembly 25 0290 205 Pusher assembly includes item 55 26 0508 553 Screw 2 27 9800 319 Screw 28 0551 757 Transducer jumper 29 9822 624 Washer 2 PS 3 21 Description 30 9800 607 Screw 5 31 54054 Washer 3...

Page 34: ...9 591 Lower ball guide 17 0509 583 Inlet valve ball 18 0551 534 Inlet valve seat 19 0509 582 O ring PTFE 20 0509 581 Inlet valve seal 21 0290 216 Inlet valve housing 22 9871 160 O ring 23 0508 748 Fil...

Page 35: ...gear 3 0558 373 Motor assembly 120V includes items 5 7 4 9800 319 Screw 4 5 0522 018 Capacitor assembly 6 0290 217 Baffle assembly 7 0512 340 Fan 8 0551 714 Cord grip 2 9 0558 449 Bracket 10 0551 980...

Page 36: ...90 214 Foot 6 0508 660 Screw 2 7 0294 635 Plug 8 0290 219 Cord holder 9 0290 214 Foot 10 0290 210 Leg left 0290 203 Left leg assembly includes items 6 10 0290 204 Right leg assembly includes items 1 5...

Page 37: ...t has to be sent without charge or presented together with the original purchase document that includes details of the purchase date and the name of the product In order to claim for an extension to t...

Page 38: ...que este producto cumple con las correspondientes disposiciones 2006 42 CE 2014 30 UE 2011 65 UE 2012 19 UE Normas armonizadas aplicadas EN ISO 12100 EN 1953 EN 60204 1 EN 61000 3 2 EN 61000 3 3 EN 61...

Page 39: ...less de Ratingen J Wagner GmbH Service St tzpunkt Siemensstra e 6 10 40885 Ratingen Tel 0 21 02 3 10 37 Telefax 0 21 02 3 43 95 N rnberg Grimmer GmbH Starenweg 28 91126 Schwabach Tel 0 91 22 7 94 73 T...

Page 40: ...gner International AG Industriestrasse 22 9450 Altst tten Schweiz Tel 41 71 7 57 22 11 Telefax 41 71 7 57 22 22 wagner wagner group ch F Euromair Antony S A V Ile de France 12 14 av F Sommer 92160 Ant...

Reviews: