26
Airless Sprayer Plus
GB
Practice
CAUTION
Be sure that the paint hose is free of kinks and clear of
objects with sharp cutting edges.
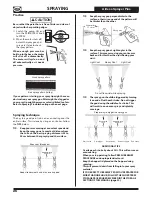
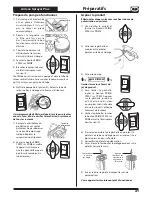
1) Switch the pump ON and
turn the PRIME/SPRAY knob
to SPRAY.
2) When the motor shuts off,
unlock the spray gun and
spray a test area to check
the spray pattern.
When enough pressure has
built up in the hose, the motor
will shut off automatically.
The motor will cycle on and
off automatically as it needs
pressure.
l
SPRAY
PRIME
Good spray pattern
Bad spray pattern (tailing)
If your pattern is tailing, your spray tip might have an
obstruction, your spray gun filter might be clogged or
your spray tip might be worn or color is diluted too few.
Refer to Spraying Troubleshooting on the next page.
Spraying technique
The key to a good paint job is an even coating over the
entire surface. This is done by using even strokes. Follow
the
TIPS
, below.
TIP:
Keep your arm moving at a constant speed and
keep the spray gun at a constant distance from
the surface. The best spraying distance is 25 to
30 cm between the spray tip and the surface.
Keep stroke smooth and at an even speed.
Even coat throughout
Approximately
25-30cm
TIP:
Keep the spray gun perpendicular to the
surface, otherwise one end of the pattern will
be thicker than the other.
Approximately
25 - 30 cm
Right way
Wrong way
TIP:
Keep the spray gun at right angles to the
surface. This means moving your entire arm
back and forth rather than just flexing your
wrist.
Heavy Coat
Do not flex wrist while spraying.
Light Coat
Light Coat
TIP:
The spray gun should be triggered by turning
it on and off with each stroke. Do not trigger
the gun during the middle of a stroke. This
will result in an uneven spray and splotchy
coverage.
Proper way to trigger the spray gun
Approximately
25-30cm
Keep stroke
even
Start stroke
End stroke
Pull trigger
Release trigger
Keep steady
ADDITIONAL TIPS
Overlap each stroke by about 30%. This will ensure an
even coating.
When you stop painting, follow PRESSURE RELIEF
PROCEDURE and unplug electrical cord.
Keep the hopper lid placed on the hopper during
spraying.
This will prevent debris from falling into your spray
material.
IF YOU EXPECT TO BE AWAY FROM YOUR SPRAYER FOR
MORE THAN ONE HOUR, FOLLOW THE SHORT-TERM
STORAGE PROCEDURE DESCRIBED IN THE STORAGE
SECTION OF THIS MANUAL (page 30).
SPRAYING
Summary of Contents for Airless Sprayer Plus 0418
Page 83: ...83 Airless Sprayer Plus...


