62
VERSION 03/2018
ORDER NUMBER DOC 2369735
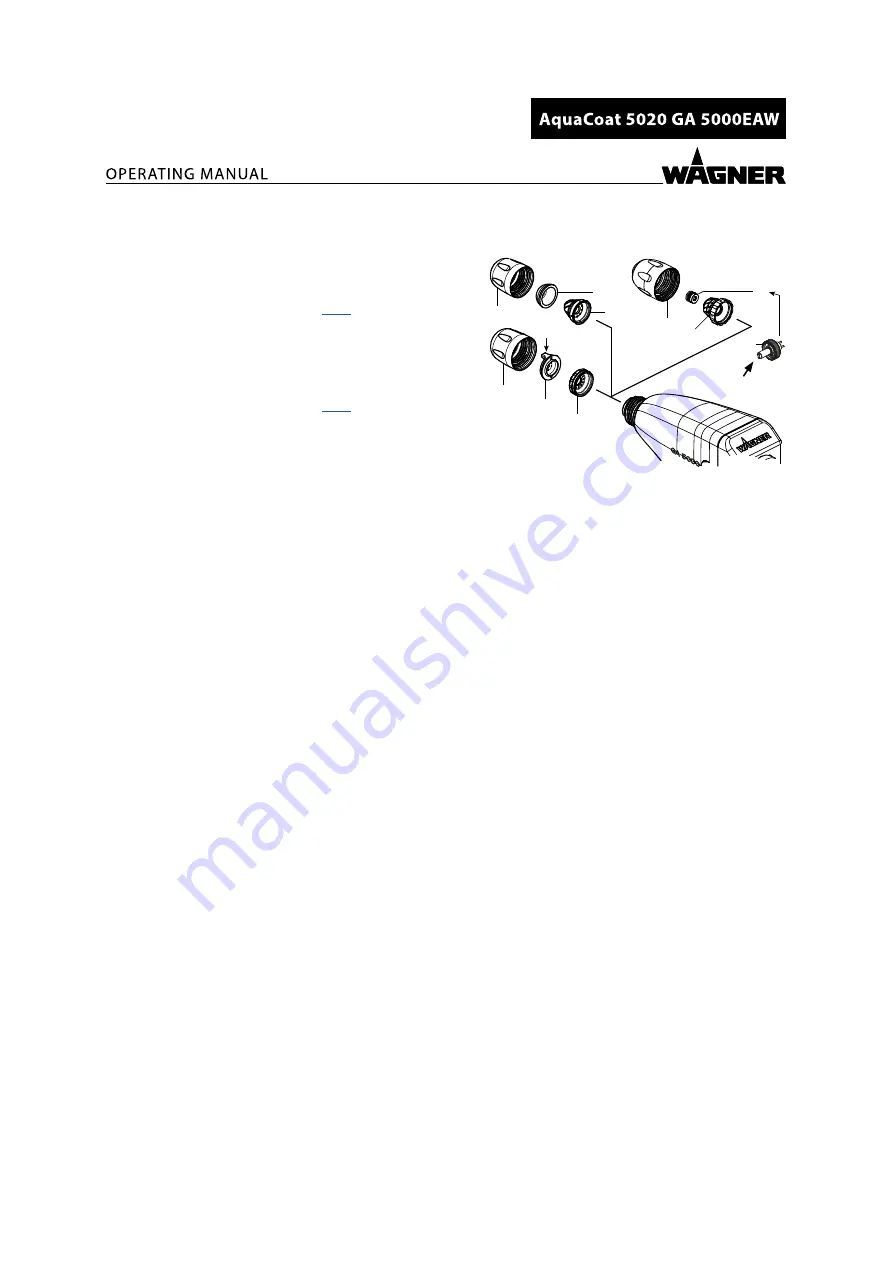
7.4.4 CHANGING THE NOZZLE, CHANGING FROM ROUND JET/FLAT JET
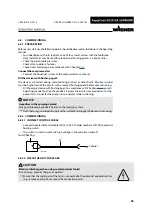
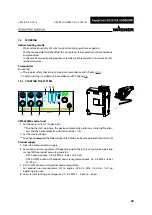
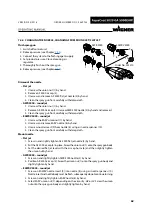
Flush spray gun
B_06149
6
1
4
5
1
8
9
EAWRV 5000
AWR 5000
3
2
10
7
Order No. 353210
1. Switch off control unit.
2. Relieve pressure (see Chapter
).
3. Connect the system to the flushing agent supply.
4. Set product pressure. Close atomizing air
regulator.
5. Thoroughly flush out the spray gun.
6. Relieve pressure (see Chapter
).
Dismount the nozzle
– Flat jet
1. Unscrew the union nut (1) by hand.
2. Remove AF 5000 air cap (4).
3. Unscrew and remove AF 5000 flat jet nozzle (5) by hand.
4. Clean the spray gun front carefully with damp cloth.
– AWR 5000 – round jet
1. Unscrew the union nut (1) by hand.
2. Remove AR 5000 air cap (2). Unscrew AWR 5000 nozzle (3) by hand and remove it.
3. Clean the spray gun front carefully with damp cloth.
– EAWRV 5000 – round jet
1. Unscrew the EARV union nut (7) by hand.
2. Unscrew and remove EARV nozzle (8) by hand.
3. Unscrew nozzle insert (9) from nozzle (8) using air nozzle spanner (10).
4. Clean the spray gun front carefully with damp cloth.
Mount nozzle
– Flat jet
1. Screw in and slightly tighten AF 5000 flat jet nozzle (5) by hand.
2. Put the AF 5000 air cap (4) in place. Screw the union nut (1) onto the spray gun body.
3. Set the desired flat jet level with the air cap horns (6) and then slightly tighten
the union nut by hand.
– AWR 5000 – round jet
1. Screw on and slightly tighten AWR 5000 nozzle (3) by hand.
2. Position AR 5000 air cap (2). Screw the union nut (1) onto the spray gun body and
slightly tighten by hand.
– EAWRV 5000 – round jet
1. Screw on EAWRV nozzle insert (9) into nozzle (8) using air nozzle spanner (10).
Nozzle insert and nozzle body must be flush, subsequently do not continue turning.
2. Screw on and slightly tighten EARV nozzle (8) by hand.
3. Select EARV union nut (7) depending on the viscosity: HV or LV. Screw the union
nut onto the spray gun body and slightly tighten by hand.

