background image

EN

3

IMPORTANT SAFETY INFORMATION

GROUNDING INSTRUCTIONS

This product must be grounded. In the event of an electrical short 

circuit, grounding reduces the risk of electric shock by providing an 

escape wire for the electric current. This product is equipped with a 

cord having a grounding wire with an appropriate grounding plug. 

The plug must be plugged into an outlet that is properly installed 

and grounded in accordance with all local codes and ordinances.

WARNING - Improper installation of the grounding 

plug can result in a risk of electric shock.

If repair or replacement of the cord or plug is necessary, do not 

connect the green grounding wire to either flat blade terminal. The 

wire with insulation having a green outer surface with or without 

yellow stripes is the grounding wire and must be connected to the 

grounding pin.
Check with a qualified electrician or serviceman if the grounding 

instructions are not completely understood, or if you are in doubt 

as to whether the product is properly grounded. Do not modify the 

plug provided.  If the plug will not fit the outlet, have the proper 

outlet installed by a qualified electrician.
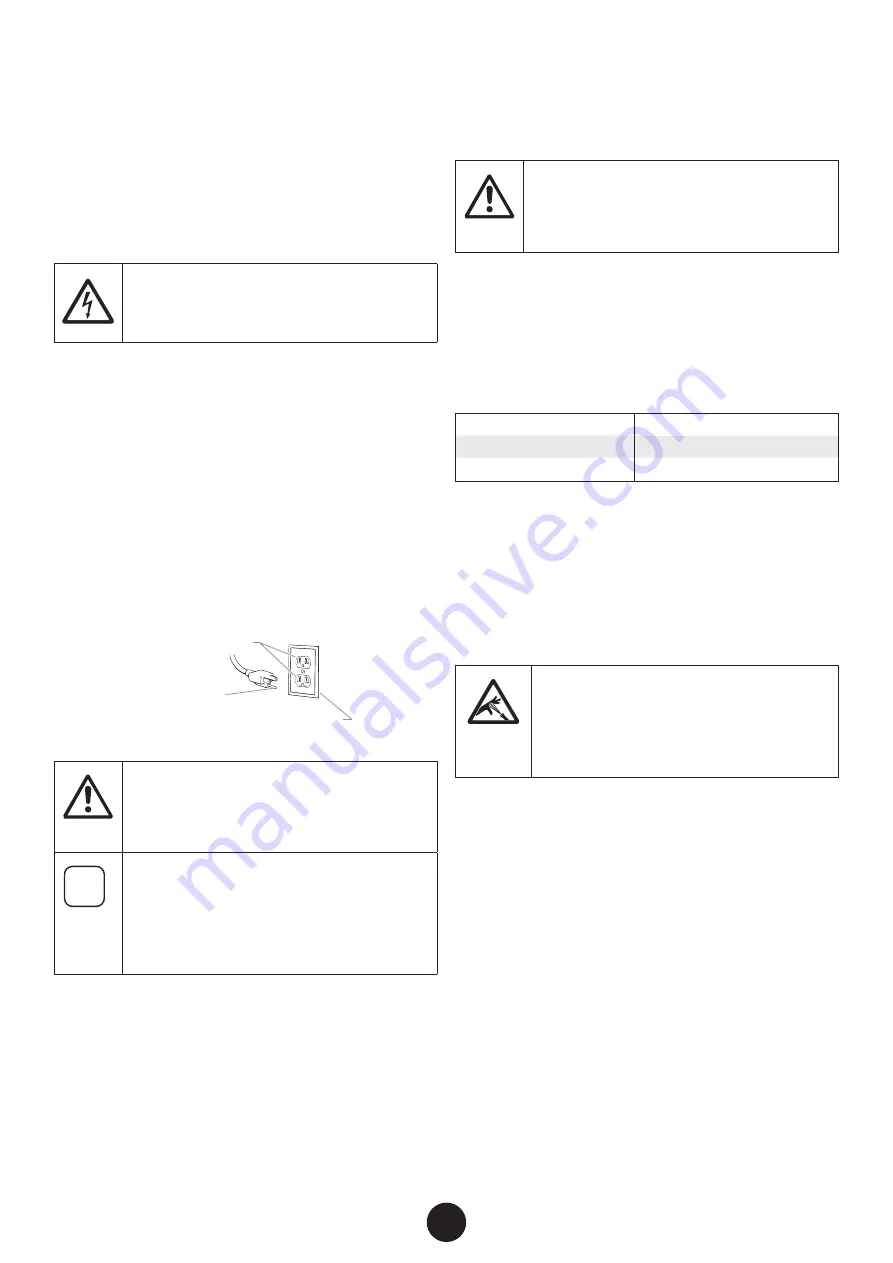
This product is for use on a nominal 120 volt circuit and has a 

grounding plug that looks like the plug illustrated below. Make 

sure that the product is connected to an outlet having the same 

configuration as the plug. No adapter should be used with this 

product.

Grounded Outlet

Grounding Pin 

Cover for grounded outlet box 

Attention

When the sprayer is used with a generator or 

uncontrolled line voltage, the use of Wagner’s “Line 

Surge Protector” (P/N 800-935) is recommended.  

i

Make sure to check for grounding continuity after 

service is performed on any electrical components.
Use an ohmmeter to determine that there is 

continuity between accessible dead-metal parts 

of the product and the grounding blade of the 

attachment plug.

IMPORTANT ELECTRICAL INFORMATION

Attention

Use only a 3-wire extension cord that has a 3-blade 

grounding plug and a 3-slot receptacle that will 

accept the plug on the product. 

Make sure your extension cord is in good condition. When using an 

extension cord, be sure to use one heavy enough to carry the current 

your product will draw. An undersized cord will cause a drop in line 

voltage resulting in loss of power and overheating. 
A 14 or 12 gauge cord is recommended (see chart). If an extension 

cord is to be used outdoors, it must be marked with “SJW” or “SJTW”.  

For example, a designation of SJTW would indicate that the cord 

would be appropriate for outdoor use.

Cord gauge

Maximum cord length

12

150 feet

14

100 feet

Wagner accessory extension cords recommended:
P/N 0090241 

20 foot extension cord

P/N 0090242 

35 foot extension cord

SAFETY HAZARDS

WARNING:  INJECTION INJURY

A high pressure paint stream produced by this 

equipment can pierce the skin and underlying 

tissues, leading to serious injury and possible 

amputation.  See a physician immediately.

PREVENTION:

• 

Do not aim the gun at, or spray any person or animal.

• 

Keep hands and other body parts away from the discharge. For 

example, do not try to stop leaks with any part of the body.

• 

NEVER put your hand in front of the gun.  Gloves will not provide 

protection against an injection injury.

• 

ALWAYS keep the tip guard in place while spraying. The tip 

guard provides some protection but is mainly a warning device.

• 

Only use a nozzle tip specified by the manufacturer.

• 

Use caution when cleaning and changing nozzle tips.  In the case 

where the nozzle tip clogs while spraying, ALWAYS lock gun 

trigger, shut pump off, and release all pressure before servicing, 

cleaning tip or guard, or changing tip.  Pressure will not be 

released by turning off the motor.  The PRIME/SPRAY valve 

or pressure bleed valve must be turned to their appropriate 

positions to relieve system pressure.  Refer to PRESSURE RELIEF 

PROCEDURE described in the pump manual (page 7).

• 

Do not leave the unit energized or under pressure while 

unattended. When the unit is not in use, turn off the unit and 

relieve the pressure in accordance with the manufacturer’s 

instructions.

Summary of Contents for CONTROL PRO 130 POWER TANK

Page 1: ...AL GUIDE D UTILISATION MANUAL DEL PROPIETARIO READTHIS MANUAL FOR COMPLETE INSTRUCTIONS LIRE CE MANUEL POUR OBTENIR DES DIRECTIVES COMPL TES LEA ESTE MANUAL PARA OBTENER LAS INSTRUCCIONES COMPLETAS wa...

Page 2: ...________________________ 16 MAINTENANCE_____________________________________ 17 18 Cleaning the Inlet Valve________________________________ 17 Cleaning the Outlet Valve______________________________ 1...

Page 3: ...ly a 3 wire extension cord that has a 3 blade grounding plug and a 3 slot receptacle that will accept the plug on the product Make sure your extension cord is in good condition When using an extension...

Page 4: ...or clean with liquids having a flash point of less than 38 C 100 F Flash point is the temperature at which a fluid can produce enough vapor to ignite Paint or solvent flowing through the equipment is...

Page 5: ...ndards particularly part 1910 of the General Standards and part 1926 of the Construction Standards should be consulted Before each use check all hoses for cuts leaks abrasion or bulging of cover Check...

Page 6: ...e port and the plastic plug from the end of the spray hose prior to assembly TOOLS NEEDED Two 6 adjustable wrenches 1 Thread one end of the high pressure spray hose to the spray hose port Hold the por...

Page 7: ...es of the tank The sprayer can be heavy when filled with spraying material Make sure to lift with your legs and not your back in order to reduce the risk of injury Do not use the tank lid to carry the...

Page 8: ...e system Attention Take care to prevent material spills Make sure to use drop cloths and mask anything that is in the spraying area and could accidentally be sprayed 1 Push tab on filter twice to ensu...

Page 9: ...through the spray gun 4 Perform the Pressure Relief Procedure page 7 5 IMPORTANT Make sure the washer a and saddle seat b are installed in the rear of the spray guard Note the orientation of the sadd...

Page 10: ...ooting page 19 10 EN PRACTICE SPRAYING YOU WILL NEED A surface to practice spraying wood carboard or scrap drywall While spraying the spray guard tip assembly can be rotated to better suit your sprayi...

Page 11: ...ate relieve pressure by 1 slowly turn PRIME SPRAY knob to PRIME 2 unlock the spray gun and 3 squeeze trigger while pointing at scrap material cardboard Release trigger lock the spray gun and try rotat...

Page 12: ...elief Procedure page 7 2 Empty the tank of spray material see Moving Emptying the Sprayer page 7 3 Remove inlet filter from tank Clean the inlet filter using the appropriate cleaning solution warm soa...

Page 13: ...sure Relief Procedure page 7 2 Turn spray tip 90 This will prevent air from drying out any spray material that may be inside the spray tip Wrap spray tip and guard in a damp rag and then place entire...

Page 14: ...ace both into the tank full of cleaning solution i Allowing the spray tip and tip guard to soak in the tank while flushing will make it easier to clean them afterwards Take care not to lose the saddle...

Page 15: ...essure Relief Procedure page 7 10 Remove the spray tip assembly Repeat step 5 from above continuing to squeeze the trigger until fluid comes out clear Attention Do not allow the pump to run for more t...

Page 16: ...DO NOT remove the nut Alightoilcanbesubstituted suchas10W30motoroilorvegetable oil for example Reassemble the spray gun 4 Place a wrench on the outlet valve to secure it Using the second wrench remov...

Page 17: ...hex opening 2 and unscrew the inlet valve fitting 2 from the sprayer Snap the lid back onto the sprayer turn it upside down and tap the bottom of the sprayer a few times to loosen the inlet seat 3 ba...

Page 18: ...derneath the outlet valve with a 2 5 mm allen wrench 3 Unscrew outlet valve from outlet valve housing using wrench Remove any accumulated material inside outlet valve housing using appropriate solutio...

Page 19: ...The material is too heavy or thick 5 The material is too coarse 6 The outlet valve assembly is damaged or worn 7 Spray hose is too long 1 Replace spray tip with a new one 2 Refer to Clean the Inlet fi...

Page 20: ..._____________________________ 35 36 Nettoyage de la soupape de d entr e_____________________ 35 Nettoyage de la soupape de sortie_______________________ 36 D PANNAGE___________________________________...

Page 21: ...Si l application requiert l utilisation d une rallonge celle ci doit tre trifilaire et dot e d une fiche trois broches et d un connecteur trois fentes pouvant accepter la fiche de l appareil Cette ra...

Page 22: ...e nue de voyants lumineux ou de sources d ignition telles que des objets chauds cigarettes moteurs mat riel et appareils lectriques vitez de produire des tincelles en connectant et en d connectant les...

Page 23: ...x tatiques et nationaux qui r gulent la ventilation la pr vention d incendies et le fonctionnement Les normes de s curit du gouvernement des tats Unis ont t adopt es dans la loi Occupational safety an...

Page 24: ...du tuyau de pulv risation et le bouchon en plastique du bout du tuyau de pulv risation avant l installation OUTILS N CESSAIRES Cl s 2 1 Vissez l une des extr mit s du boyau de pulv risation sur la so...

Page 25: ...tre lourde lorsqu elle est remplie de fluide pulv riser Assurez vous d utiliser les muscles de vos jambes et non ceux de votre dos pour la soulever afin de r duire les risques de blessure N utilisez...

Page 26: ...de produit Assurez vous d utiliser des toiles de peinture et de masquer tout ce qui se trouve dans la zone de pulv risation et qui pourrait tre accidentellement pulv ris 1 Pousser deux reprises sur la...

Page 27: ...ement travers le pistolet de pulv risation 4 Suivez la Proc dure de D compression page 25 5 IMPORTANT Assurez vous que la rondelle a et le si ge b sont install s l arri re du protecteur de pulv risati...

Page 28: ...face pour pratiquer la pulv risation bois carton ou morceau de cloison s che Pendant la pulv risation on peut tourner l ensemble anti claboussure embout afin qu il convienne mieux votre mouvement de p...

Page 29: ...t le bouton PRIME SPRAY PRIME 2 en d bloquant le pistolet pulv risateur et 3 en appuyant sur la d tente tout en pointant vers des d bris morceaux de carton Rel chez la d tente bloquez le pistolet pulv...

Page 30: ...Proc dure de D compression page 25 2 Videz la r servoir de tout mat riau pulv riser voir la section D placer Vider le Pulv risateur page 25 3 Retirer le filtre d entr e de la r servoir Nettoyez le fil...

Page 31: ...Suivez la Proc dure de D compression page 25 2 Tournez l embout de 90 Cela emp chera l air d ass cher le produit pulv riser qui pourrait se trouver l int rieur de l embout Enveloppez l embout et d fl...

Page 32: ...eux pi ces dans le r servoir rempli de solution de nettoyage i Il sera plus facile de nettoyer l embout et le prot ge embout si vous les laissez tremper dans le r servoir pendant le rin age Veillez ne...

Page 33: ...de D compression page 25 10 Enlevez l ensemble de l embout R p tez l tape 5 ci dessus en continuant d appuyer sur la d tente jusqu ce que le liquide sorte clairement Attention Ne laissez pas la pompe...

Page 34: ...re peut tre utilis e comme de l huile moteur 10W30 ou de l huile v g tale par exemple Remonter le pistolet de pulv risation 4 Placez une cl sur la soupape de sortie pour la fixer l aide de la deuxi me...

Page 35: ...verture hexagonale 2 et d vissez le raccord de la soupape d entr e 2 du pulv risateur Replacez le couvercle sur le pulv risateur tournez le pulv risateur l envers et tapez la partie inf rieure du pulv...

Page 36: ...oupape de sortie avec une cl hexagonale de 2 5 mm 3 D vissez la soupape de sortie du bo tier de la soupape de sortie l aide d une cl Retirez le produit accumul l int rieur du bo tier de la soupape de...

Page 37: ...obstru 4 Le produit est trop lourd ou pais 5 Le produit est trop grossier 6 La soupape de sortie est endommag e ou us e 7 Le tuyau de pulv risation est trop long 1 Remplacer l embout par un nouvel em...

Page 38: ...__________________ 53 54 Limpieza de la v lvula de entrada________________________ 53 Limpieza de la v lvula de salida_________________________ 54 SOLUCI N DE PROBLEMAS_____________________________ 55...

Page 39: ...es sin corriente del producto y la clavija de conexi n a tierra del enchufe de acoplamiento INFORMACI N EL CTRICA IMPORTANTE Atenci n Use solamente un cable de extensi n de 3 conductores que tenga un...

Page 40: ...ir chispas al conectar y desconectar los cables de alimentaci n No pulverice ni limpie con l quidos que tengan un punto de inflamaci n por debajo de 38 C 100 F El punto de inflamaci n es la temperatur...

Page 41: ...Ley de salud y seguridad ocupacional OSHA Deben consultarse tres normas particularmente la secci n 1910 de las Normas generales y la secci n 1926 de las Normas sobre construcci n Cada vez que vaya a...

Page 42: ...rizaci n y el tap n de pl stico del extremo de la manguera de pulverizaci n antes del montaje HERRAMIENTAS NECESARIAS Llaves 2 1 Enrosque uno de los extremos de la manguera del rociador en la v lvula...

Page 43: ...ociar Para levantarla aseg rese de hacer el esfuerzo con las piernas y no con la espalda para reducir el riesgo de lesiones No use la tapa del tanque para transportar el pulverizador ya que se puede r...

Page 44: ...ta todo lo que est en el rea de pulverizaci n y que pueda ser pulverizado accidentalmente 1 Empuje la pesta a del filtro dos veces para probar el funcionamiento de la v lvula de entrada 2 Llenado de l...

Page 45: ...a 4 Realice el Procedimiento de Alivio de Presi n p gina 43 5 IMPORTANTE Aseg rese de que la arandela a y el asiento b est n instalados en la parte posterior de la cubierta contra la pulverizaci n Ten...

Page 46: ...madera cart n o cart n yeso Mientras pulveriza puede girar el conjunto de boquillayprotecci ndepulverizaci nparaadecuarse mejor al movimiento de pulverizaci n Bloquee el gatillo de la pistola pulveri...

Page 47: ...RAY hasta la posici n PRIME 2 desbloquear la pistola de pulverizaci n y 3 apretar el gatillo mientras apunta hacia un pedazo de material o cart n Suelte el gatillo bloquee la pistola de pulverizaci n...

Page 48: ...io de Presi n p gina 43 2 Retire el material de rociado que pueda haber en la tanque vea Movimiento Vaciado del Pulverizador p gina 43 3 Retire el filtro de entrada de la tanque Limpie el filtro de en...

Page 49: ...en 90 Esto evitar que el aire seque el material de pulverizaci n que podr a estar dentro de la boquilla de pulverizaci n Envuelva la boquilla y cubierta de pulverizaci n en un pa o h medo y coloque t...

Page 50: ...s instrucciones de limpieza QU NECESITAR Agua tibia con jab n material de l tex Disolventes minerales materiales a base de aceite Contenedor para desechos Cepillo de cerdas suaves 1 Realice el Procedi...

Page 51: ...de Alivio de Presi n p gina 43 10 Retire el conjunto de boquilla de pulverizaci n Repita el paso 5 anterior siga apretando el gatillo hasta que el l quido que sale sea transparente Atenci n No permit...

Page 52: ...O RETIRE la tuerca Se puede sustituir con un aceite liviano tal como aceite de motor 10W30 o aceite vegetal Vuelva a montar la pistola 4 Coloque una llave en la v lvula de salida para afirmarla Con la...

Page 53: ...acople de la v lvula de entrada 2 del pulverizador Vuelva a encajar la tapa en el pulverizador col quelo boca abajo y golpee la parte inferior del pulverizador un par de veces para soltar el asiento...

Page 54: ...salida con una llave hexagonal de 2 5 mm 3 Con una llave destornille la v lvula de salida de la carcasa de la v lvula de salida Elimine todo el material acumulado dentro de la carcasa de la v lvula de...

Page 55: ...1 Reemplace la boquilla de pulverizaci n con una nueva 2 Consulte Limpieza del filtro de entrada o reemplace con un nuevo filtro de entrada 3 Consulte Limpieza de la boquilla de pulverizaci n o reemp...

Page 56: ...2 0580072A Outlet valve assembly Ensemble de la soupape de sortie Conjunto de la v lvula de salida 3 0580070 Set screw Vis de pression Tornillo de ajuste 4 0580662A Inlet filter Filtre d entr e Filtr...

Page 57: ...T Ensemble du pistolet de pulv risation Control Pro T Conjunto de la pistola pulverizadora Control Pro T 2 0580606 Spray tip 515 Embout 515 Boquilla de pulverizaci n 515 3 0580767 Spray guard assembly...

Page 58: ...50 blanc peintures et teintures solides Filtro malla 50 blanco Pinturas y tinturas s lidas 0154842 Filter 100 mesh yellow semi transparent and transparent stains Filtre maille 100 jaune Teintures tra...

Page 59: ...ONSABLE DE DOMMAGES INT R TS INDIRECTS OU CONS CUTIFS QUE CE SOIT POUR UNE RUPTURE DE CETTE GARANTIE OU TOUTE AUTRE RAISON En cas de d faut de mat riau ou de fabrication du produit durant la p riode d...

Page 60: ...sur le site www wagnerspraytech com QUESTIONS Call Wagner Technical Service at 1 800 328 8251 Register your product online at www wagnerspraytech com NECESITA AYUDA Llame Wagner Technical Service al 1...

Reviews: