46
Finish 270 / 250
GB
repaIrs at the unIt
10.4
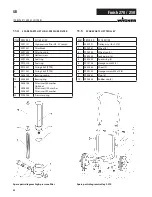
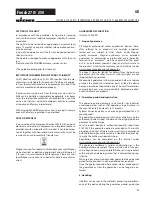
PReSSuRe cOntROl VAlVe
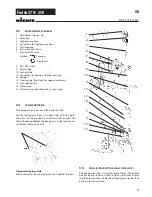
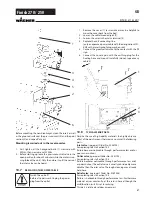
Only have the pressure control valve (1) re-
placed by the customer service.
The max. operating pressure has to be reset
by the customer service.
1
5
6
4
3 2 7
1
10.5
RelIeF VAlVe
Replace a fault refief valve (1) as a single unit.
Only the O-ring (2) may be replaced as a single part
1
2
10.6
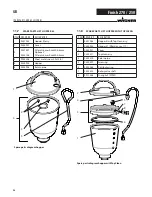
RePlAcInG tHe dIAPHRAGM
Switch the unit off.
Before all repair work: Unplug the power
plug from the outlet.
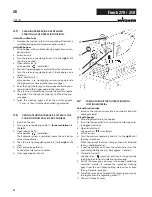
1. Screw the trigger housing with inlet valve out of the paint
section as described in Section 10.2 Inlet valve, Items 1 to
3. (disassembling of hexagon nuts will become easier)
2. Turn back the pressure control valve, rotary knob com-
pletely (anti-clockwise).
(Note: If the unit is still warm, open the oil screw plug (6)
briefly in order to compensate the pressure and close it
again.)
3. Use a 19 mm wrench to screw the hexagonal bolt (Item 1)
out of the pressure insert (2).
4. Remove the paint section (3).
5. Remove the insert (4) and the diaphragm (5).
6. The diaphragm can only be used once. Always replace the
diaphragm.
Summary of Contents for Finish 250
Page 19: ...19 Finish 270 250 10 9 Schaltplan d reparaturen am ger t...
Page 24: ...24 Finish 270 250 ersatzteile und zubeh r Ersatzteilbild Pumpenaggregat d...
Page 48: ...48 Finish 270 250 GB Repairs at the unit 10 9 Connection diagram...
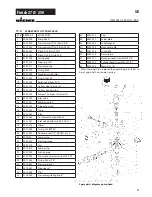
Page 53: ...53 Finish 270 250 GB Spare parts diagram pump aggregate Spare parts and accessories...
Page 77: ...77 Finish 270 250 10 9 Sch ma lectrique F R parations sur l appareil...
Page 107: ...107 Finish 270 250 10 9 Elektrisch schema Reparaties aan het apparaat NL...
Page 112: ...112 Finish 270 250 Onderdelenafbeelding pompaggregaat NL Accessoires en onderdelen...
Page 118: ...118 Finish 270 250 NL CE Verklaring van overeenstemming...
Page 119: ...119 Finish 270 250 NL CE Verklaring van overeenstemming...

