background image

6


EN

IMPORTANT SAFETY INFORMATION 

FCC CAUTION

The manufacturer is not responsible for radio interference 

caused by unauthorized modifications to this equipment. Such 

modifications could void the user’s authority to operate the 

equipment.
This device complies with Part 15 of the FCC Rules. Operation is 

subject to the following two conditions:
 1)  This device may not cause harmful interference, and
 2) This device must accept any interference received, 

including interference that may cause undesired operation.

NOTE! This equipment has been tested and found to comply 

with the limits for a Class B digital devices, pursuant to Part 

15 of the FCC rules. These limits are designed to provide 

reasonable protection against harmful interference in a 

residential installation. This equipment generates uses and 

can radiate radio frequency energy and, if not installed and 

used in accordance with the instructions, may cause harmful 

interference to radio communications. However, there is 

no guarantee that interference will not occur in a particular 

installation. If this equipment does cause harmful interference 

to radio or television reception, which can be determined by 

turning the equipment off and on, the user is encouraged to 

try to correct the interference by one or more of the following 

measures:

 •

Reorient or relocate the receiving antenna.

 •

Increase the separation between the equipment and 

receiver.

 •

Connect the equipment into an outlet on a circuit different 

from that to which the receiver is connected.

 •

Consult the dealer or an experienced radio/TV technician 

for help. Consult the dealer or an experienced radio/TV 

technician for help.

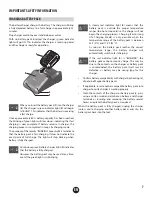
ELECTRONIC CELL PROTECTION (ECP)

The lithium ion battery is protected against deep discharging 

by the “Electronic Cell Protection (ECP)”. When the  battery  is 

empty, the tool is switched off by means of a protective circuit.
The battery is supplied partially charged. Completely charge the 

battery before using your cordless power tool for the first time. 

The lithium ion battery can be charged at any time, without 

reducing its service life. Interrupting the charging procedure 

does not damage the battery.

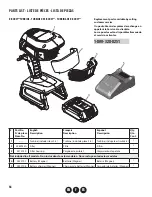
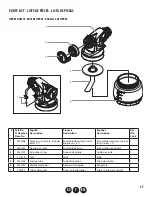
BATTERY / CHARGER LIST

For this product, use only the Wagner model batteries and 

charger listed below:  

Brand

Model

Part 

Number

Battery: Wagner

BAT612 or 2445315 2445942

Charger: Wagner

GAL18V-40

2422706

Use of any other battery packs may create risk 

of injury or fire.

i

Use of chargers or battery packs not sold by 

Wagner will void the warranty.

Summary of Contents for FLEXIO 3550

Page 1: ...AL MANUEL DE L UTILISATEUR MANUAL DE USARIO READTHIS MANUAL FOR COMPLETE INSTRUCTIONS LIRE CE MANUEL POUR OBTENIR DES DIRECTIVES COMPL TES LEA ESTE MANUAL PARA OBTENER LAS INSTRUCCIONES COMPLETAS www...

Page 2: ...ty information will follow Attention This symbol indicates a potential hazard to you or to the equipment Important information that tells how to prevent damage to the equipment or how to avoid causes...

Page 3: ...xtinguisher equipment shall be present and working HAZARD ELECTRIC SHOCK This product can cause injury due to electric shock PREVENTION Never submerge electrical parts Never expose the equipment to ra...

Page 4: ...pack or charger Contact customer service immediately 9 Make sure cord is located so that it will not be stepped on tripped over or otherwise subjected to damage or stress Damaged plug and cord may re...

Page 5: ...50 100 150 AWG Size of Cord 18 16 16 14 d An extension cord is a temporary solution Move the charger to a standard receptacle as soon as the job has been completed IMPORTANT CHARGING NOTES 1 The charg...

Page 6: ...ich can be determined by turning the equipment off and on the user is encouraged to try to correct the interference by one or more of the following measures Reorient or relocate the receiving antenna...

Page 7: ...e battery pack may be used at any time even if the green light is still blinking A steady red indicator light 3 means that the battery pack is outside the proper temperature ranges too hot or too cold...

Page 8: ...thinned latex RECHARGEABLE BATTERY The turbine is powered by the rechargeablebattery Afullycharged battery will provide approximately 7 minutes of continuous spraying at the highest Air Power Setting...

Page 9: ...ol determines the amount of spray material that is sprayed from the spray nozzle iSpray Nozzle The material flow can be adjusted incrementally from 1 minimum to 12 maximum by turning the adjustable ma...

Page 10: ...en by the coating manufacturer Most paints do not require thinning but some paints with heavy pigments and solid bases may require thinning to spray as desired If thinning is necessary use water or pa...

Page 11: ...ed as far as it will go to ensure a tight fit Attention Never tip the sprayer at more than a 45 angle Material could get into the turbine and damage the sprayer 4 Make sure the battery is fully charge...

Page 12: ...ey knob on the trigger of the spray gun For thicker materials it is recommended that you start with the highest material flow setting and then gradually decrease the flow to suit your particular spray...

Page 13: ...the black retaining ring is not loosened i The air cap can be set diagonally on the Detail Finish nozzle only To achieve a round pattern with the iSpray nozzle see the Adjust Spray Width section The s...

Page 14: ...eing triggered If you pause or linger in one spot too long too much material will be sprayed to the surface Position the spray gun perpendicular to and six 6 to eight 8 inches from the spray surface d...

Page 15: ...terial is going on too thin increase the material flow If you feel the material is going on too thick decrease the material flow even further or move the spray gun further away from the surface Beside...

Page 16: ...solution into the cup Water 1 2 full Mineral spirits 1 4 full 4 Attach the cup to the nozzle and replace the battery 5 Spray the cleaning solution into a safe area While spraying gently shake the spra...

Page 17: ...ing brush and the appropriate cleaning solution Reassemble all parts when clean 4 Both nozzles Clean the air vent c on the suction tube with a soft bristled cleaning brush or toothpick 5 Both nozzles...

Page 18: ...steps below 1 Pull the air tube a at the top from the nozzle Screw off the valve cover b Remove the valve seal c Clean all the parts carefully Make sure to remove any material from valve seal housing...

Page 19: ...etting 3 Adjust material flow or increase movement of spray gun 4 Thin see page 10 Problem D Spray jet pulsates 1 Material in container running out 2 Air filter clogged 3 Air valve tube disconnected 4...

Page 20: ...Alojamiento de pistola 1 Not included in all models Non inclus dans tous les mod les No se incluye en todos los modelos 4 2422707 Battery Wagner Batterie Wagner Bater a Wagner 1 5 2422706 Battery cha...

Page 21: ...1 7 Ensamblaje de pistola incluye los articulos 1 7 1 2 2382751 Nozzle assembly Ensemble de buse Ensamblaje de boquilla 1 3 2382753 Adjustment ring Anneau de tarage Anillo de ajuste 1 4 417474 Seal J...

Page 22: ...Sello de boquilla 1 3 414381 Nozzle Buse Boquilla 1 4 414384 Air cap Chapeau d air Tapa de aire 1 5 417319 Connecting nut crou d assemblage Tuerca de conexi n 1 6 529005 Tube Valve seal Tube Joint de...

Page 23: ...s de detalle y acabado m s fino 529257 Control Finish nozzle Buse de Control Finish Boquilla de Control Finish Medium coverage speed with semi smooth finish Finishing and painting small projects Vites...

Page 24: ...E AUTRE RAISON LA GARANTIE NE COUVRE PAS LES ACCESSOIRES CET ARTICLE A T CON U EXCLUSIVEMENT EN VUE D UN USAGE DOMESTIQUE LA GARANTIE NE SERA VALABLE QUE POUR 30 JOURS COMPTER DE LA DATE D ACHAT DE L...

Reviews: