background image

10


EN

PROPER SPRAYING TECHNIQUE 

STOP

The room you are spraying must be properly 

masked in order to prevent overspray from 

covering woodwork, floors or furnishings.  

Make sure you have properly masked the 

room per the instructions on the enclosed 

“Taping Guide”.

i

If spraying with an spray system is new or 

unfamiliar to you, it is advisable to practice 

on a piece of scrap wood or cardboard before 

beginning on your intended workpiece and/

or test with water.   
Watch videos on proper use and get tips 

and tricks at www.wagnerspraytech.com/

sprayer-tips-and-tricks-videos/

SPRAY POSTER

A spray poster is included with your unit.  The spray poster can 

be adhered to a spraying surface and can be used for practice.  

Follow the guidelines on the poster. 

SURFACE PREPARATION

All objects to be sprayed should be thoroughly cleaned before 

spraying material on them.  Areas not to be sprayed may, in 

certain cases, need to be masked or covered.

SPRAY AREA PREPARATION

The spray area must be clean and free of dust in order to avoid 

blowing dust onto your freshly sprayed surface. 

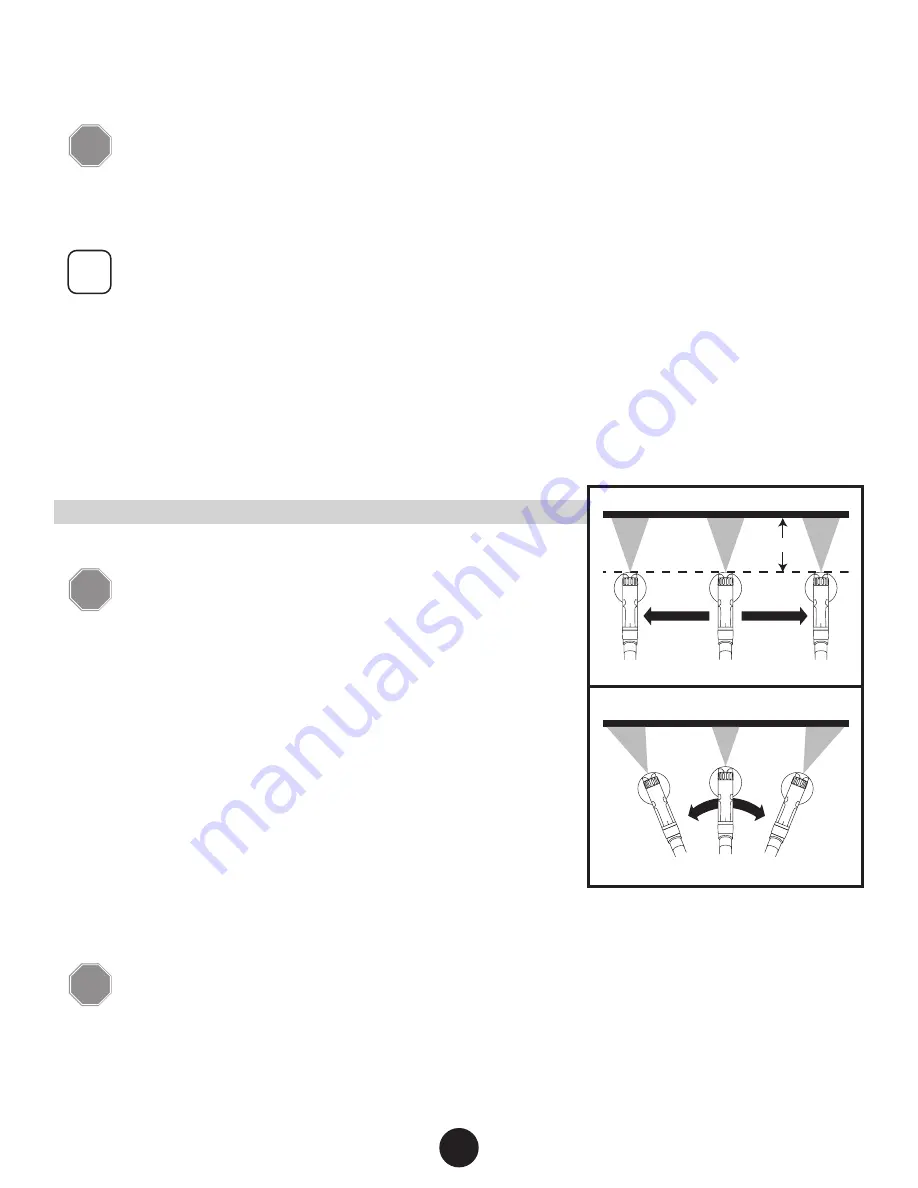
HOW TO SPRAY PROPERLY

STOP

It is important to keep your arm moving whenever the gun is 

being triggered.  If you pause or linger in one spot too long, 

too much material will be sprayed to the surface. 

 •

Position the spray gun perpendicular to and six (6) to eight (8) inches from the 

spray surface, depending upon the spray pattern size desired.  With reduced 

material flow and air power, you can get closer to the spraying surface.  

 •

Spray parallel to the surface with smooth passes at a consistent speed as 

illustrated below.  Doing this will help avoid irregularities in the finish (i. e. 

runs and sags).

 •

Always apply a thin coat of material first then allow to dry before applying a 

second, slightly heavier coat.  

 •

When spraying larger surfaces, overlap each spray pass by at least 50%  This 

will ensure full coverage.

 •

When spraying, always trigger the spray gun after spray pass has begun 

and release trigger before stopping the pass.  Always keep the gun pointed 

squarely at the spray surface and overlap passes slightly to obtain the most 

consistent and professional finish possible.

STOP

During a project, periodically wipe the nozzle tip with a cloth to remove any dried paint.  
When you quit spraying for any length of time, turn the turbine OFF and place the spray gun into the spray 

gun holder on the turbine.

6 - 8 inches

Correct

Even coat throughout

Keep stroke smooth and at an even speed

Incorrect

Do not flex wrist while spraying.

Light coat

Heavy coat

Light coat

Summary of Contents for FLEXIO 5000

Page 1: ...MANUEL DE L UTILISATEUR MANUAL DE USARIO READTHIS MANUAL FOR COMPLETE INSTRUCTIONS LIRE CE MANUEL POUR OBTENIR DES DIRECTIVES COMPL TES LEA ESTE MANUAL PARA OBTENER LAS INSTRUCCIONES COMPLETAS www wa...

Page 2: ...cal codes and ordinances WARNING Improper installation of the grounding plug can result in a risk of electric shock If repair or replacement of the cord or plug is necessary do not connect the green g...

Page 3: ...sent and working HAZARD ELECTRIC SHOCK This product can cause injury due to electric shock PREVENTION Do not submerge air hose into any liquids Power cord must be connected to a grounded circuit Never...

Page 4: ...our feedback so please visit our website and write a review on the FLEXiO handheld sprayer so we can continue to learn and improve our products Just click on www wagnerflexio com iSPRAY NOZZLE Designe...

Page 5: ...hose retainer 3 Unwrap the power cord Slide the power cord into the provided recess Attention Do not close the Power Box cover if the power cord is not positioned correctly The power cord could be dam...

Page 6: ...ieve a finer finish Make sure you adjust the X Boost and Material flow settings for your specific material needs If thinning is necessary use water for water based materials mineral spirits for oil ba...

Page 7: ...to ensure a tight fit 3 Carefully screw the cup back onto the nozzle assembly Tighten firmly 4 Align the nozzle and the handle approximately as shown 5 Insert and twist the nozzle into the handle tow...

Page 8: ...ial flow setting and then gradually decrease the flow to suit your particular spraying needs For thinner materials it is recommended that you start with a low material flow setting and then gradually...

Page 9: ...e iSpray nozzle determines the width of the spray pattern TIPS 1 Start with a narrow fan pattern for painting trim work 1 5 width and larger surfaces like doors and walls 5 width 2 Adjust Material Air...

Page 10: ...gered If you pause or linger in one spot too long too much material will be sprayed to the surface Position the spray gun perpendicular to and six 6 to eight 8 inches from the spray surface depending...

Page 11: ...feel the material is going on too thin increase the material flow If you feel the material is going on too thick decrease the material flow even further or move the spray gun further away from the sur...

Page 12: ...r 3 Pour a small amount of the appropriate cleaning solution into the cup Water 1 2 full Mineral spirits 1 4 full 4 Attach the cup to the nozzle and plug in the sprayer 5 Spray the cleaning solution i...

Page 13: ...ll parts with a cleaning brush and the appropriate cleaning solution Reassemble all parts when clean 4 Both nozzles Clean the air vent c on the suction tube with a soft bristled cleaning brush or toot...

Page 14: ...the air tube a at the top from the nozzle Screw off the valve cover b Remove the valve seal c Clean all the parts carefully Make sure to remove any material from valve seal housing area d Make sure t...

Page 15: ...2 Increase air power setting 3 Adjust material flow or increase movement of spray gun 4 Clean 5 Change 6 Tighten container 7 Thin Problem D Spray jet pulsates 1 Material in container running out 2 Ai...

Page 16: ...de pi ce 2 Caja de alimentaci n X Boost incluye le articulo 2 1 2 420330 Filter Filtre Filtro 1 3 2341906A Handle air hose assembly Ensemble de poign e tuyau d air Ensamblaje del asa manguera de aire...

Page 17: ...e pistola incluye los articulos 1 7 1 2 2382751 Nozzle assembly Ensemble de buse Ensamblaje de boquilla 1 3 2382753 Air cap Chapeau d air Tapa de aire 1 4 417474 Container seal Joint d tanch it de r s...

Page 18: ...e seal Joint d tanch it de buse Sello de boquilla 1 3 0414381 Nozzle Buse Boquilla 1 4 0414384 Air cap Chapeau d air Tapa de aire 1 5 0417319 Connecting nut crou d assemblage Tuerca de conexi n 1 6 05...

Page 19: ...OUTE AUTRE RAISON LA GARANTIE NE COUVRE PAS LES ACCESSOIRES CET ARTICLE A T CON U EXCLUSIVEMENT EN VUE D UN USAGE DOMESTIQUE LA GARANTIE NE SERA VALABLE QUE POUR 30 JOURS COMPTER DE LA DATE D ACHAT DE...

Page 20: ...FLEXIO 5000 www wagnerspraytech com...

Reviews: