background image

EN

11

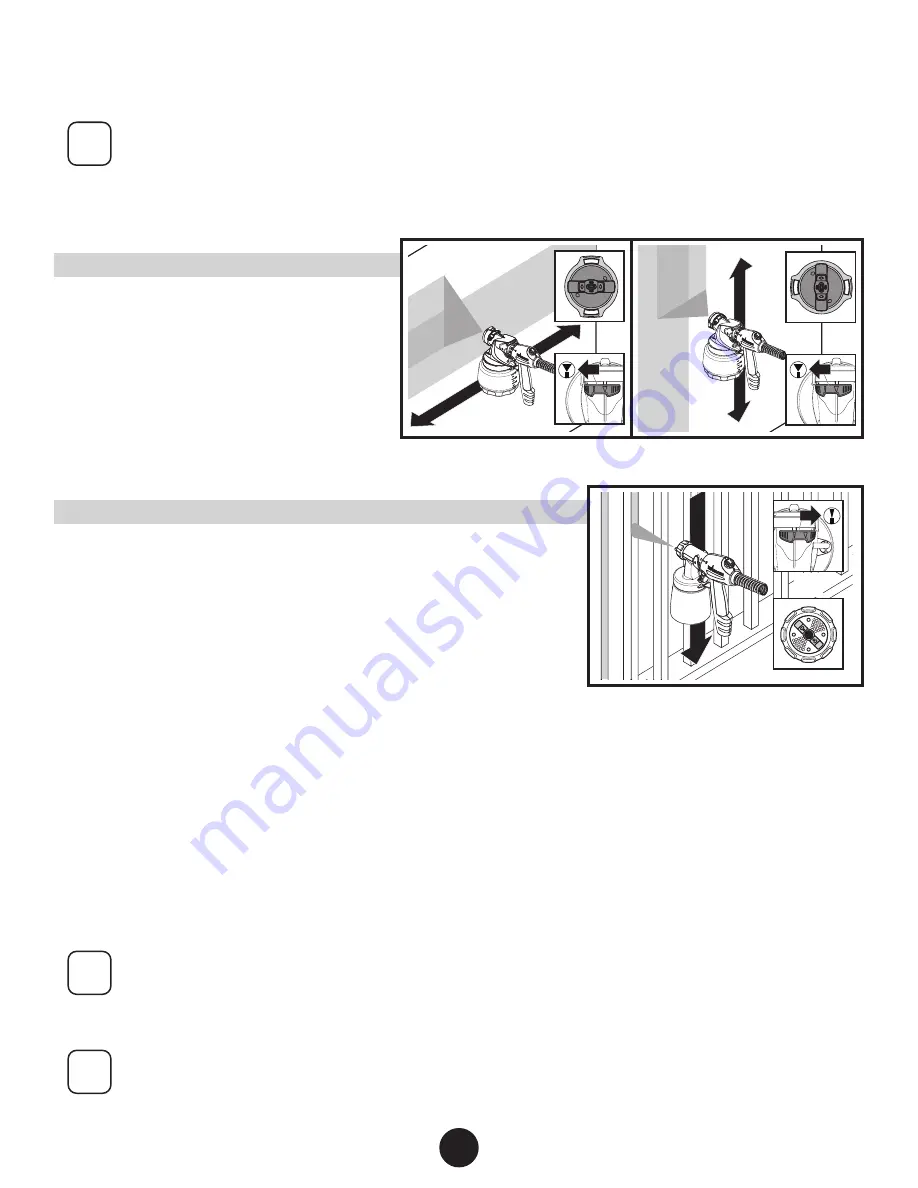
PROPER SPRAYING TECHNIQUE 

i

Use the images and guidelines below in order to assist you in achieving the desired spray pattern for your 

project.  These are meant to be general starting points - you may have to slightly modify certain controls on 

the system in order to get the exact performance you need. 

LARGE SURFACE PROJECTS

Generally, high material flow and air power are 

needed for spraying large surface areas, such as walls 

and decks.  
The iSpray nozzle is ideal for these applications and 

is designed for broad coverage in either horizontal 

or vertical spraying. 

 •

The air cap position will determine the 

movement direction of the spray gun.   

SMALL SURFACE PROJECTS

Generally, low material flow and air power are needed for spraying smaller 

surface areas, such as corners, lattice, or spindles. 
For this type of project, reduce power, material flow and switch to a narrow 

width when using the iSpray nozzle, or use the Detail Finish nozzle. 

NOTES:

 •

If you feel the material is going on too thin, increase the material flow.

 •

If you feel the material is going on too thick, decrease the material flow even further or move the spray gun further away from 

the surface.

Besides adjusting the controls, other factors that should be considered when spraying:

 •

Distance from the spray object - if you are too far from the spraying surface, the material will go on too thin, and vice versa.

 •

Material thickness* - if the spray pattern is too splotchy, the material may need to be thinned.  

 •

Spray gun movement - moving the gun too quickly will cause the spray pattern to be too thin and excess overspray.  Moving 

the gun too slowly will cause the spray pattern to be too coarse or thick. 

i

*Thinning the material may be necessary to improve spray performance but only after attempting to achieve 

optimal spray performance by adjusting the various controls. 
If the material needs to be thinned, dilute the material in steps of 5% - 10% until the desired spray pattern 

is achieved.

i

If after following the guidelines on these two pages you are still not getting the spray performance you 

need, refer to the ‘Troubleshooting’ section on page 15.

=

OR

Summary of Contents for FLEXIO 5000

Page 1: ...MANUEL DE L UTILISATEUR MANUAL DE USARIO READTHIS MANUAL FOR COMPLETE INSTRUCTIONS LIRE CE MANUEL POUR OBTENIR DES DIRECTIVES COMPL TES LEA ESTE MANUAL PARA OBTENER LAS INSTRUCCIONES COMPLETAS www wa...

Page 2: ...cal codes and ordinances WARNING Improper installation of the grounding plug can result in a risk of electric shock If repair or replacement of the cord or plug is necessary do not connect the green g...

Page 3: ...sent and working HAZARD ELECTRIC SHOCK This product can cause injury due to electric shock PREVENTION Do not submerge air hose into any liquids Power cord must be connected to a grounded circuit Never...

Page 4: ...our feedback so please visit our website and write a review on the FLEXiO handheld sprayer so we can continue to learn and improve our products Just click on www wagnerflexio com iSPRAY NOZZLE Designe...

Page 5: ...hose retainer 3 Unwrap the power cord Slide the power cord into the provided recess Attention Do not close the Power Box cover if the power cord is not positioned correctly The power cord could be dam...

Page 6: ...ieve a finer finish Make sure you adjust the X Boost and Material flow settings for your specific material needs If thinning is necessary use water for water based materials mineral spirits for oil ba...

Page 7: ...to ensure a tight fit 3 Carefully screw the cup back onto the nozzle assembly Tighten firmly 4 Align the nozzle and the handle approximately as shown 5 Insert and twist the nozzle into the handle tow...

Page 8: ...ial flow setting and then gradually decrease the flow to suit your particular spraying needs For thinner materials it is recommended that you start with a low material flow setting and then gradually...

Page 9: ...e iSpray nozzle determines the width of the spray pattern TIPS 1 Start with a narrow fan pattern for painting trim work 1 5 width and larger surfaces like doors and walls 5 width 2 Adjust Material Air...

Page 10: ...gered If you pause or linger in one spot too long too much material will be sprayed to the surface Position the spray gun perpendicular to and six 6 to eight 8 inches from the spray surface depending...

Page 11: ...feel the material is going on too thin increase the material flow If you feel the material is going on too thick decrease the material flow even further or move the spray gun further away from the sur...

Page 12: ...r 3 Pour a small amount of the appropriate cleaning solution into the cup Water 1 2 full Mineral spirits 1 4 full 4 Attach the cup to the nozzle and plug in the sprayer 5 Spray the cleaning solution i...

Page 13: ...ll parts with a cleaning brush and the appropriate cleaning solution Reassemble all parts when clean 4 Both nozzles Clean the air vent c on the suction tube with a soft bristled cleaning brush or toot...

Page 14: ...the air tube a at the top from the nozzle Screw off the valve cover b Remove the valve seal c Clean all the parts carefully Make sure to remove any material from valve seal housing area d Make sure t...

Page 15: ...2 Increase air power setting 3 Adjust material flow or increase movement of spray gun 4 Clean 5 Change 6 Tighten container 7 Thin Problem D Spray jet pulsates 1 Material in container running out 2 Ai...

Page 16: ...de pi ce 2 Caja de alimentaci n X Boost incluye le articulo 2 1 2 420330 Filter Filtre Filtro 1 3 2341906A Handle air hose assembly Ensemble de poign e tuyau d air Ensamblaje del asa manguera de aire...

Page 17: ...e pistola incluye los articulos 1 7 1 2 2382751 Nozzle assembly Ensemble de buse Ensamblaje de boquilla 1 3 2382753 Air cap Chapeau d air Tapa de aire 1 4 417474 Container seal Joint d tanch it de r s...

Page 18: ...e seal Joint d tanch it de buse Sello de boquilla 1 3 0414381 Nozzle Buse Boquilla 1 4 0414384 Air cap Chapeau d air Tapa de aire 1 5 0417319 Connecting nut crou d assemblage Tuerca de conexi n 1 6 05...

Page 19: ...OUTE AUTRE RAISON LA GARANTIE NE COUVRE PAS LES ACCESSOIRES CET ARTICLE A T CON U EXCLUSIVEMENT EN VUE D UN USAGE DOMESTIQUE LA GARANTIE NE SERA VALABLE QUE POUR 30 JOURS COMPTER DE LA DATE D ACHAT DE...

Page 20: ...FLEXIO 5000 www wagnerspraytech com...

Reviews: