background image

Español

Français

English

50


© Wagner Spray Tech - All Rights Reserved

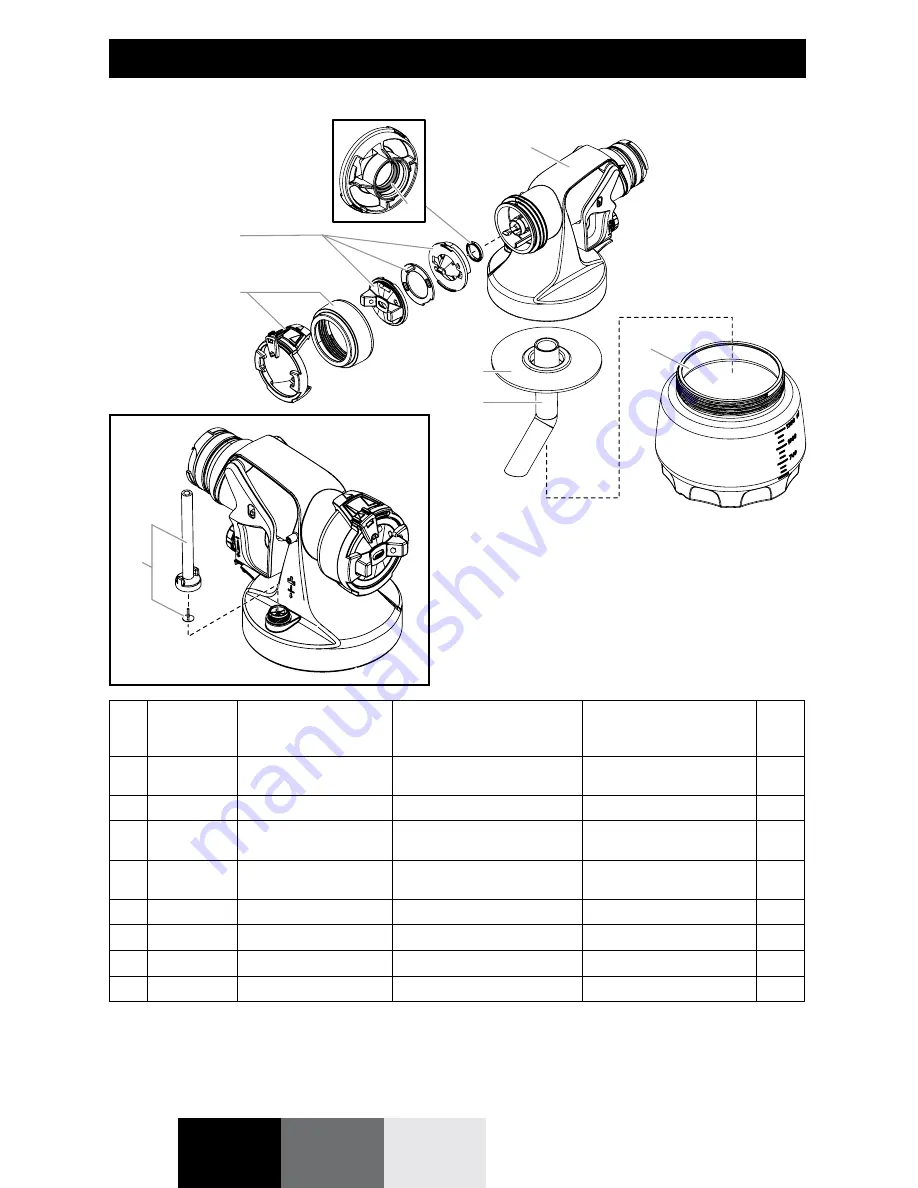
Parts List • Liste de pièces • Lista de piezas

iSpray Nozzle • Buse de iSpray • Boquilla de iSpray

Replacement parts available by calling 

customer service 
On peut obtenir des pièces de rechange 

en appelant le Service à la clientèle. 
Los repuestos están disponibles 

llamanado al servicio a clientes.

1-800-328-8251

1

8

2

6

3

4

7

5

#

Part no.

nº de piéce

Pieza no.

English

Description

Français

Description

Español

Descripción

Qty.

Qte.

Cant.

1

0529014

Spray gun assembly 

(includes items 1-8) 

Ensemble de pistolet (inclut 

des pièces 1 à 8)

Ensamblaje de pistola 

(incluye los articulos 1-8)

1

2

--------

Nozzle seal

Joint d’étanchéité de buse 

Sello de boquilla 

1

3

0529262

FLEXiO air cap kit  

(includes item 2)

Trousse de chapeau d’air de 

FLEXiO (inclut de pièce 2)

Juego de tapa de aire de 

FLEXiO (incluye la articulo 2)

1

4

0529225

Spray jet kit

Trousse de buse de 

pulvérisation

Kit de chorro de 

pulverización

1

5

0529005

Tube / Valve seal

Tube / Joint de clapet

Tube / Junta de la válvula

1

6

0417474

Seal

Joint

Sello

1

7

0417473

Suction tube

Tube d’aspiration

Tubo de succión

1

8

2303366

Material container

Réservoir de liquide

Recipiente

1

Summary of Contents for flexio 690

Page 1: ...ety Information 4 Controls and Functions 5 Material Preparation 6 7 Assembly 8 Air and Material Controls 9 Spray Pattern Adjustment 10 Proper Spraying Technique 12 Cleanup 14 Reassembly 15 Maintenance...

Page 2: ...ircuit and has a grounding plug that looks like the plug illustrated below Make sure that the product is connected to an outlet having the same configuration as the plug No adapter should be used with...

Page 3: ...ts 3 Never expose the equipment to rain Store indoors 4 Keep electrical cord plug and spray gun trigger free from paint and other liquids Never hold the cord at plug connections to support the cord Fa...

Page 4: ...ontainer Filter housing both sides Spray gun holder ON OFF switch The ON OFF switch turns power to the turbine on and off The ON OFF switch is located on top of the carrying handle of the turbine X Bo...

Page 5: ...the nozzle 3 After the material has been properly thinned and strained fill the container to desired level Thinning the material For certain spraying situations or desired finishes thinning the mater...

Page 6: ...inish that is between a roller and fine finish sprayer Note These two spray nozzles have different spray pattern width controls Make sure to familiarize yourself with the controls on each spray nozzle...

Page 7: ...e spray gun into the handle toward the lock symbol on the spray gun handle The tab below the trigger will lock the two pieces into place 6 Insert the air hose tightly into the connection on the spray...

Page 8: ...ial flow adjustment controls the amount of spray material that is sprayed from the spray gun For thicker materials it is recommended that you start with the highest material flow setting and then grad...

Page 9: ...and edges IMPORTANT When changing the spray pattern make sure the black retaining ring is not loosened Note The air cap can be set diagonally on the Detail Finish nozzle only To achieve a round patte...

Page 10: ...me if the turbine is not running This will result in spray material leaking from the nozzle Spray parallel to the surface with smooth passes at a consistent speed as illustrated below Doing this will...

Page 11: ...he Detail Finish Nozzle provides an even narrower pattern for smaller surface projects and fine finishing Moving closer to the spray surface narrows the fan and moving farther away widens it If you fe...

Page 12: ...rigger so that the material inside the spray nozzle drains back into the container 2 Unscrew the container and remove Empty any remaining material back into the material container 3 Pour a small amoun...

Page 13: ...nd the appropriate cleaning solution Reassemble all parts when clean 4 Clean the air vent c on the suction tube with a soft bristled cleaning brush 5 Push the tab below the trigger twist and separate...

Page 14: ...h 2 on the nozzle 1 and secure with the connecting nut 3 Note This step is easier if the nozzle is facing up 3 Snap the adjustment ring 4 into the connecting nut 3 enabling the adjustment lever f on t...

Page 15: ...t has entered the air tube proceed as follows 1 Pull the air tube a at the top from the nozzle Screw off the valve cover b Remove the valve seal c Clean all the parts carefully Make sure to remove any...

Page 16: ...onnect both ends of the air tube replace valve seal 8 Clean see Cleaning the Air Valve Tube page 15 9 Change 10 Thin 11 Replace the nozzle Problem B Material leaking 1 Nozzle loose 2 Nozzle worn 3 Noz...

Page 17: ...ine includes item 2 Turbine inclut de pi ce 2 Turbina incluye le articulo 2 1 2 2307279 Filter Filtre Filtro 2 3 0414219 Air hose Tuyau d air Manguera de aire 1 4 2303300 Turbine handle Poign e de pis...

Page 18: ...Qte Cant 1 0529014 Spray gun assembly includes items 1 8 Ensemble de pistolet inclut des pi ces 1 8 Ensamblaje de pistola incluye los articulos 1 8 1 2 Nozzle seal Joint d tanch it de buse Sello de bo...

Page 19: ...nclut des pi ces 1 9 Ensamblaje de boquilla de Detail Finish incluye los articulos 1 9 1 2 0414353 Nozzle seal Joint d tanch it de buse Sello de boquilla 1 3 0414381 Nozzle Buse Boquilla 1 4 0414384 A...

Page 20: ...NE COUVRE PAS LES ACCESSOIRES CET ARTICLE A T CON U EXCLUSIVEMENT EN VUE D UN USAGE DOMESTIQUE LA GARANTIE NE SERA VALABLE QUE POUR 30 JOURS COMPTER DE LA DATE D ACHAT DE L ARTICLE EST UTILIS DES FIN...

Reviews: