47
NESPRAY PLUS
4.
STARTUP
4.1
UNIT WITH SUCTION SYSTEM
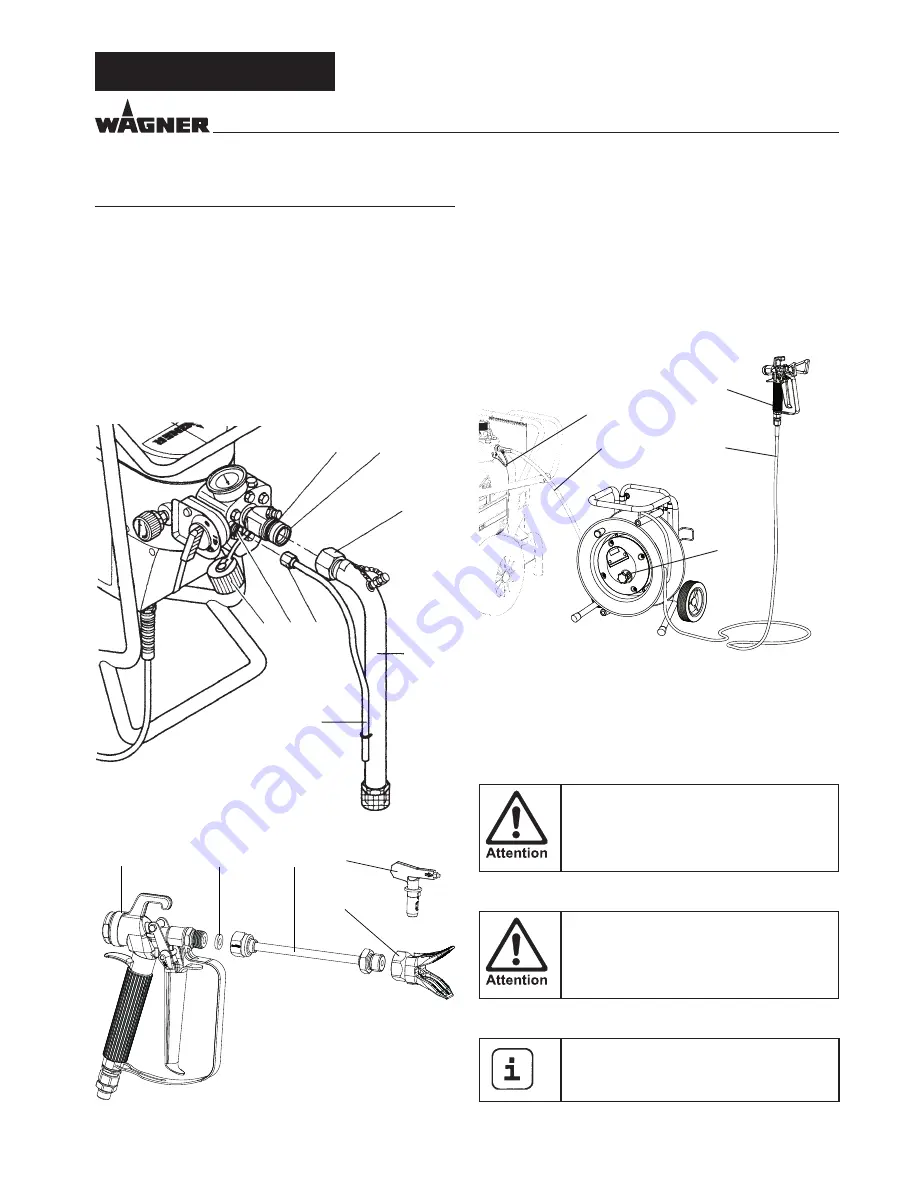
1. Unscrew the dust protective cap (Item 1).
2. Ensure that the sealing surfaces of the connections are
clean.
Ensure that the red inlet (2) is inserted in the coating ma-
terial inlet (5).
3. Use the enclosed 41 mm wrench to screw the union nut
(3) at the suction hose (4) onto the coating material inlet
(5) and tighten it.
4. Screw the union nut (6) at the return hose (7) to the con-
nection (8).
4.2
SPRAY GUN
4.3
HEATING HOSE DRUM
1. Equip the spray gun (1) with the tip extension (2) and tip
carrier (3).
2. When mounting the tip extension insert the plastic flat
packing (4) (enclosed in the spray gun packaging) be-
tween the gun and the tip extension and tighten it.
3. Screw the tip carrier with the selected tip (5) onto the tip
extension, align it and tighten it (also refer to the spray
gun/tip carrier instructions).
5
2
3
4
7
6
8
1
STARTUP
1
4
2
5
3
1. Place hose drum close to the Airless-unit.
2. Release the lock-advice (2).
3. Release hose whip (1) from frame and pull it through the
hose guide with roller. Roll up the high-pressure hose.
Lock the lock-advice (2) again after rolling the hose up.
4. Release connecting hose and connect it to the hose
adapter of the airless-unit (enclosed 19 mm wrench).
Counter with a wrench, if you unscrew the
high-pressure hose from the hose connector.
5. Mount spray gun (4) to the hose whip (tighten the union
nut with the enclosed 19 / 19 mm wrench).
For safety reasons never use the heating-
hose without the steal-armoured hose whip,
if working with a spray gun.
6. Tighten all coupling nuts strongly, in order that no coating
material can leak.
The use of the protective cap (5) allows a
change of location without contaminating
the workplace.
1
2
3
4
5
GB
Summary of Contents for NESPRAY PLUS
Page 143: ...143 NESPRAY PLUS I...


