background image

21

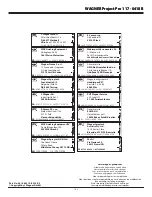
WAGNER Project Pro 117 - 0418B 

- Troubleshooting / Maintenance

Problem

A. The sprayer does not start.

B.  The sprayer starts but does not 

draw in paint when the PRIME/

SPRAY knob is set to PRIME.

C.  The sprayer draws up paint but 

the pressure drops when the 

gun is triggered.

D.  The PRIME/SPRAY valve is on 

SPRAY and there is flow through 

the return tube.

E.  The spray gun leaks.

F.  The tip assembly leaks.

G.  The spray gun will not spray.

H.  The paint pattern is tailing.

Cause

1.  The sprayer is not plugged in.

2.  The ON/OFF switch is set to OFF.

3.  The sprayer was turned off while still under 

pressure.

4.  No voltage is coming from the wall plug.

5.  The extension cord is damaged or has too low 

a capacity.

6.  A fuse is blown in the sprayer.

7.  There is a problem with the motor.

1.  The unit will not prime properly or has lost 

prime.

2.  The paint bucket is empty or the suction tube 

is not totally immersed in the paint.

3.  The suction set is clogged.

4.  The suction tube is loose at the inlet valve.

5.  The inlet valve is stuck.

6.  The inlet valve is worn or damaged.

7.  The PRIME/SPRAY valve is plugged.

1.  The spray tip is worn.

2.  The inlet filter is clogged.

3.  The gun filter is plugged.

4.  The paint is too heavy or coarse.

5.  The inlet valve assembly is damaged or worn.

1.  The PRIME/SPRAY valve is dirty or worn.

1.  Internal parts of the gun are worn or dirty.

1.  The tip was assembled incorrectly.

2.  A seal is dirty.

1.  The spray tip or the gun filter is plugged.

2.  The spray tip is in the reverse position.

1.  The pressure is set too low.

2.  The gun filter, the tip, or the suction filter is 

plugged.

3.  The suction tube is loose at the inlet valve.

4.  The tip is worn.

5.  The paint is too thick.

6.  Pressure loss.

Solution

1. Plug the sprayer in.

2. Turn the ON/OFF switch to ON.

3. Slide the PressureTrac™ to maximum pressure (+), or 

relieve pressure by turning the PRIME/SPRAY valve to 

PRIME.

4. Properly test the power supply voltage.

5. Replace the extension cord.

6. Contact your sales point/ dealer.

7. Contact your sales point/ dealer.

1. Try to prime the unit again.

2. Refill the bucket or immerse the suction tube in paint.

3. Clean the suction set.

4. Clean the tube connection and tighten it securely.

5. Clean the inlet valve.  Inlet may be stuck from old paint.

Operate Quickflo™ valve to release.

6. Install pump section refurbishing kit*.

7. Contact your sales point/ dealer.

1. Replace the spray tip with a new tip.*

2. Clean the inlet filter..

3. Clean or replace the proper filter.  Always keep extra 

filters on hand.

4. Thin or strain the paint.

5. Install pump section refurbishing kit*.

1. Contact your sales point/ dealer.

1. Contact your sales point/ dealer.

1. Check the tip assembly and assemble properly.

2. Clean the seal.

1. Clean the spray tip or gun filter.

2. Put the tip in the forward position.

1. Increase the pressure.

2. Clean..

3. Tighten the suction tube fitting.

4. Replace the spray tip.

5. Thin the paint.

6. Refer to Causes and Solutions for problem C.

*  Special repair kits with instructions are available for these procedures. Refer to the Accessories section of this manual for a list of the kits 

and their part numbers.

Daily Maintenance

The only daily maintenance necessary is thorough cleaning and lubricating after usage. Follow the cleaning and lubricating procedures in this 

manual.

Extended Maintenance

Some pump parts eventually wear out from use and must be replaced.  However, pump performance is the only reliable indicator of when to 

replace wear parts.  Refer to the Troubleshooting section for more information on when to use these kits.

Summary of Contents for ProjectPro 117 0418B

Page 1: ...nleitung Owner s Manual Manuel d utilisation Manuale dell utente Manual de usuario Gebruikshandleiding Ejermanual Anv ndarmanual Manual do Propriet rio D GB F 2 12 22 I ES NL 32 42 52 DK S P 62 72 82...

Page 2: ...WAGNER Project Pro 117 0418B WAGNER Project Pro 117 0418B D F E G H J B C A I 1 2 1 2 1 2 a 3 4 SPRAY PRIME 1 3 2 O 5 1 2 6...

Page 3: ...WAGNER Project Pro 117 0418B WAGNER Project Pro 117 0418B 1 a b 2 SPRAY PRIME 4 3 5 l 7 SPRAY PRIME 1 2 SPRAY PRIME 3 l 8 a b 9 10 25 30 cm A B C 25 35 cm 25 30 cm 25 30 cm D...

Page 4: ...WAGNER Project Pro 117 0418B WAGNER Project Pro 117 0418B A B 11 12 A 2 3 1 B 13 a c b 14 g a c b f d e 15...

Page 5: ...WAGNER Project Pro 117 0418B WAGNER Project Pro 117 0418B a b 16 a 18 1 2 17 19 3 2 4 1 20 7 8 5 9 11 6 3 4 1 2 10 21...

Page 6: ...2 Secure WAGNER spray gun using the safety catch on the trigger 3 Ensure that the unit is properly earthed The connection must take place through a correctly earthed two pole and earth socket outlet...

Page 7: ...us injuries b Wear personal safety equipment and always wear safety goggles Wearing personal protective equipment such as dust mask non slip safety shoes safety helm or ear protection depending on the...

Page 8: ...great force or leak a high pressure fluid stream causing severe injury Always secure the spray gun when mounting or dismounting the tip and in case of interruption to work U Recoil of spray gun Dange...

Page 9: ...anger Vapors containing solvents may not be allowed to build up in the area of the device Setting up the unit on the side a way from the sprayed object A minimum distance of 5 m between the unit and s...

Page 10: ...anger Always lock the trigger off when attaching the spray tip or when the spray gun is not in use 1 The gun is secured when the trigger lock is at a 90 angle perpendicular to the trigger in either di...

Page 11: ...trigger is pulled and released Overlap each stroke by about 30 This will ensure an even coating i When finished spraying perform Pressure Relief Procedure i If you expect to be away from your spray p...

Page 12: ...O Make sure the PRIME SPRAY knob is turned to PRIME Unplug the sprayer 2 Remove spray gun from the paint hose using adjustable wrenches 3 Unclip the trigger guard a from the filter housing b by pulli...

Page 13: ...Suction set assembly 1 Figure 20 Spray Gun Spray Hose Item Part Description Quantity 1 0418717 Gun assembly without nozzle 1 2 0418708 Tip L 1 3 0418713 Filter L XXL white 2 4 2351007 Spray hose 10m y...

Page 14: ...Align the piston 5 with the yoke 4 Be careful not to damage the piston 6 Apply a bearing grease to the holes in the yoke where the dowel 3 is inserted 7 Install the dowel pin 3 to connect the yoke to...

Page 15: ...is too thick 6 Pressure loss Solution 1 Plug the sprayer in 2 Turn the ON OFF switch to ON 3 Slide the PressureTrac to maximum pressure or relieve pressure by turning the PRIME SPRAY valve to PRIME 4...

Page 16: ...Indicazione per lo smaltimento Secondo la direttiva europea 2002 96 CE per lo smaltimento di vecchi apparecchi elettrici e la sua conversione nel diritto nazionale questo prodotto non va smaltito att...

Page 17: ...A14 2010 EN ISO 12100 2010 EN 1953 1998 A1 2009 EN 55014 1 2006 A1 2009 EN 55014 2 1997 A1 2001 A2 2008 EN 61000 3 2 2006 A1 2009 A2 2009 EN 61000 3 3 2008 NL Verklaring van overeenstemming Hiermede...

Page 18: ...e Declaramos com a presente que a vers o fornecida de WAGNER Project Pro 117 0418B Est em conformidade com as seguintes normas 2006 42 EG 2004 108 EG 2002 95 EG 2002 96 EG Normas harmonizadas aplicada...

Page 19: ...27 41 605 Swietochlowice 48 32 2 45 06 19 48 32 2 41 42 51 CH J Wagner AG Industriestra e 22 9450 Altst tten 41 71 7 57 22 11 41 71 7 57 23 23 H Magyarorsz gi szerviz Hondimpex KFT Kossuth L u 48 50...

Reviews: