background image

10

W 125

GB

Fig. 4 A

 = vertical flat jet

for horizontal surfaces

Fig. 4 B

 = horizontal flat jet

for vertical surfaces

Fig. 4 C

 = circular jet

for corners, edges and hard-to-reach surfaces

8. Adjusting the Material Volume (Fig. 5)

Adjust the volume of material by turning the union nut from 1 - 8.

9. Spray Technique

• 

 The spray result depends heavily on the smoothness and cleanliness of the surface to be   
 sprayed. Therefore the surface should be carefully prepared and kept free of dust.

• 

 Cover all surfaces not to be sprayed.

• 

 It is advisable to test the spray gun on cardboard or a similar surface to find the correct  
 setting.

Important:  

Begin spraying outside of the target area and avoid interruptions inside the 
target area.

• 


Correct (Fig. 6a)

 Be sure to hold the spray gun at an even distance of approx. 5 - 15 cm   

 to the target object.

• 


Incorrect (Fig. 6b)

 Heavy spray fog build-up, uneven surface quality.

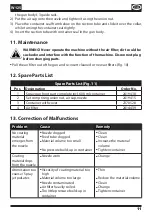
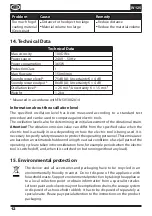
10. Taking Out of Operation and Cleaning

Proper cleaning is the prerequisite for problem-free operation of the paint application 
device. No warranty claims are accepted in case of improper or no cleaning. When 
processing 2-component varnishes, clean the device immediately.

WARNING! Never hold the spray gun rear part under water or immerse it 
into liquids. Clean the housing only with a moistened cloth.

1)   Turn off the machine and remove the plug. 
2)   Unscrew the container. Empty any remaining coating material back into the material 

tin.

3)   Pull out the suction tube with container seal.
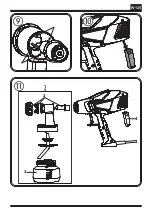
4)   Turn the union nut (Fig. 7, 1) beyond the lock at level 1 to remove it. Remove the air 

cap (2) and pull out the front section of the gun (3). Pull the nozzle (4) out of the front 
part of the spray gun. 

CAUTION!  

Never clean the spray gun with metal objects.

5)   Clean all parts carefully using a brush and water or solvent (depending on the material 

being processed). Take particular care to ensure that the ventilation hole (Fig. 8) is 
clear.

Assembly

1) 

1)  Insert the nozzle (Fig. 9) into the gun body so that the slots in the nozzle engage in 

Insert the nozzle (Fig. 9) into the gun body so that the slots in the nozzle engage in 

Summary of Contents for W 125

Page 1: ...wagner group com WOOD METAL SPRAYER W 125 OPERATING INSTRUCTIONS AUS...

Page 2: ...W 125 A B 7 6 4 5 3 1 2...

Page 3: ...W 125 d A B C 2 5 15 cm A B 2 1 4 3...

Page 4: ...W 125 i 1 2 4 3...

Page 5: ...y 13 Translation of the original operating instructions 1 Explanation of symbols used This symbol indicates a potential danger for you or for the device Under this symbol you can find important inform...

Page 6: ...d Do not misuse the mains lead by carrying the tool by the lead hanging it from the lead or by pulling on the lead to remove the plug Keep the lead away from heat oil sharp edges or moving tool parts...

Page 7: ...t overload the tool Use the power tool designed for the work that you are doing You work better and safer in the specified performance range if you use the suitable power tool b Do not use power tools...

Page 8: ...be cleaned with flammable solvents Caution against dangers that can arise from the sprayed substance and observe the text and information on the containers or the specifications given by the substance...

Page 9: ...t into the paint container 2 If the convey capacity is too low add 5 10 dilution step by step until the convey capacity fulfils your requirements 6 Start up Before connecting to the mains supply be su...

Page 10: ...leaningistheprerequisiteforproblem freeoperationofthepaintapplication device No warranty claims are accepted in case of improper or no cleaning When processing 2 component varnishes clean the device i...

Page 11: ...rts List Spare Parts List Fig 11 Pos Designation Order No 1 Spray gun front part complete incl 600 ml container 2419438 2 Set comprising union nut air cap nozzle 2419415 3 Container with cover 2370528...

Page 12: ...emission value can differ from the specified value when the electric tool is actually in use depending on how the electric tool is being used It is necessary to specify safety measures to protect the...

Page 13: ...orrect use or commissioning or fitting or repair work which is not stated in our operating instructions Wearing parts are also excluded from the guarantee The guarantee excludes commercial use We expr...

Page 14: ...WAGNER SPRAYTECH AUSTRALIA PTY LTD 14 16 Kevlar Close Braeside VIC 3195 T 61 9587 2000 F 61 9580 9120 J WAGNER AG Industriestra e 22 9450 Altst tten T 41 71 7 57 22 11 F 41 71 7 57 23 23 DVA A S Marie...

Reviews: