


11
W 125
GB
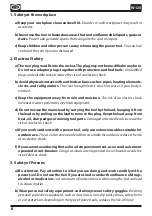
the gun body's 3 guide rails.
the gun body's 3 guide rails.
2) Put the air cap onto the nozzle and tighten it using the union nut.
3) Place the container seal from below on the suction tube and slide it over the collar,
while turning the container seal slightly.
4) Insert the suction tube with container seal in the gun body.
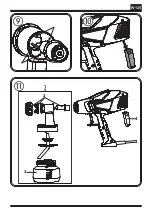
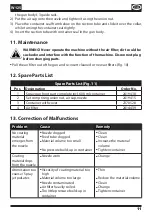
11. Maintenance
WARNING! Never operate the machine without the air filter; dirt could be
sucked in and interfere with the function of the machine. Disconnect plug
before changing parts.
•
Pull the air filter out of the gun and re-insert cleaned or new air filters (Fig. 10).
12. Spare Parts List
Spare Parts List (Fig. 11)
Pos.
Designation
Order No.
1
Spray gun front part complete incl. 600 ml container
2419438
2
Set comprising union nut, air cap, nozzle
2419415
3
Container with cover
2370528
4
Air filter
2414439
13. Correction of Malfunctions
Problem
Problem
Cause
Cause
Remedy
Remedy
No coating
material
emerges from
the nozzle
•
Nozzle clogged
•
Feed tube clogged
•
Material volume too small
•
No pressure build-up in container
•
Clean
•
Clean
•
Increase the material
volume
•
Tighten container
Coating
material drips
from the nozzle
•
Nozzle worn
•
Change
Atomisation too
coarse / Spray
jet pulsates
•
Viscosity of coating material too
high
•
Material volume too large
•
Nozzle contaminated
•
Air filter heavily soiled
•
Too little pressure build-up in
container
•
Thin
•
Reduce the material volume
•
Clean
•
Change
•
Tighten container


