


GB
19
WallPerfect W 665
Assemble the parts again (see “Assembly”).
14)
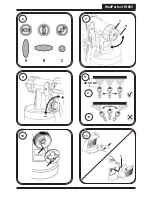
Assembly
The unit may only be operated with an integer diaphragm (Fig. 12 A, 16). Place the
diaphragm with the pin facing upwards on the bottom section of the valve. Also see
the marking on the gun body. Place on the valve cover and screw it closed. Place the
ventilating hose on the valve cover and on the nipple at the gun body.
Slide the nozzle seal (Item 4) with the groove (slot) facing forwards into the nozzle (Fig. 12 B).
Put the nozzle onto the gun body and find the correct position by turning it. Put the air
cap onto the nozzle and tighten it using the union nut.
Place the container seal from below on the suction tube and slide it over the collar, while
turning the container seal slightly. Insert the suction tube with container seal in the gun
body.
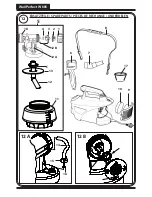
Maintenance
Change the air filter if it is soiled. Use a screwdriver to lever the cover fastening from the
unit (Fig. 11, arrow). The smooth side of the air filter (Fig. 11, 1) must be placed towards
the machine. Replace the cover on the unit until it latches.
WARNING! Never operate the machine without the air filter; dirt could be sucked in
and interfere with the function of the machine.
In order to mount the gun more easily apply lubricating grease (enclosed) liberally
to the Oring at the gun front part (Fig. 12, 18).
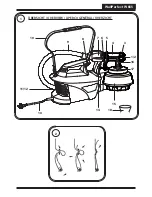
Spare Parts List (Fig. 12)
Pos.
Name
Order No.
1
Union nut
0417 471
2
Air cap
0417 470
3
Nozzle
0417 468
4
Nozzle seal
0417 465
5
WallPerfect spray attachment incl. 1800 ml. conainer
2301 734
6
Handle
2303 300
7
Air hose
2303 410
8
Carrying belt
0414 204
9
Cover
0414 302
10
Air filter
0414 700
11
Container with cover 1800 ml (only for WallPerfect
spray attachment)
2304 025
12
Suction tube
0417 473
13
Container seal
0417 474
14
Ventilating hose
15
Valve cover
2304 027
16
Diaphragm
17
Feed hopper (3x)
2304 028
Lubricating grease
9892 550


