30
10.5
Setting the baud rate
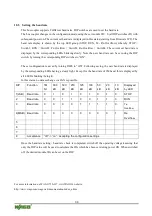
This bus coupler supports 9 different baud rates. DIP switches are used to set the baud rate.
The bus coupler changes to the configuration mode using the set module ID = 0 (all DIP switches off) with
subsequent power on. The current set baud rate is displayed in this status (starting from Firmware WT). The
baud rate display is shown by the top LED group (STOP, RUN, Tx-, Rx-Overflow), whereby STOP =
Switch1, RUN = Switch2, Tx-Overflow = Switch3, Rx-Overflow = Switch4. The current set baud rate is
displayed by the corresponding LEDs blinking slowly. Now the new baud rate can be set using the DIP
switch, by turning the corresponding DIP switches to “ON”.
The set configuration is saved by turning DIP8 to “ON”. Following saving, the new baud rate is displayed
by the corresponding LEDs having a steady light. Except for the baud rate of 1M baud, this is displayed by
all 4 LEDs blinking/ being lit.
In this status, no data exchange via CAN is possible.
DIP
Function
1M
bit
800
kB
500
kB
250
kB
125
kB
100
kB
50
kB
20
kB
10
kB
Displayed
by LED
1(LSB)
Baud rate
0
1
0
1
0
1
0
1
0
STOP
2
Baud rate
0
0
1
1
0
0
1
1
0
RUN
3
Baud rate
0
0
0
0
1
1
1
1
0
Tx-
Overflow
4(MSB) Baud rate
0
0
0
0
0
0
0
0
1
Rx-
Overflow
5
6
7
8
Acceptance
“off” -> “on” : Accepting the configuration settings
Once the baud rate setting / baud rate check is completed, switch off the operating voltage knowing that
only the DIP value will be used to calculate the IDs which has been set during power ON. When switched
off, the desired module ID can be set on the DIP.
For more information on WAGO 750-337, visit WAGO's website.
http://www.wago.com/wagoweb/documentation/index_e.htm
Summary of Contents for 750-337
Page 4: ......

