background image

30  Device Description 

Compact Power 

787-1211 DC power supply, 12 V

Manual 

Version 1.

1

.0 

P o s :   3 4 . 21  / S er ie   7 87   ( E PS I TR O N ) /G e rä te be s ch r eib u n g/ Te c hn is c he   D a te n /A n ga b en   z u   U m g eb u ng s be d in g un g en /U m g e bu n gs b e din g u ng e n  - Ü b e rs ch r ift  3  @  30 \m o d _1 5 06 4 0 89 6 13 4 7_ 2 1. d oc x  @ 4 6 2 24 3   @  3  @ 1  


3.6.6 

Environmental Conditions 

P o s :  

3 4 . 22   / S er ie   7 87   ( E PS I TR O N ) /G e rä te be s ch r eib u n g/ Te c hn is c he   D a te n /A n ga b en   z u   U m g eb u ng s be d in g un g en /U m g e bu n gs b e din g u ng e n  78 7 -1 2 11   @   3 2\ m od _ 15 3 7 26 5 54 9 31 7 _ 21 .d o cx   @   5 00 5 18   @     @   1  


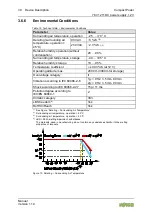
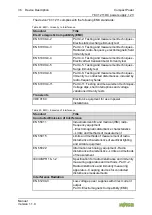
Table  19

: Technical  Data  ‒ Environmental  Conditions


Parameter 

Value 

Surrounding air temperature, operation 

25 … +70 °C

Derating (surrounding air 

temperature, operation > 

45 °C) 

90 VAC 

−3

 %/K 

1)2)

230 VAC 

−2.3

 %/K 

1)3)

Relative humidity, operation (without 

condensation) 

20 … 90 % 

Surrounding air temperature, storage 

40 … +85 °C

Relative humidity, storage 

10 … 95 % 

Temperature coefficient 

 ±0.03 %/K (at 12 V) 

Operating altitude, max. 

2000 m (3000 m for storage) 

Overvoltage category 

II 

Vibration according to IEC 60068-2-6 

1g: < 9 Hz:  3.5 mm, 90 min 

2g: < 9 Hz:  3.5 mm, 90 min 

Shock according to IEC 60068-2-27 

15g / 11 ms 

Pollution degree according to 

IEC/EN  60664-1 

Climatic category 

3K3 

LBS freedom 

4)


Yes 

RoHS II/Reach 

Yes 

1)

See Figure “Derating  – Surrounding  Air Temperature”

2)

Surrounding air temperature,  operation > 45 °C 

3)

Surrounding  air temperature,  operation > 50 °C


4)

LBS = Paint-w etting impairment  substances

The materials used in manufacturing do not contain any substances harmful to the w etting

properties of lacquers.

Figure  13: Derating – Surrounding  Air Temperature 

Summary of Contents for 787-1211

Page 1: ...d o c x 4 0 5 3 8 8 1 Manual Compact Power 787 1211 DC power supply 12 V Version 1 1 0 P o s 3 A l l e S e r i e n A l l g e m e i n e M o d u l e R e c h t l i c h e s A l l g e m e i n e s I m p r e...

Page 2: ...vable measure has been taken to ensure the accuracy and completeness of this documentation However as errors can never be fully excluded we always appreciate any information or suggestions for improvi...

Page 3: ...Devices 10 2 2 Safety Advice Precautions 11 2 2 1 Special Notes for Use in Accordance to EN 60335 1 13 2 2 2 Special Notes on Use as a DIN Rail Built in Installation Device 14 3 Device Description 15...

Page 4: ...Wiring 44 5 1 2 2 2 Removing the Female Connector with Wiring 45 5 1 2 3 Plugging in the Female Connector 46 6 Notes on Operation 47 6 1 Inrush Current 47 6 2 Parallel connection output side 48 6 3 Sh...

Page 5: ...P S I T R O N H i n w e i s e z u r D o k u m e n t a t i o n G l t i g k e i t s b e r e i c h G l t i g k e i t s b e r e i c h D o k u m e n t a t i o n S p a n n u n g s v e r s o r g u n g E P S...

Page 6: ...s t i g e H i n w e i s e V o r s i c h t V o r s i c h t _ Wa r n u n g v o r P e r s o n e n s c h d e n a l l g e m e i n _ E r l u t e r u n g 1 3 m o d _ 1 3 4 3 3 1 0 0 2 8 7 6 2 _ 2 1 d o c x 1...

Page 7: ...itional Information Refers to additional information which is not an integral part of this documentation e g the Internet P o s 1 1 6 D o k u m e n t a t i o n a l l g e m e i n G l i e d e r u n g s...

Page 8: ...6 0 0 5 _ 2 1 d o c x 1 8 4 8 1 4 2 1 1 5 Font Conventions P o s 1 1 1 0 A l l e S e r i e n A l l g e m e i n e M o d u l e R e c h t l i c h e s A l l g e m e i n e s S c h r i f t k o n v e n t i...

Page 9: ...utility patents Third party products are always mentioned without any reference to patent rights Thus the existence of such rights cannot be excluded P o s 1 4 4 S e r i e 7 8 7 E P S I T R O N Wi c...

Page 10: ...o d _ 1 4 0 0 5 6 6 0 9 4 3 5 0 _ 2 1 d o c x 1 5 4 2 6 8 3 1 2 1 4 Technical State of the Devices Devices are supplied from the factory with a dedicated hardware configuration All other changes to th...

Page 11: ...i c h e r h e i t s u n d s o n s t i g e H i n w e i s e G e f a h r G e f a h r U n f a l l v e r h t u n g s v o r s c h r i f t e n b e a c h t e n 6 m o d _ 1 2 6 0 1 8 0 6 5 7 0 0 0 _ 2 1 d o c...

Page 12: ...M a t e r i a l i e n 6 m o d _ 1 2 6 0 1 8 1 2 0 3 2 9 3 _ 2 1 d o c x 4 6 7 5 1 1 Clean only with permitted materials Clean housing and soiled contactswith propanol P o s 1 4 2 4 A l l e S e r i e...

Page 13: ...roduct may only be used as described in this note and in the complete instructions Use other than this may represent a risk to safe intended use and will nullify the warranty or guarantee WAGO Kontakt...

Page 14: ...stic installation P o s 1 4 3 5 S e r i e 7 8 7 E P S I T R O N Wi c h t i g e E r l u t e r u n g e n S i c h e r h e i t s u n d s o n s t i g e H i n w e i s e G e f a h r G e f a h r B e r h r u n...

Page 15: ...nd this is also supported by conformity with EN 60335 1 The power supply units can be fitted on a DIN rail Screw mounting using the fastening clips supplied with the device is also a possible alternat...

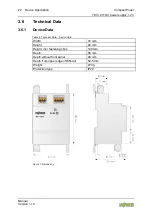
Page 16: ...i l d u n g A n s i c h t 7 8 7 1 2 x 1 3 2 m o d _ 1 5 3 3 2 7 4 3 2 6 4 3 9 _ 2 1 d o c x 4 9 2 7 5 5 1 Table 3 Legend for Figure View Pos Description Details see section a Screw mount clip Mounting...

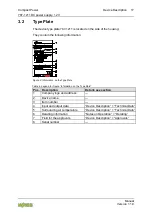
Page 17: ...information Figure 2 Information on the Type Plate Table 4 Legend for Figure Information on the Type Plate Pos Description Details see section 1 Company logo and address 2 Device name 3 Item number 4...

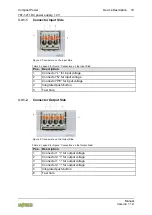
Page 18: ...e d e r l e i s t e n b i s z u m A n s c h l a g i n d i e S t i f t l e i s t e n s t e c k e n 1 8 m o d _ 1 3 9 2 9 0 2 8 8 9 0 2 1 _ 2 1 d o c x 1 4 5 9 4 4 1 Plug the female connectors all the w...

Page 19: ...Integrated push button 5 Test hole 3 3 1 2 Connector Output Side Figure 4 Connectors on the Output Side Table 6 Legend for Figure Connectors on the Output Side Pos Description 1 Connector 1 for outpu...

Page 20: ...u n g 3 0 m o d _ 1 5 0 2 7 1 3 2 9 4 2 8 9 _ 2 1 d o c x 4 5 8 3 3 9 1 The DC OK LED indicates the status of output voltage UOUT P o s 2 8 3 S e r i e 7 8 7 E P S I T R O N G e r t e b e s c h r e i...

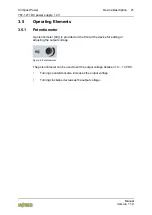
Page 21: ...6 9 _ 2 1 d o c x 5 0 0 4 2 3 3 1 3 5 1 Potentiometer A potentiometer Adj is provided on the front of the device for setting or adjusting the output voltage Figure 6 Potentiometer P o s 3 1 2 S e r i...

Page 22: ...5 9 _ 2 1 d o c x 4 6 2 1 8 9 3 1 3 6 1 Device Data P o s 3 4 2 S e r i e 7 8 7 E P S I T R O N G e r t e b e s c h r e i b u n g T e c h n i s c h e D a t e n A n g a b e n z u m G e r t G e r t e d...

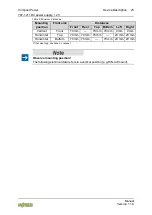
Page 23: ...P o s 3 4 4 S e r i e 7 8 7 E P S I T R O N Wi c h t i g e E r l u t e r u n g e n S i c h e r h e i t s u n d s o n s t i g e H i n w e i s e H i n w e i s H i n w e i s E i n b a u l a g e b e a c h...

Page 24: ...l load Table 12 Technical Data Inrush Current Parameters Value Inrush current 1 2 230 VAC 30 A 1 Cold start at room temperature of 25 C 2 After 1 ms at nominal load Table 13 Technical Data Mains Failu...

Page 25: ..._ 2 1 d o c x 5 0 0 4 3 6 1 Table 15 Technical Data Output Parameters Value Output voltage 12 VDC at 90 264 VAC SELV Voltage range output 10 14 VDC Factory default 12 VDC 1 Output current max 5 A at 1...

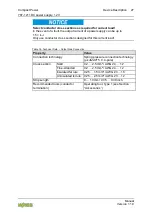
Page 26: ...P o s 3 4 1 2 S e r i e 7 8 7 E P S I T R O N Wi c h t i g e E r l u t e r u n g e n S i c h e r h e i t s u n d s o n s t i g e H i n w e i s e A c h t u n g A c h t u n g L e i t e r q u e r s c h...

Page 27: ...A u s g a n g 3 2 m o d _ 1 5 3 3 2 8 9 4 6 8 9 6 8 _ 2 1 d o c x 4 9 2 9 3 7 1 Table 16 Technical Data Output Side Connection Property Value Connection technology Spring pressure connection technolog...

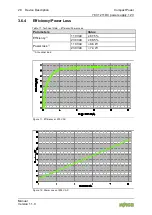
Page 28: ...e s c h r e i b u n g T e c h n i s c h e D a t e n E l e k t r i s c h e A n g a b e n E l e k t r i s c h e D a t e n 7 8 7 1 2 1 1 W i r k u n g s g r a d V e r l u s t l e i s t u n g 3 2 m o d _...

Page 29: ...o s 3 4 1 9 S e r i e 7 8 7 E P S I T R O N G e r t e b e s c h r e i b u n g T e c h n i s c h e D a t e n A n g a b e n z u m G e r t M T B F L e b e n s e r w a r t u n g 7 8 7 1 2 1 1 3 2 m o d _...

Page 30: ...eter Value Surrounding air temperature operation 25 70 C Derating surrounding air temperature operation 45 C 90 VAC 3 K 1 2 230 VAC 2 3 K 1 3 Relative humidity operation without condensation 20 90 Sur...

Page 31: ...orage For long term storage power must be applied to equipment with built in capacitors at least every two years for five minutes P o s 3 4 2 4 D o k u m e n t a t i o n a l l g e m e i n G l i e d e...

Page 32: ...ty Value Internal input fuse 1 T 3 15 A 250 V Transient suppression at input Varistor Overload protection at output 122 170 rated current per output Overvoltage protection at output max 2 16 20 VDC Fe...

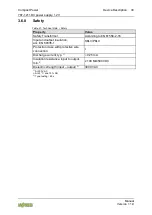
Page 33: ...u m G e r t S i c h e r h e i t 7 8 7 1 2 x 1 3 2 m o d _ 1 5 3 3 2 9 0 2 6 7 0 7 5 _ 2 1 d o c x 4 9 2 9 4 9 1 Table 21 Technical Data Safety Property Value Safety Transformer According to EN 61558...

Page 34: ...7 8 7 E P S I T R O N G e r t e b e s c h r e i b u n g Z u l a s s u n g e n Z u l a s s u n g e n p r o G e r t A l l g e m e i n E i n l e i t u n g 3 0 m o d _ 1 5 0 6 4 2 6 3 4 2 0 6 5 _ 2 1 d o...

Page 35: ...0 0 5 4 5 1 Table 22 Mechanical and Climatic Environmental Conditions Standard Test value Mechanical Environmental Conditions EN 60068 2 6 1g f 9 Hz 3 5 mm 90 min 2g f 9 Hz IEC 60068 2 27 Shock 15g 1...

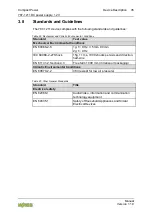
Page 36: ...lds EN 61000 4 11 Part 4 11 Testing and measurement techniques Voltage dips short interruptions and voltage variations immunity tests Transients VDE 0160 Electronic equipment for use in power installa...

Page 37: ...2 and accepted technical regulations This electrical equipment is intended for installation in electrical systems or machines and fulfills the requirements of the low voltage directive When installin...

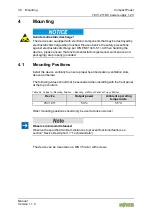
Page 38: ...ng values should not be exceeded when installing with the front panel at the top or bottom P o s 4 5 4 S e r i e 7 8 7 E P S I T R O N M o n t i e r e n M o n t a g e 7 8 7 1 2 x 1 A l l g e m e i n T...

Page 39: ...ocated relative to the height of the device see Section Device Description Technical Data Figure 14 Position of the DIN Rail The distances from the central axis of the DIN rail to the top and bottom a...

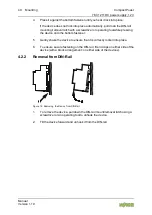
Page 40: ...ked into place 6 To ensure secure fastening on the DIN rail fit end clips on either side of the device with a block arrangement on either side of the devices 4 2 2 Removal from DIN Rail Figure 16 Remo...

Page 41: ...r Fastening Clips Table 27 Legend for Figures Snap fit Openings for Fastening Clips Pos Description 1 1 Snap fit opening top rear fastening 1 2 Snap fit opening top side fastening 2 1 Snap fit opening...

Page 42: ...s 5 0 1 S e r i e 7 8 7 E P S I T R O N Wi c h t i g e E r l u t e r u n g e n S i c h e r h e i t s u n d s o n s t i g e H i n w e i s e I n f o r m a t i o n I n f o r m a t i o n We i t e r e I n...

Page 43: ...nto the corresponding connection opening 3 To close the spring clamp connection release the push button This secures the conductor 5 1 1 2 Directly Inserting Conductors The following conductors can be...

Page 44: ...onnector WAGO recommends using a picoMAX unlocking tool referred to in the following text as the unlocking tool Further information on the unlocking tool is provided in the Section Accessories Tools F...

Page 45: ...amage with a risk of injury caused by malfunction overheating or electric shock When using a screwdriver or an actuation tool ensure correct positioning between the locking latch and the female connec...

Page 46: ...ctor Make sure that the picoMAX Female Connectors are mated properly Mismating the input female connector into the output connector may lead to a hazardous voltage of 230 V on the output side Make sur...

Page 47: ...l t s t r o m 7 8 7 1 2 x 1 3 2 m o d _ 1 5 3 3 5 3 4 2 1 5 7 7 0 _ 2 1 d o c x 4 9 3 0 9 2 1 If several devices are connected in parallel and supplied on the input side using the same circuit higher...

Page 48: ...sistance of the conductors between the power supply units and the load must be virtually the same Only connect devices of the same type in parallel Please use external rail mount terminal blocks when...

Page 49: ...ctual output current UOUT Output voltage see Section Device Description Technical Data The output voltage UOUT is reduced if the output current IOUT IST is in the range 1 2 IOUT IOUT IST 1 7 IOUT see...

Page 50: ...8 4 1 The maximum load is dependent on the surrounding air temperature and the input voltage Table 31 Nominal Values according to UL IN 100 240 VAC 1 3 A 50 60 Hz OUT 12 VDC 5 A Ambient temp 45 C Rest...

Page 51: ...ending on the degree of protection it must be protected from dust accumulation moisture radiation and aggressive chemicals Repairs shall only occur within the scope of the measures outlined in these o...

Page 52: ...y disposal benefits health and protects the environment from harmful substances in electrical and electronic equipment Observe national and local regulations for the disposal of electrical and electro...

Page 53: ...ose of packaging of all types that allows a high level of recovery reuse and recycling Improper disposal of packaging can be harmful to the environment and wastes valuable resources P o s 5 4 D o k u...

Page 54: ...tool with partially insulated shaft Type 1 2 5 0 4 mm blade 210 719 Operating tool Phillips PH0 210 769 P o s 5 8 S e r i e 7 8 7 E P S I T R O N Z u b e h r Z u b e h r 7 8 7 1 2 x x V e r d r a h t...

Page 55: ...Behavior 26 Figure 9 Hiccup Mode 26 Figure 10 Switch on Time 26 Figure 11 Efficiency at 230 VAC 28 Figure 12 Power Loss at 230 VAC 28 Figure 13 Derating Surrounding Air Temperature 30 Figure 14 Positi...
Page 56: ...s Failure Buffering Time 24 Table 14 Technical Data Input Side Connection 24 Table 15 Technical Data Output 25 Table 16 Technical Data Output Side Connection 27 Table 17 Technical Data Efficiency Powe...

Page 57: ...Compact Power List of Tables 57 787 1211 DC power supply 12 V Manual Version 1 1 0 E n d e d e r L i s t e f r T e x t m a r k e V e r z e i c h n i s _ h i n t e n...

Page 58: ...P o s 6 6 D o k u m e n t a t i o n a l l g e m e i n E i n b a n d E i n b a n d H a n d b u c h R c k s e i t e 2 0 1 7 2 8 m o d _ 1 4 8 6 4 7 7 5 0 3 5 8 0 _ 2 1 d o c x 4 0 5 3 9 4 1 WAGO Kontak...

Reviews: