www.wainmanhawaii.com - 5
As mentioned before, it is
VERY IMPORTANT
that you take lessons with a competent and
certified instructor which will ensure safe kite setup and rigging.
REMEMBER: Safety is
the number one priority.
Below are a few steps on rigging the ManiaC.
STEP 1.
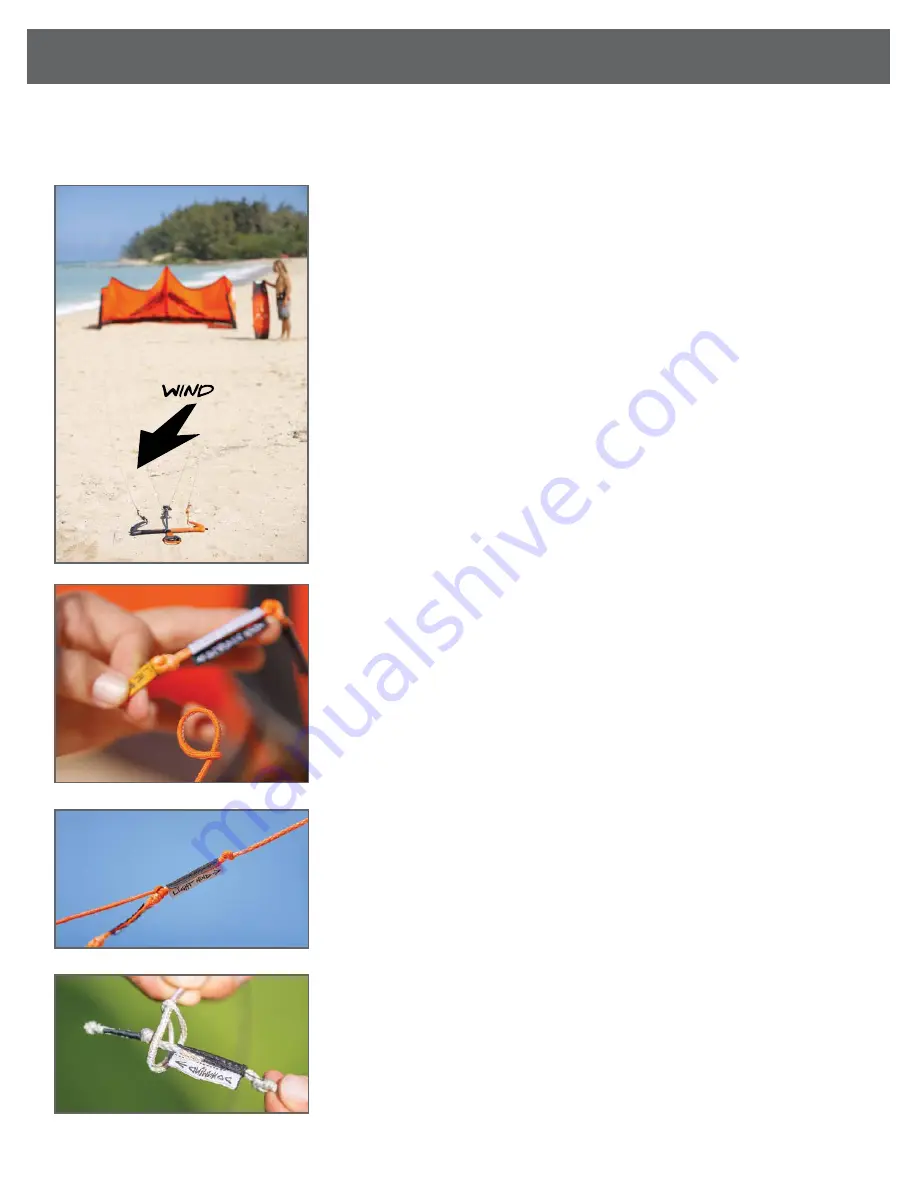
There are two ways of laying out your lines - upwind and downwind of the
kite. Wainman Hawaii highly recommends rigging
DOWNWIND
of the kite (figure 1).
There will be certain situations that you can only lay out your lines upwind of the kite.
When rigging
DOWNWIND
, make sure that your bar is flipped upside down and Grey
rear line is on left and orange rear line is on right (figure 1). Separate all four lines by
combing the lines towards the kite with the grey line on your left and orange line on
your right. Double check that no lines are crossed over each other.
STEP 2.
Once you have pumped up your kite (see tips section on pg. 20), separated
all four lines and double checked that no lines are crossed over each other, you can
attach the lines to the pigtails on the kite. The lines are color coded to ensure that you
attach the correct lines to the corresponding pigtail on the kite.
i) Attaching Rear Steering Lines:
Attach color coded steering line to pigtail using larks head knot (see figure 2).
The
LEFT
steering line and pigtail is
ORANGE
. The
RIGHT
steering line and pigtail
is
GREY
.
Depending on the wind conditions and rider experience level, always start by
using the MIDDLE knot (see figure 3) and move it up or down to get more or
less power.
There are (3) knots on the pigtail that you can attach the back line to. They are:
Strong Wind (labeled) -
The knot (furthest from the) kite will lengthen the back
lines providing more depower capabilities. This setting is recommended when you
are over powered and need to spill extra power from the kite.
Center Knot (not labeled) -
This knot provides power in the kite that is in
between Strong Wind and Light Wind.
Light Wind (labeled) -
The knot (closest to the kite) will shorten the back lines
and provide the most power in your kite.
NOTE:
When adjusting the position of the rear line pigtail (SLOW/FAST) at the
webbing on the kite tips, the rear to center line length ratio will also change.
Please make sure your kite is trimmed correctly to ensure that the kite does not
oversheet or backstall.
ii) Attaching Front Center Lines:
Attach color coded (GREY) and labeled (CENTER) line to pigtail using larks head
knot (see figure 4) . There are three knots on the pigtail. Make sure you use the
same knot on each side and that the pulley is free of sand and moving freely on
bridle line. You can use 2 different knots in situations where you center lines are
not of equal length. This is only a temporary solution and if your front lines are not
equal, they must be adjusted.
STEP 3.
Once you have attached your lines, once again be sure to do a final check that
your lines are connected to the corresponding pigtails and not crossed. Make sure all
knots are corresponding to the tabs on the LE (Upwind tab/Upwind Knot, Stock tab/
Stock Knot, Downwind tab/downwind knot).
STEP 4.
If you have rigged DOWNWIND, REMEMBER to flip your bar over the correct
way (DANGER label on bar facing down;left hand on the orange side; right hand on
grey side). Double check once again that your lines are not crossed before you hook
your harness loop into spreader bar.
RIggINg TIPs
Figure 4.
Figure 3.
Figure 2.
Figure 1.


