2
2.0 Installation
Assembling the Sensor
CAUTION:
Wear gloves and safety glasses during assembly of
the sensor since the electrolyte is a STRONG ACID. It is
recommended to perform this operation over a sink with running
water available. After using, re-cap any remaining electrolyte and
store the bottle upside-down until the next use.
Standard Free Chlorine/Bromine Sensors
(part numbers 104010,
191300, 191441, 191530 & 191587)
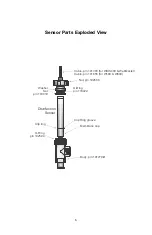
1.
Clean just the
tip
of the working electrode with the special abrasive
paper supplied. Avoid touching the electrodes! Place the special
abrasive paper on top of a clean paper towel and rub the electrode
tip over the abrasive paper, holding the electrode at a slight angle.
Repeat several times at different angles. Never touch or clean the
brown electrode shaft.
2.
Remove the rubber band from the groove in the membrane cap just
until the vent hole underneath is exposed, then fill the membrane
cap to the top with the electrolyte fill solution.
Never shake the
electrolyte bottle, it must stay free of bubbles!
3.
Hold the sensor body vertically with the tip pointing down and
SLOWLY screw on the membrane cap until it is hand tight.
Be
prepared for some electrolyte solution to squeeze out from the
vent hole in the cap.
4.
Rinse your hands, the sensor, and all surfaces contaminated with
electrolyte solution with running water. Check the sensor for leaks,
especially at the membrane and the membrane cap threads. If any
leaks are detected, tighten the membrane cap or replace it. Move the
rubber band back into the groove.
Never remove the membrane
cap with the rubber band covering the vent hole, or the
membrane will be damaged!
5.
Push the cable onto the end of the sensor, aligning the pins with the
holes. Turn the connector until hand tight to seal the cable
connection.

