background image

9

Special Features

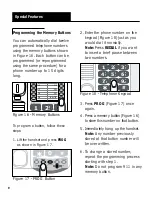
Programming the Memory Buttons

You can automatically dial twelve
programmed telephone numbers
using the memory buttons shown
in Figure 16. Each button can be 
programmed (or reprogrammed
using the same procedure) for a
phone number up to 15 digits
long.

To program a button, follow these
steps:

1. Lift the handset and press 

PROG

as shown in Figure 17.

2. Enter the phone number on the 

keypad (Figure 18) just as you 
would dial it normally.

Note:

Press 

REDIAL

if you want 

to insert a brief pause between 
two numbers.

3. Press 

PROG

(Figure 17) once 

again.

4. Press a memory button (Figure 16) 

to store this number on that button.

5. Immediately hang up the handset.

Note:

Any number previously 

stored at that button number will 
be overwritten.

6. To change a stored number, 

repeat the programming process 
starting with step 1.

Note:

Do not program 911 in any 

memory button.

1

A

B

C

D

E

F

2

3

M3

M4

M5

M6

M9

M11

M10

¤

Figure 16 - Memory Buttons

0

#

HOLD

PROG

TONE

LO

HI

FLASH

REDIAL

VOL

AMPLIFY

*

Figure 17 - PROG Button

DIALOGUE 

XL 40

1

A

B

C

G

H

I

T

U

V

O

P

E

J

K

L

M

N

O

D

E

F

2

3

4

5

6

7

8

9

0

#

*

Q

R

S

X

Y

Z

P

W

Figure 18 - Telephone Keypad

Summary of Contents for XL-30

Page 1: ...are manufactured by Walker a Division of Plantronics Inc 12082 Western Avenue Garden Grove CA 92841 800 874 3005 VOICE 800 772 2889 TTY TDD 714 897 4703 FAX email ameriphonecs plantronics com website...

Page 2: ...Operating Instructions XL 30LP 5270 3321 A 4 03 M03699 XL 30 XL XL 30 AMPLIFIED TELEPHONE The Extra Loud Clear Line Powered...

Page 3: ...lace this telephone on a stable surface Serious damage and or injury may result if the telephone falls 8 Do not cover the slots and openings on this telephone This telephone should never be placed nea...

Page 4: ...ation E If the telephone has been dropped or the case has been damaged F If the telephone exhibits a distinct change in performance 15 Never install telephone wiring during a lightning storm 16 Never...

Page 5: ...airs to certified equipment should be made by an authorized Canadian maintenance facility designated by the supplier Any repairs or alterations made by the user to this equipment or equipment malfunct...

Page 6: ...or Wall Mount 4 Desktop Use 4 For Wall Mounting 5 Using Your XL 30 Incoming Voice Volume 6 Incoming Voice Tone 7 Ringer Volume and Pitch 8 Hold 8 Last Number Redial 8 Flash 8 Special Features Program...

Page 7: ...ating Guide provide you with the information you need to use your XL 30 effectively and safely Read this manual thoroughly before using your telephone Keep the manual near the telephone for easy refer...

Page 8: ...E F 2 3 4 5 6 7 8 9 0 HOLD PROG TONE LO HI FLASH REDIAL VOL AMPLIFY M1 M2 M5 M6 M7 M8 M9 M10 M11 M3 M4 P W OPERATING INSTRUCTIONS AND QUICK GUIDE XL 30 Handset Base Unit Telephone Line Cords Handset C...

Page 9: ...volume switch Phone number directory MEMORY button REDIAL button FLASH button VOL volume slider LOW BATTERY indicator RING flasher AMPLIFY button AMPLIFY indicator PROG program button DIAL AUDIO OUTPU...

Page 10: ...ls install one 9 Volt alkaline battery not included To install new battery 1 Slide open the battery compartment cover on the bottom of the telephone Figure 3 2 Install one fresh battery and reinstall...

Page 11: ...ition of the base as shown in Figure 6 Push the mounting bracket in and down firmly until it snaps into place 3 Locate a desired wall phone jack and hold phone upright 4 Plug in the short phone line c...

Page 12: ...me will be up to 30dB louder HOLD PROG TONE LO HI FLASH REDIAL VOL AMPLIFY HOLD PROG TONE LO HI FLASH REDIAL VOL AMPLIFY Figure 9 Volume Slide Control Figure 8 AMPLIFY Button and Indicator 5 Angle the...

Page 13: ...ON Repeated incremental exposure to amplification levels greater than18 dB may be harmful to individuals without hearing disabilities Therefore do not remove the warning label attached to the back of...

Page 14: ...TONE has two pitch settings LO and HI Hold To put the line on hold press the HOLD button and return the handset to its cradle You will notice the HOLD indicator light comes on NOTE If you pick up an...

Page 15: ...REDIAL if you want to insert a brief pause between two numbers 3 Press PROG Figure 17 once again 4 Press a memory button Figure 16 to store this number on that button 5 Immediately hang up the handset...

Page 16: ...e this feature set the outgoing voice amplifier switch to AMPLIFY underneath the unit Note Even with the AMPLIFY switch ON the voice of your callers can still be amplified by up to 15dB Note The facto...

Page 17: ...h processor Plug the stereo end of the plug into the Audio Output socket on the phone Speak into the handset when using the Cochlear Implant Adapter Cord 1 A B C G H I Q R S T U V X Y Z J K L M N O D...

Page 18: ...ION Check all phone cord connections No number stored in that memory button See Programming the Memory buttons P 9 See Setting Up Your Phone to reset the dial mode switch P 4 5 1 Check that line cord...

Page 19: ...onnected to a telephone line Excessive RENs on a telephone line may result in the devices not ringing in response to an incoming call In most but not all areas the sum of RENs should not exceed five 5...

Page 20: ...mpt to perform repairs will void the warranty For service or repairs call 1 800 874 3005 Connection to party line service is subject to state tariffs Contact the state public utility commission public...

Page 21: ...ay cause harmful interference to radio communications However there is no guarantee that interference will not occur in a particular installation if this equipment does cause harmful interference to r...

Page 22: ...compliance with the above conditions may not prevent degradation of service in some situations Repairs to certified equipment should be made by an authorized Canadian maintenance facility designated b...

Page 23: ...of any combination of devices subject only to the requirement that the sum of the Ringer Equivalence Numbers of all the devices does not exceed five The term IC before the certification registration n...

Page 24: ...18...

Page 25: ...maining time on the original warranty period whichever is longer Implied warranties including those of fitness for a particular purpose and merchantability an unwritten warranty that the product is fi...

Page 26: ...2889 TTY for instructions This warranty does not cover defects resulting from accidents damage while in transit to our service location alterations unauthorized repair failure to follow instructions m...

Page 27: ...kHz 30dB Wide band 300 to 3000Hz 20dB Tone control range Full range 300 to 3000Hz using one slide control Dimensions Size 9 1 2 x 7 x 3 1 4 Weight 2 52 lbs Power Requirements One 9 Volt alkaline batte...

Page 28: ...Installing the Backup Batteries 4 Last Number Redial 8 Programming the Memory Buttons 9 Ringer Volume and Pitch 8 Sales Receipt 1 Troubleshooting 12 Warranty Service 1 Ameriphone products are manufact...

Page 29: ...F R A N A I S M47402 AMERIPHONE XL 30french 5270 3321 A 4 03 Manuel d utilisation XL XL 30 AMPLIFIED TELEPHONE Tr s Forte et tr s Claire Activ Par Ligne T l phonique...

Page 30: ...s CONSERVEZ CES INSTRUCTIONS Lorsque vous utiliserez votre t l phone suivez toujours les mesures de s curit de base suivantes afin de r duire les risques d incendie de choc lectrique et de blessures 1...

Page 31: ...mplificateur 6 B Bouton d amplification 6 C S lecteur de tonalit 8 D Volume de la voix de l utilisateur 8 E Volume et tonalit de la sonnerie 8 F Indicateur visuel de la sonnerie 9 G Appel en garde 9 H...

Page 32: ...M9 M11 M10 Merci d avoir choisi le nouveau t l phone XL 30 d AMERIPHONE Inc Ce t l phone a t con u pour r pondre aux normes de qualit les plus lev es afin que vous puissiez l utiliser sans probl me p...

Page 33: ...Contr le du Volume Indicateur de pile us e Voyant de la sonnerie Touche d Amplification Voyant d Amplification Touche de Programmation DIAL AUDIO OUTPUT P T RINGER RING TONE Lo Hi Off Lo Hi 1 A B C G...

Page 34: ...commutateur P impulsion si vous avez composer rotatoire L installation du XL 30 comprend cinq tapes 1 Placez quatre piles alcalines AA de secours en cas de panne de courant 2 Choisissez l installatio...

Page 35: ...de la tonalit Le t l phone est pr t l emploi Installation murale 1 Retirez le crochet du socle fig 6 et retournez_le pour le pointer vers le haut et pour qu il soutienne le combin dans la position ver...

Page 36: ...sactiver l amplificateur Lorsque la touche AMPLIFY est activ e cela vous ram ne au r glage pr c dent de Fig 9 0 HOLD PROG TONE LO HI FLASH REDIAL VOL AMPLIFY 5 Dirigez le t l phone vers le bas pour s...

Page 37: ...ible d utiliser le t l phone fixez de mani re s re l avertissement imprim en Braille l arri re du combin sch ma A F R A N A I S Remarque En mode d utilisation normale l amplificateur s teint d s que v...

Page 38: ...vous entendez des sons forts clairs et faciles comprendre Cela vous permet d accentuer les fr quences des sons que vous entendez le mieux 1 Lorsque vous avez une personne en ligne appuyez sur AMPLIFY...

Page 39: ...30 raccrochera de lui m me H Recomposition du dernier num ro Le t l phone XL 30 enregistre le dernier num ro compos jusqu 31 chiffres D crochez et appuyez simplement sur REDIAL pour recomposer le dern...

Page 40: ...une aide auditive Pour vous connecter branchez la prise audio un cable auxiliaire compatible puis branchez l autre bout votre aide auditive programmer un num ro dans chaque touche un maximum de 15 ch...

Page 41: ...sortie audio du t l phone Si vous utilisez le cordon pour implant cochl aire parlez dans le combin NB Parlez dans le combin du t l phone lorsque vous utilisez la prise audio directe L Commutateur La t...

Page 42: ...le composer Pas de sonnerie Le t l phone se bloque aucune fonction ne fonc tionne CAUSES ET SOLUTIONS V rifiez tous les cordons de raccordement Aucun num ro n a t programm dans cette touche de m moris...

Page 43: ...800 772 2889 TTY TDD pour obtenir des conseils concernant la r paration de votre appareil Toute r paration sera couverte par une garantie de 90 jours Cette garantie s applique seulement aux appareils...

Page 44: ...rantie 13 Installation au mur 5 Installation 5 Installation sur bureau 5 Lampe de la sonnerie 9 Liste des pi ces 2 M morisation 9 Modes de composition Impulsions 4 Tonalit 4 Pile 4 Prise audio directe...

Reviews: