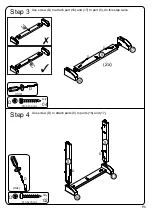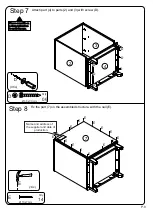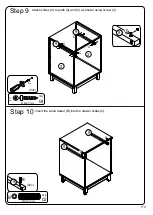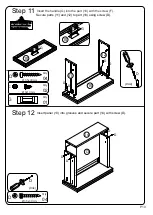
P.3
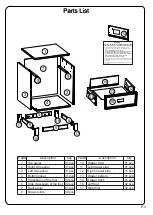
Part#
Description
Qty
1
Top panel
01 pcs
2
Right side panel
01 pcs
3
Left side panel
01 pcs
4
Bottom panel
01 pcs
5
Crossbeam of the foot
02 pcs
6
Side crossbeam of the foot 02 pcs
7
Back panel
01 pcs
8
Drawer slide
02 pcs
Part#
Description
10
Drawer front
11
Left drawer side
12
Right drawer side
13
Drawer bottom
14
Drawer back
Qty
01 pcs
01 pcs
01 pcs
01 pcs
01 pcs
5
4
3
2
1
10
12
14
WARNING!
* Use the wall attachment device provided.
* Do not let children climb or hang on drawers, doors or shelves.
* Place the heaviest items in the lower drawers or shelves.
* Do not place Tv’s or other heavy objects on top of this product,
unless it has specifically designed to support them
* Never open more than one drawer at a time
.
.
IN ORDER TO PREVENT OVER TURNING THIS PRODUCT MUST
BE USED WITH THE WALL ATTACHMENT DEVICE PROVIDED
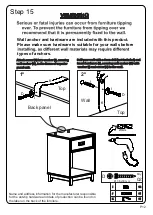
Serious or fatal crushing injuries can occur from furniture
tipping over. To help prevent this item of furniture tipping over:
Always ensure the wall to be drilled is free from hidden electrical wires, water
and gas pipes.
An attachment device is provided with your product, however you will need to
source suitable fixings for your wall type. If in doubt, please consult a qualified
trades person
9
9
11
7
16
Left foot
02 pcs
17
Right foot
02 pcs
6
6
6
5
5
11
13
17
16
16
17
WARNING!
* Use the wall attachment device provided.
* Do not let children climb or hang on drawers, doors or shelves.
* Place the heaviest items in the lower drawers or shelves.
* Do not place Tv’s or other heavy objects on top of this product,
unless it has specifically designed to support them
* Never open more than one drawer at a time
.
.
IN ORDER TO PREVENT OVER TURNING THIS PRODUCT MUST
BE USED WITH THE WALL ATTACHMENT DEVICE PROVIDED
Serious or fatal crushing injuries can occur from furniture
tipping over. T
o help prevent this item of furniture tipping over:
Always ensure the wall to be drilled is free from hidden electrical wires, water
and gas pipes.
An attachment device is provided with your product, however you will need to
source suitable fixings for your wall type. If in doubt, please consult a qualified
trades person
12
WARNING!
* Use the wall attachment device provided.
* Do not let children climb or hang on drawers, doors or shelves.
* Place the heaviest items in the lower drawers or shelves.
* Do not place Tv’s or other heavy objects on top of this product,
unless it has specifically designed to support them
* Never open more than one drawer at a time
.
.
IN ORDER TO PREVENT OVER TURNING THIS PRODUCT MUST
BE USED WITH THE WALL A
TTACHMENT DEVICE PROVIDED
Serious or fatal crushing injuries can occur from furniture
tipping over. T
o help prevent this item of furniture tipping over:
Always ensure the wall to be drilled is free from hidden electrical wires, water
and gas pipes.
An attachment device is provided with your product, however you will need to
source suitable fixings for your wall type. If in doubt, please consult a qualified
trades person
12
9
9
9
9
9
9


