background image

D

(04x)

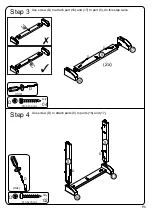
Step 3

P.6

Step 4

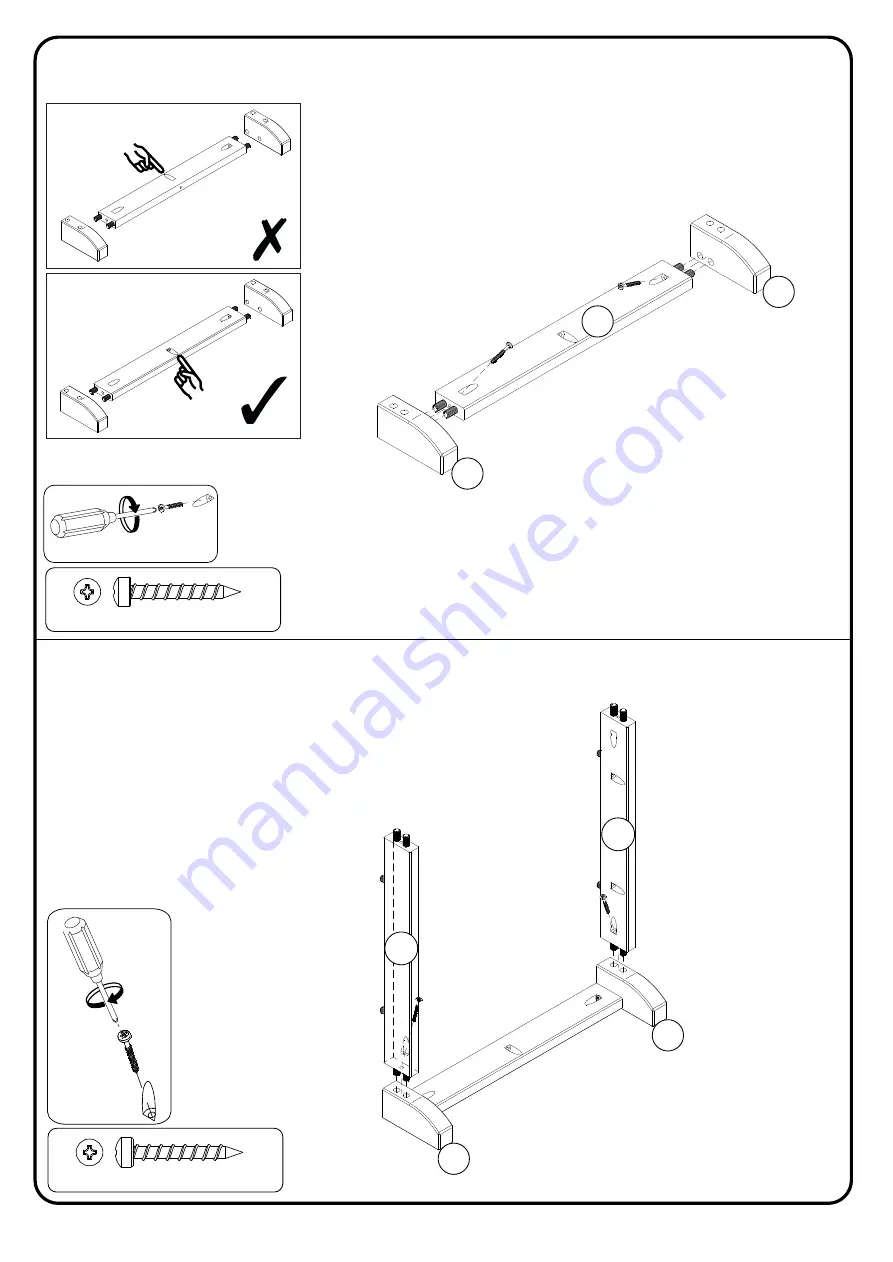
Use screw (D) to attach part (16) and (17) to part (6), do this step twice

Use screw (D) to attach parts (5) to parts (16) and (17).

(02x)

D

5

16

17

D

D

5

17

16

6

D

D

D

Qty

04

Ø 3,5x30 mm

D

Qty

02

Ø 3,5x30 mm

(2x)

Summary of Contents for BR18LACNS

Page 1: ...Edison Furniture Co LLC All rights reserved c Revised 05 2022 V1 Please visit our website for the most current instructions assembly tips to report damage or request parts www walkeredison com Assembl...

Page 2: ...or Para n wax from a standard candle can be used 2 Apply the wax by rubbing it on the wooden guide rails where there is wood on wood contact when opening and closing the drawer Wax should be room tem...

Page 3: ...item s in the low er dra we rs or she lve s Do not pla ce Tv s or oth er hea vy obj ect s on top of this pro duc t unl ess it has spe ci cal ly des ign ed to sup por t the m Ne ver ope n mo re tha n o...

Page 4: ...r recommended for assembly not included Screw A B C D E F G 04 pcs 36 pcs 04 pcs 36 pcs 14 pcs 02 pcs 01 pc Wood dowel 8 30 mm 4 25mm 3 5 30mm 10 7mm Nail 3 10mm Handles H 04 pcs Felt 20 20 mm Washer...

Page 5: ...owel A into part 9 Insert wood dowel B into part 2 3 5 6 11 and 12 04 8x20 mm Qty 32 8x30 mm Qty 06x D D D D D D D 3 2 1 3 B B B B 2 B B B B 6 B B B B B B B B 6 6 B B B B B B B B B B B B 5 5 B B B B 1...

Page 6: ...Step 3 P 6 Step 4 Use screw D to attach part 16 and 17 to part 6 do this step twice Use screw D to attach parts 5 to parts 16 and 17 02x D 5 16 17 D D 5 17 16 6 D D D Qty 04 3 5x30 mm D Qty 02 3 5x30...

Page 7: ...ts 5 e 6 in the part 4 as shown using screw D 02x D D D D D D D D D 06x D 6 17 16 6 5 5 4 5 5 H H H H 5 5 6 5 6 H 04x 17 16 16 17 Insert felt H into parts 16 and 17 D Qty 02 3 5x30 mm D Qty 06 3 5x30...

Page 8: ...the part 7 on the assembled structure with the nail E 06x D D D D D D D Qty 14 E 10x7 mm E 14x 4 3 2 D Qty 06 3 5x30 mm D E E E E E E E E 7 E E E E E E Name and address of the supplier and date of pr...

Page 9: ...10 P 9 Step 9 C 04x Qty 04 C 4x25 mm Attach slides 9 to parts 2 and 3 as shown using screw C Insert the wood dowel B into the drawer slides 9 02x B B B C C C C 3 2 9 9 9 9 9 9 9 9 9 9 9 9 02 8x30 mm Q...

Page 10: ...oves and secure part 14 with screw D Insert the handle G into the part 10 with the screw F Secure parts 11 and 12 to part 10 using screw D 10 F FG F F G 10 G F Qty 02 3x10 mm Qty 01 D Qty 04 3 5x30 mm...

Page 11: ...Step 13 P 11 Insert wood dowel B on the inside of all drawers while drawer is inside the unit Step 14 B B 75 lbs 20 lbs B 02 8x30 mm Qty B 02x...

Page 12: ...washer I and screw D in the wall D I K D I J panel unit Wall anchor and hardware are included with this product Please make sure hardware is suitable for your walls before types of anchors K I 02 J 0...

Reviews: