background image

25

Walker Magnetics, Inc., NEO Permanent Lifting Magnets

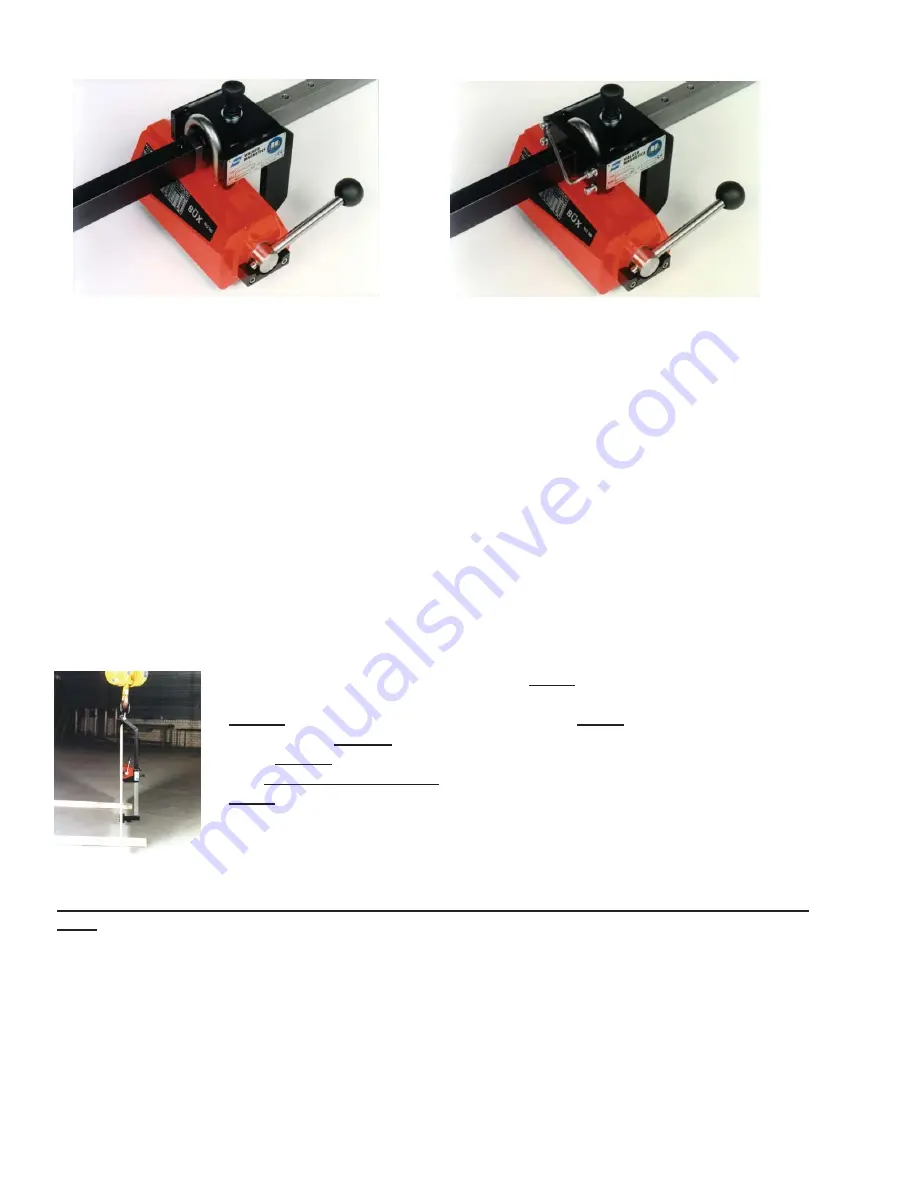
4  Push the lifting arm forward until the lifting eye of the magnet falls into the slider. (See Figure 2.)
5  Mount the end plate.
6  Tighten the (4) screws properly. (See fi gure 3)
7  Replace and secure the lifting eye to the arm.

Figure 2

CAUTION:


Confi rm that the correct magnet model is mounted on the correct HV arm. Always use a NEO 
250 magnet with a HV 250 arm, a NEO 500 magnet with a HV 500 arm, and a NEO 1000 
magnet with a HV 1000 arm.


Confi rm that the magnet has freedom to tilt and twist slightly.


Confi rm that the arm’s slider moves with ease.


Confi rm that the locking pin in the arm’s slider locks into the arm properly.

SAFETY PRECAUTIONS

Never

 attempt to operate this NEO-HV 250, 500, or 1000 lifting device until you read and understand the NEO 

series magnet Operator’s Manual and Safety Instructions (DD-14493), and these NEO-HV operating and 
safety instructions.

1  ALWAYS STAY CLEAR OF THE LOAD

Never

 get in a position where you could get 

hit with the load if it should come off the magnet.

2  Always

 position the magnet so that it is slightly 

below

 the center of gravity of the work-

piece when in 

vertical

 position. (See Figure 4 & Figure 5)

3

  In the 

vertical

 position, the lifting device together with the workpiece should always 

lean 

a few degrees forward

. (With the device on “top side” see Figure 4.)

4  Never

 exceed the workload limits corresponding to the material thickness, surface 

quality, and type of material. Refer to the guidelines for the Reduction of Rated Lifting 
Capacity on page 11.

Figure 4

WORKLOAD LIMITS

Read and understand the Lifting magnet’s instruction (Manual # 37-DD-14493) before lifting any 
load!

The workload limit depends on:


Surface quality, fl atness, rust, scale, paint, dirt etc.


Material thickness


Length/width relation (sagging/peeling)


Type of material


Contact area

Figure 3

Summary of Contents for NEO-125

Page 1: ...u have read and understand this Operator s Manual DANGER WALKER MAGNETICS NEO HV 250 NEO HV 500 NEO HV 1000 WITH INSPECTION AND MAINTENANCE INSTRUCTIONS OPERATOR S MANUAL AND SAFETY INSTRUCTIONS NEO P...

Page 2: ...LY 27 WEEKLY 27 ANNUALLY 27 HV SPARE PARTS LIST 28 Thank you for purchasing this Walker Magnetics Product If used and maintained properly it should serve you for many years Thousands of Walker lift ma...

Page 3: ...sing your lifter If you do not understand everything in this manual contact Walker Magnetics for assistance before using the magnet Call 1 800 W MAGNET Always stay clear of the load Never lift loads o...

Page 4: ...surface should be such to permit the load to remain level when lifted Red Background White Letters Orange Background Black Letters Yellow Background Black Letters This indicates a situation in which...

Page 5: ...l actuator must be fully in the on or lift position Repair of this magnet should only be done by Walker Magnetics or a Qualifi ed Person If you have any diffi culty lifting a load DON T LIFT IT Call W...

Page 6: ...taken to protect these surfaces Follow the Inspection Instructions in this manual Attaching or welding other materials to the lifting surfaces in order to reduce wear should not be done with this mag...

Page 7: ...edges begin to droop This drooping or sagging of the load can create an air gap between the load and the magnet This is called peel If this occurs the lifting capacity of the magnet is greatly reduce...

Page 8: ...Magnetics Inc for advice at 1 800 W MAGNET When working in an area using lifting magnets wear safety glasses work gloves steel toed shoes and a safety hat 2 Check the condition of the magnet prior to...

Page 9: ...gnet so the load remains level 4 To energize magnet grip the handle fi rmly and pull the handle from its locked position Turn the handle to the ON position Then be sure to return the handle to the FUL...

Page 10: ...agnet length so that the entire lifting surface of the magnet is in contact with the load When the load width is less than the magnet width position the magnet so you get the maximum and equal amounts...

Page 11: ...eduction Factors for Materials Other than AISI 1020 Steel Materials REDUCTION FACTOR Cast Steel 0 90 3 Silicon Steel 0 80 AISI 1095 Steel 0 70 416 Stainless Steel 0 50 Cast Iron non chilled 0 45 Pure...

Page 12: ...REGULAR OR ROUGH Similar to a Flat Smooth Cut File 020 Max Air Gap 508mm Maximum Load Pounds Maximum Length Inches Maximum Load Pounds Maximum Length Inches Maximum Load Pounds Maximum Length Inches 1...

Page 13: ...iameter Inches TYPE OF SURFACE CONDITION CLEAN SMOOTH Similar to a Flat 32 micro inch RMS Ground Surface RUST OR SCALE Similar to a Flat Hot Rolled Steel Surface 010 Max Air Gap 254mm IRREGULAR OR ROU...

Page 14: ...95kg 30x24 75 x 6m 1 2 12 7mm 275 125kg 48x40 1 2 x 1 0m 220 100kg 48x30 1 2 x 75m 160 73kg 36x30 9 x 75m 3 8 9 5mm 170 77kg 48x32 1 2 x 8m 130 60kg 36x32 9 x 8m 107 49kg 42x24 1 05 x 6m 1 4 6 4mm 90...

Page 15: ...mm IRREGULAR OR ROUGH Similar to a Flat Smooth Cut File 020 Max Air Gap 508mm Maximum Length Inches Maximum Load Pounds Maximum Length Inches Maximum Load Pounds Maximum Length Inches Maximum Load Pou...

Page 16: ...R OR ROUGH Similar to a Flat Smooth Cut File 020 Max Air Gap 508mm Maximum Load Pounds Maximum Length Inches Maximum Load Pounds Maximum Length Inches Maximum Load Pounds Maximum Length Inches 2 1 2 a...

Page 17: ...EGULAR OR ROUGH Similar to a Flat Smooth Cut File 020 Max Air Gap 508mm Maximum Length Inches Maximum Load Pounds Maximum Length Inches Maximum Load Pounds Maximum Length Inches Maximum Load Pounds 10...

Page 18: ...GULAR OR ROUGH Similar to a Flat Smooth Cut File 020 Max Air Gap 508mm Maximum Load Pounds Maximum Length Inches Maximum Load Pounds Maximum Length Inches Maximum Load Pounds Maximum Length Inches 3 a...

Page 19: ...ULAR OR ROUGH Similar to a Flat Smooth Cut File 020 Max Air Gap 508mm Maximum Length Inches Maximum Load Pounds Maximum Length Inches Maximum Load Pounds Maximum Length Inches Maximum Load Pounds 11 2...

Page 20: ...l Surface 010 Max Air Gap 254mm IRREGULAR OR ROUGH Similar to a Flat Smooth Cut File 020 Max Air Gap 508mm Maximum Load Pounds Maximum Length Inches Maximum Load Pounds Maximum Length Inches Maximum L...

Page 21: ...R OR ROUGH Similar to a Flat Smooth Cut File 020 Max Air Gap 508mm Maximum Length Inches Maximum Load Pounds Maximum Length Inches Maximum Load Pounds Maximum Length Inches Maximum Load Pounds 13 75 3...

Page 22: ...the operation of the handle The handle shaft should move freely when extended and return promptly upon release If the handle shaft binds and remains extended DO NOT CONTINUE TO USE THE MAGNET This ha...

Page 23: ...lation Model No NEO 125 NEO 250 NEO 500 NEO 1000 NEO 2000 Length 3 63 5 94 9 69 12 44 18 89 Width 2 31 3 94 4 72 5 79 6 50 Height to Hook 4 31 6 61 6 61 8 50 9 88 Net Weight 6 2 lbs 22 lbs 42 lbs 80 l...

Page 24: ...HV 250 HV 500 and HV 100 separately and retrofi t them to your NEO 250 500 and 1000 lifting magnet With the HV lifting arm installed the lifting magnet can be used for turning workpieces from the hori...

Page 25: ...tor s Manual and Safety Instructions DD 14493 and these NEO HV operating and safety instructions 1 ALWAYS STAY CLEAR OF THE LOAD Never get in a position where you could get hit with the load if it sho...

Page 26: ...e on the arm 3 Make sure the stopper remains pressed against the edge of the load Push the stopper against the edge of the load again if required 4 Switch the magnet ON the lever must lock in place 5...

Page 27: ...center of gravity See Figure 5 Make sure the locking pin on the slider is engaged in the slot 2 Push the stopper fi rmly against the lower edge of the workpiece 3 Switch the magnet ON the lever must l...

Page 28: ...QTY PART NO QTY 1 OBLONG LINK 393 26 88 1 393 26 88 1 393 25 95 1 2 SHACKLE 393 20 34 1 393 20 34 1 393 25 92 1 3 PLATE A4 744 05 89 1 A4 744 05 75 1 A4 744 06 02 1 4 SCREW 363 01 56 4 363 01 56 4 363...

Page 29: ...x 84 Grimsby ON L3M 4G1 Canada 905 643 3338 www walkermagnet com e mail info walkermagnet com ALWAYS STAY CLEAR OF THE LOAD Guide the load by pushing or pulling the edges This keeps your entire body c...

Reviews: