background image

73

Effective Date 01-01-10 

Use only genuine

 Walker

®

 replacement parts.

Refer to Decks

Parts Manual

for Deck Decals

9

2

1

6

15

14

10

3

3 7

8

13

12

11

11

4

16

5

5

TraCTOr DECaLs

.

.

.

.

.

.

.

.

.

.

.

.

.

.

.

.

.

Summary of Contents for MBV

Page 1: ...d Maintenance Instructions and ILLUSTRATED PARTS MANUAL Model MBV 18 HP Model MBK 18 HP Please Read and Save These Instructions Effective Date 04 01 10 For Safety Read All Safety and Operation P N 400...

Page 2: ...elp prevent possible injury to the operator or others If any thing in this manual is confusing or hard to understand please contact your local authorized dealer or call our service department at 970 2...

Page 3: ...LOCATION AND FUNCTION _ _____________ 26 Ignition Switch________________________ 26 Engine Choke_________________________ 27 Engine Throttle________________________ 27 Forward Speed Control FSC _____...

Page 4: ...Filter_ ___________________________ 60 Blade Overload Shear Bolts_____________ 61 PTO Shear Pin_ ________________________ 61 Mower Blades_________________________ 62 ADJUSTMENTS_______________________...

Page 5: ...he ground drive belt to the main drive wheel LEFT HAND LH refers to the left hand side of the tractor when the operator is seated facing forward in the tractor seat POWER TAKE OFF PTO transmits engine...

Page 6: ...tine maintenance and general service in structions are provided For the service of these components during the limited warranty period it is important to find a local authorized servicing agent of the...

Page 7: ...W 30 Viscositybelow32 F 0 C Oil Filter 492932 12 050 01 Fuel Tank Capacity 3 Gallons 11 35 liters 3 Gallons 11 35 liters Fuel Automotive Grade Unleaded Gasoline 87 Octane Automotive Grade Unleaded Gas...

Page 8: ...m SL Grade Oil Transmission Fluid Capacity 79 fl oz 2336 ml 79 fl oz 2336 ml Transmission Cooling Cooling Fan Mounted on Drive Pulley Cooling Fan Mounted on Drive Pulley Ground Travel Speed Forward m...

Page 9: ...107 cm SD Model with Deflector 47 3 4 in 121 cm 47 3 4 in 121 cm 48 in 122 cm SD Model with Deflector 53 3 4 in 137 cm 53 3 4 in 137 cm 52 in 132 cm SD Model with Deflector 63 in 160 cm 56 in 142 cm...

Page 10: ...wise Rotating Blades with a 2 in 5 cm Center Overlap Deck Suspension Torsion Flex Frame with Caster Wheels and Counterweight Springs Torsion Flex Frame with Caster Wheels and Counterweight Springs CU...

Page 11: ...Wheels Deck Discharge Shield Deck Lift Handle Cutting Height Adjustment Tilt Up Hook Tilt Up Latch Tilt Up Deck Handle Footrests Deck Support Pin and Height Adjustment Hitch Pins Counterweight Spring...

Page 12: ...ification 8 Rear View and Left Side View Left Hand Drive Wheel Cylinder Head Cooling Fins Fuel Tank and Cap Muffler Tailpipe Tailwheel Fork and Wheel Fuel Pickup Line Oil Fill Spread Tail Wheel NOTE M...

Page 13: ...Tank Oil Dipstick Muffler Guard Oil Fill Rubber Bumpers Body Support Parking Brake Steering Lever Dampeners RH Transmission Control Arm LH Transmission Control Arm Transaxle Expansion Reservoir Air C...

Page 14: ...Tank Cap Fuel Pickup Line Fuel Tank Oil Fill Dipstick Rubber Bumpers Body Support RH Transmission Control Arm LH Transmission Control Arm Steering Lever Dampening Springs LH Transaxle LH Transaxle Lo...

Page 15: ...by Walker Manufacturing must take full responsibility for safety The Walker Rider Lawnmower has been designed withmanysafetyfeaturestoprotecttheoperatorfrom personal harm or injury However it is neces...

Page 16: ...DISENGAGED position Also the en gine should stop if the operator lifts off the seat with the PTO clutch in the ENGAGED position 10 Handle gasoline with care Gasoline is highly flammable and its vapors...

Page 17: ...ing slowly engage the parking brake NOTE This is exactly the same procedure used to normally stop and park the machine 6 Disengage the blade clutch and put the FSC in the NEUTRAL PARK position before...

Page 18: ...n the engine off before leaving the seat b LOOK to make sure blade drive shaft movement has stopped before trying to un clog the system c Disconnect the spark plug wires d Never place hands under the...

Page 19: ...sely affects its operation perfor mance durability or use will VOID the war ranty and may cause hazardous conditions 8 Never attempt to disconnect any safety devices or defeat the purpose of these saf...

Page 20: ...placement should be ordered and installed before putting the machine into operation The Decal Part Number is listed below and in the Parts Section Each End of Mower Deck 5808 All Decks Except DSD56 58...

Page 21: ...hould be ordered and installed before putting the machine into operation The Decal Part Number is listed below and in the Parts Section Deck Carrier Frame 8647 Deck Carrier Frame 8653 Deck Carrier Fra...

Page 22: ...through the wheel hub position the spacer washer on each side of the hub if used and fit the assembly into the wheel fork 3 Insert the 3 8 16 x 4 1 2 in bolt through the wheel fork with the bolt head...

Page 23: ...ocation of deck support arm Deck Support Arms Mower Deck Installation 2 Engage the deck carrier frame tube sockets on the tractor support arms refer to PTO Shaft Guard Installation photo for socket lo...

Page 24: ...l help is required Refer to Deck Counterweight Spring Installation photo Deck Installation Model MBK 1 Lightly grease each deck support arm 2 on the tractor Refer to Mower Deck Installation pho to for...

Page 25: ...l on the shaft to check for security Spring Loaded Coupler Ring In Fully Forward Position Coupler Ring Locked Position 8 Raise the mower body instead of lifting the front of deck and clip the counterw...

Page 26: ...m under the deck support pins on the low side to level the deck 3 Check the front to rear level Rotate the blades to point forward Measure the distance from bladetiptogroundonthefrontandrear Therear o...

Page 27: ...of these items will not need to be checked every day but the operator should be aware of the condition of each For proper fuel and lubricants refer to Specifications CHECK BODY ROD IN STOWED POSITION...

Page 28: ...ion cleanliness and security of the complete air cleaner system inspect air filter every 100 hours For detailed procedures re fer to CLEANING the Engine Air Cleaner Sys tem in Maintenance Instructions...

Page 29: ...ONDITION SHARPNESS AND SECURITY OF MOUNT ING Theblademountingnutshouldbetightenedto60ft lb 81 3 N m If blade sharpening is required refer to CHECKING SERVICING for Sharpen Mower Blades in MaintenanceI...

Page 30: ...eturns to after starting and S is the START position When starting the engine turn the key clockwise to the S position Do not hold the key in the S position longer than 10 seconds If the engine does n...

Page 31: ...peed is proportional to the lever position the further the lever is advanced forward the faster the tractor moves It is not necessary to hold the FSC in posi tion since the friction lock maintains the...

Page 32: ...ithout the engine running e g for service Refer to TRANSAXLE LOCKOUTS in this section for operating instructions NOTE The transaxle lockout rods ends should be completely retracted against the body ot...

Page 33: ...o Establishes the Neutral Park Position of the Steering Levers Full Forward Ground Speed Position Reverse Drive Wheel Motion Position Neutral Park Position Fast Throttle Position Idle Position LEFT WH...

Page 34: ...the key to RUN position as soon as the engine starts NOTE The choke may not be required if the engine is warm IMPORTANT DO NOT crank the engine con tinuously for more than 10 seconds at a time If the...

Page 35: ...rator Hand Position on the Controls Beginning Recommendations are Learn operation of the mower in an open area away from buildings fences and ob structions Learn operation on flat ground BEFORE operat...

Page 36: ...ission control needs to be adjusted Refer to ADJUSTMENTS of Trans mission Control in Maintenance Instructions ENGAGING THE MOWER 1 Set the engine throttle at about 1 3 speed Do not attempt to engage t...

Page 37: ...g the mower Contact your Walker dealer 4 Turn the ignition switch OFF WARNING Remove the key from the ignition switch when leaving the mower unattended This will prevent children and inexperienced ope...

Page 38: ...eewheel with the rods in the LOCKOUT position The levers must be in the highest position to completely unlock the trans missions Hydro Lockout Rod Hydro Lockout Rod Freewheel Position 4 After moving t...

Page 39: ...ling in Assembly In structions Use an alternating stripe mowing pattern for best appearance and vary the direction of the stripe each time the grass is mowed to avoid wear patterns in the grass Avoid...

Page 40: ...up configuration should only be used when the tractor is parked The tractor body should never be tilted for ward with the deck in the tilt up position This can cause the deck to unhook from the tract...

Page 41: ...x 48 Check Air Filter Element x 49 Check Regap Spark Plugs x 55 Change Engine Crankcase Oil MBK x 42 Change Engine Oil Filter MBK x 42 Change Transaxle Oil and Filter x 46 Replace Fuel Filter x 60 Ch...

Page 42: ...g fins Air Cleaner System Use only Cummins Fleetguard air cleaner elements Aftermarket elements may not seal in the air cleaner housing allowing dirt to enter the engine Also aftermarket filters often...

Page 43: ...recoolingairthroughtheenginecool ingfins Air Cleaner System Use only Cummins Fleetguard air cleaner elements Aftermarket elements may not seal in the air cleaner housing allowing dirt to enter the eng...

Page 44: ...ANT NEVER check or add oil with the engine running 2 Before removing the dipstick clean the area around the dipstick to keep any dirt or debris out of the engine 3 Remove the dipstick wipe off with a...

Page 45: ...il filter on the engine Turn the oil filter clockwise until the rubber gasket con tacts the sealing surface then tighten the filter an additional 1 2 to 3 4 turn 8 Reinstall the drain plug 9 Fill the...

Page 46: ...Remove the dipstick again and check the oil lev el on the dipstick The oil level should be within the Operating Range on the dipstick between the L mark and the F mark IMPORTANT DO NOT operate engine...

Page 47: ...nd as sure proper lubrication in hot weather Fill up to but not above the F mark on the dip stick Crankcase capacity is 1 85 quarts 1 75 liters plus 1 2 pint 0 24 liters for the new oil filter IMPORTA...

Page 48: ...15 PTO Clutch Lever Pivot Grease 1 16 Transaxle Oil Reservoir Oil 20W 50 1 17 Clutch Engagement Pivot Grease 1 18 Rear Wheel Pivot Grease 2 19 Tail Wheel Caster Pivot Grease 1 20 Rear Wheel Bearing G...

Page 49: ...Maintenance Instructions lubrication 45 Chassis and Deck Lubrication Points 1 3 4 5 7 7 8 9 10 26 25 26 6 1 2 4 7 6 7 11 24 27 22 28 24 17 2 14 14 13 16 11 15 23 22 21 12 18 19 18 20...

Page 50: ...ill the gear drive assembly NOTE Since the gearboxes are connected as a unit by connector tubes it is necessary to add oil slowly Allow a few minutes after adding oil for the oil to flow throughout th...

Page 51: ...he transaxles sound noisy or have poor steer ing response recheck oil level in both transax les by removing the elbows check oil level at fill opening 11 If oil needs to be added refer back to steps 4...

Page 52: ...olding a hand adjacent to the cylinder head and feeling the cooling airflow If there is little or no airflow clean the cooling fins as follows DAnger Make sure to keep hands clear of exhaust pipe muff...

Page 53: ...auge on the air cleaner outlet to indicate when the air filter needs servicing a red flag will appear when the filter is overly restricting airflow into the engine IMPORTANT Use only Cummins Fleetguar...

Page 54: ...ith compressed air 4 Use a bright light inside the element to inspect for damage Check the element very carefully for pin holes or other damage that will allow dirt to leak through the paper media Rep...

Page 55: ...tilting action 2 Using the carrier frame lift handle raise deck to the TILT UP position and insert the deck hook into the tilt up latch on the tractor body Tilt Up Latch Deck Secured in TILT UP Positi...

Page 56: ...und the housing the fins underneath need to be clean as well as the more visible fins above Also pay close attention to the area under the drive pul ley IMPORTANT In case an oil leak develops on the i...

Page 57: ...one part baking soda and four parts water Rinse with clean water Coat the terminals with petroleum jelly or terminal protector spray to retard further corrosion Charging the Battery danger BATTERIES...

Page 58: ...the blade cutting edge is dull or nicked it should be sharpened Remove blades for sharpening by grasping the end of the blade us ing a rag or a thick padded glove while loosen ing and removing the nut...

Page 59: ...y Breaker Points Model MBV The Briggs Stratton engine is equipped with elec tronic ignition No breaker points maintenance or adjustments are necessary with this system Con tact an authorized Briggs St...

Page 60: ...ard Speed Control FSC and PTO disengaged and panel horn works but the starter is not engaging Forward Speed Control Friction Lock The FSC friction lock is designed to hold the se lected forward travel...

Page 61: ...wires IMPORTANT ALWAYS use genuine factory re placement parts Substitute parts CAN result in product malfunction and possible injury to the op erator and or others Drive Belts There are three 3 indivi...

Page 62: ...Open Engine Hidden for Clarity 2 To replace the engine PTO belt a Reverse the removal procedure to replace the engine belt b Secure wire on lock pin above tab on lower PTO guard Engine PTO Belt Belt...

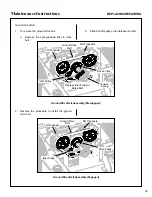
Page 63: ...lt off pulleys then release the idler Ground Drive Belt Assembly Disengaged 2 Reverse the procedure to install the ground drive belt Ground Drive Belt Assembly Engaged Depress Idler Pulley to Relax Be...

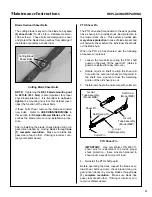
Page 64: ...a clean area where the fuel line and connections will not be contaminated by any dust and dirt DANGER Gasoline is extremely flammable and can be highly explosive To minimize danger Use only an approv...

Page 65: ...ox has a shear pin to provide shock load protection to the mower deck drive This system provides pri mary shock protection in case of blade impact and will normally shear before the individual shear b...

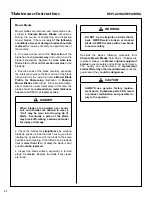
Page 66: ...sandy soil and if blades are allowed to wear a slot may be worn into the wing tip of blade Eventually a piece of the blade may break off creating a serious potential for injury or damage Check the bla...

Page 67: ...1 NOTE For proper operation the steering levers should be adjusted to sit evenly using the following procedure 1 Examine the steering levers to make sure they are parallel front to back in relation to...

Page 68: ...sition and tighten both locknuts Adjustment Slide Locknut Position Locknut Pivot Point Steering Lever Adjustment Neutral Position Adjustment Step 3 1 With the Forward Speed Control FSC in NEU TRAL the...

Page 69: ...SC in the NEUTRAL position and the en gine running the wheels should not move If a drive tire is moving the Control Rod on that side is out of adjustment Adjust that side to achieve neutral Now both t...

Page 70: ...b serve if the mower moves in a straight line use cement joint or other line on ground for refer ence 3 If travel is not straight shorten the control rod of the slow side adjust in 1 8 turn increments...

Page 71: ...stment Step 7 FSC Position With Levers 1 Place the FSC in the full FORWARD position and pull both steering levers back the FSC lever should not move If the FSC lever moves back the friction needs to b...

Page 72: ...ngaged To adjust length remove ball joint from clutch arm shorten the clutch rod to decrease this measurement or lengthen the clutch rod to increase this measurement If adjust ments are needed more fr...

Page 73: ...Disengaged Use the following procedures to check and adjust clutch disengagement and brake action Idler Pulley Maximum Travel Adjustment Step 1 Loosen the brake band adjustment nut allowing stop arm...

Page 74: ...e necessary to adjust the blade brake band nut to maintain these dimensions CLUTCH DISENGAGED CLUTCH ENGAGED 5 8 in to 3 4 in 16 mm to 19 mm Clutch Idler Pulley Travel Adjustment Blade Brake Band Adju...

Page 75: ...level surface if any pin is sticking up likely the front pins tighten the opposite side or loosen the same side to lower the pin Adjustments are made by loosening the jam nut and tightening or loosen...

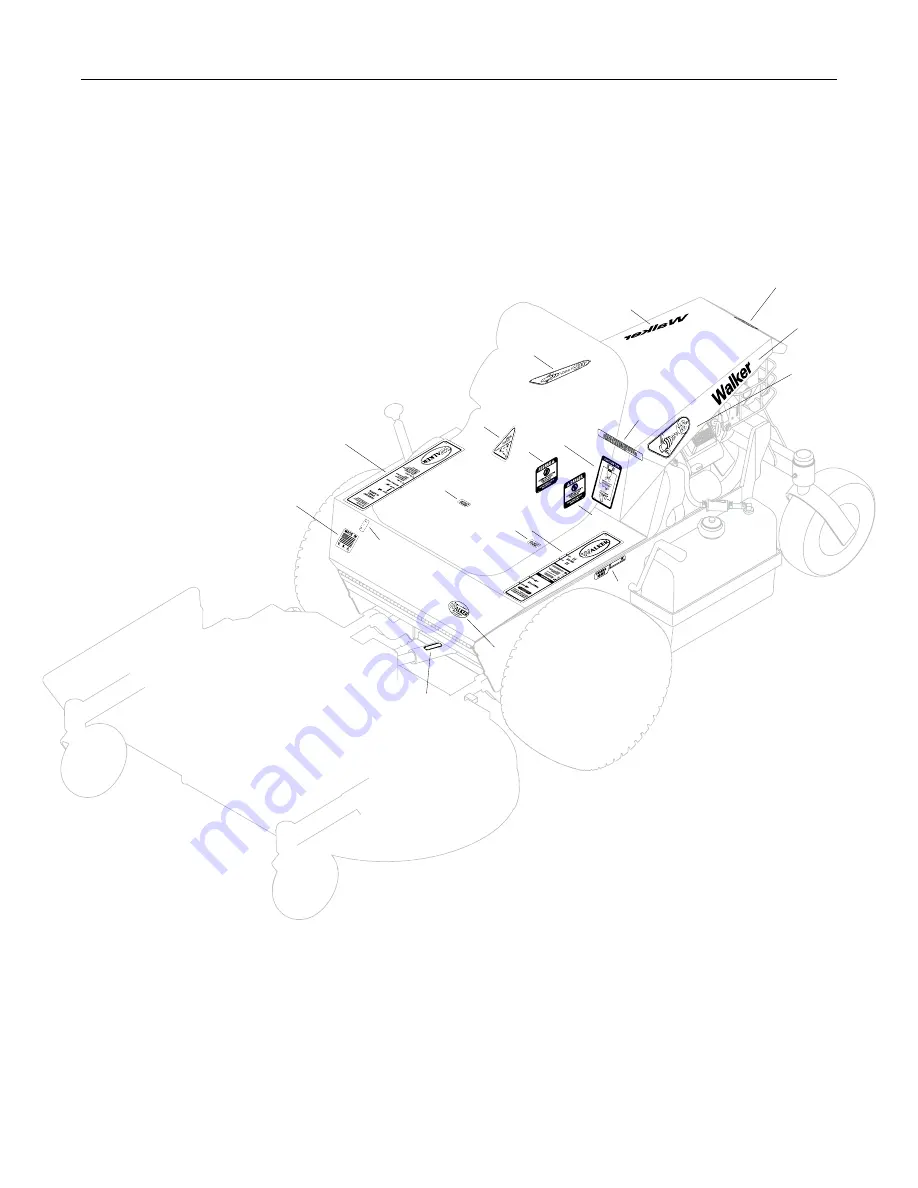
Page 76: ...8 5803 Walker Manufacturing Logo Body 1 Danger Decals Warning Decals Caution Decals 9 5805 Caution Engine Exhaust Rear Body 1 10 4107 10 Decal Belt Routing Rear Body Underside 1 11 4107 1 Danger Rota...

Page 77: ...73 Effective Date 01 01 10 Use only genuine Walker replacement parts Refer to Decks Parts Manual for Deck Decals 9 2 1 6 15 14 10 3 3 7 8 13 12 11 11 4 16 5 5 TRACTOR DECALS...

Page 78: ...eel 5 1 8 2 42 8768 2 Seal Reverse Lip 4 43 8037 Bearing Cone 3 4 ID 4 44 8768 Caster Wheel Pneumatic 11 x 4 00 5 2 8768 3 Tire Pneumatic 11 x 4 00 5 8768 5 Caster Wheel 5 x 3 45 8766 Axle Nut 3 4 16...

Page 79: ...F120 F127 29 28 8 3 4 5 16 22 15 F227 F009 F005 F002 F116 27 26 25 24 6 7 18 18 18 F257 F025 F034 F034 F034 F009 F009 F430 F430 F009 F200 46 F200 F034 F025 17 F009 F009 F034 F475 F093 F009 F004 F381 F...

Page 80: ...W Hole 1 4 x 5 8 1 34 4411 2 Drive Shaft 1 35 4245 1 Idler Pulley 4 Flat 2 36 4230 1 Engine PTO Belt Matched Set 1 37 4236 4 Idler Pulley 4 AA 1 38 5214 2 Ball Joint 5 16 24 Nylon Lined 2 39 5226 1 Sp...

Page 81: ...09 F035 F120 F153 F153 F065 F120 F034 F211 F009 F120 F120 F120 F120 F058 F058 F031 F211 F381 F034 F290 8 9 7 10 7 11 34 35 35 30 29 28 27 26 27 31 32 F069 33 37 36 F051 F051 F041 F041 12 13 2 3 F350 F...

Page 82: ...1 24 4046 Fuel Tank 3 0 Gal Gas 1 Fuel Cap Centered Includes Items 25 26 25 5082 2 Fuel Cap Seal 1 26 5082 Fuel Tank Cap 1 Includes Item 25 Choke and Throttle Assemblies 27 5975 3 Cable Tie 50 x 7 2...

Page 83: ...F201 F002 F002 F025 F005 16 37 F183 F034 F185 F268 F268 1 2 3 4 5 34 33 35 29 30 31 17 18 19 17 25 24 26 36 F185 F184 F184 F009 32 Refer to Body Chassis Assembly Refer to Body Chassis Assembly 27 28 1...

Page 84: ...24 5020 2 Fuel Filter In Tank 1 25 4046 Fuel Tank 3 0 Gal Gas 1 Fuel Cap Centered Includes Items 26 27 26 5082 2 Fuel Cap Seal 1 27 5082 Fuel Tank Cap 1 Includes Item 26 Choke and Throttle Assemblies...

Page 85: ...ts Refer to Body Chassis Assembly F009 F439 F175 F185 1 2 3 4 5 19 20 18 19 26 25 27 F185 F184 F184 Refer to Body Chassis Assembly 31 17 F164 F050 F201 F002 F002 F025 F005 38 37 39 33 32 35 29 28 36 3...

Page 86: ...Handle Grip Red 1 36 5830 3 Grease Fitting 45 Deg 1 37 8655 4 Clevis Pin 5 16 x 3 4 2 38 4406 12 BrakeActuator Pull 1 39 2280 Clevis 3 8 1 40 2406 4 Clevis Pin 5 16 x 1 1 8 1 41 4406 5 Parking Brake...

Page 87: ...5 16 17 18 34 35 18 37 38 39 18 18 42 43 44 37 22 47 47 21 20 48 23 48 46 19 19 18 27 24 24 25 25 26 26 28 26 29 29 30 30 31 31 31 31 32 32 33 45 40 41 F034 F009 10 10 10 1 F054 F171 F171 F171 F054 F0...

Page 88: ...b 2 29 5453 10 Steering Lever Handle Adjustable 2 Includes Items 30 F345 30 5850 2 Handle Grip Foam 5 1 2 2 31 5214 3 Ball Joint 5 16 24LH Nylon Lined 2 32 2215 5 Steering Lever Dampener 2 33 4451 6 S...

Page 89: ...7 F004 F004 F211 6 F386 F059 F183 F024 F093 1 2 5 8 F385 9 Refer to Body Chassis Assembly F093 F183 27 26 27 26 18 30 30 29 28 28 29 F345 F188 F167 F035 F198 F373 F008 F009 F009 F032 F009 F004 F003 F3...

Page 90: ...r Solenoid Cable 1 14 4929 Starter Solenoid 1 15 5835 Cable Clamp 3 4 1 16 6941 6 Relay Switch 30 40AMP 17 6941 7 Relay Mount 18 4940 1 Wire Harness 1 19 7910 Battery 12V 275CCA Dry 1 20 4940 2 Wire H...

Page 91: ...L YEL PUR PUR DETAILF BRN WHT WHT BLK BLK BLK BLK BRN WHT PUR RED PUR BLK ORG ORG RED WHT PUR PUR RED C I Refer to Body Chassis Assembly Refer to Body Chassis Assembly 6 3 27 27 28 29 1 2 27 4 5 F349...

Page 92: ...40AMP NC 3 Includes Items 14 15 13 5835 Cable Clamp 3 4 1 14 6941 6 Relay Switch 30 40AMP 15 6941 7 Relay Mount 16 4940 7 Wire Harness 1 17 5941 Safety Switch NC 1 18 4359 3 Switch Mount Clutch 1 19...

Page 93: ...N WHT BLK DETAILE BLK BLK YEL YEL PUR PUR DETAILF BRN WHT WHT BLK BLK BLK BLK BRN WHT PUR RED PUR BLK ORG ORG RED WHT PUR PUR RED C Refer to Body Chassis Assembly Refer to Body Chassis Assembly 6 3 24...

Page 94: ...le 2 Wires 9 6 5977 1 Grommet 1 8 x 3 8 2 7 7995 4 Power Lead WireAssembly 1 Includes Items 6 8 9 8 5996 1 4 x 16 14 GAQDF Terminal 1 Fully Insulated 9 5975 1 Cable Tie 18 x 3 3 4 1 10 6940 10 Jumper...

Page 95: ...10 Use only genuine Walker replacement parts Refer to Body ChassisAssembly Refer to Body ChassisAssembly Refer to Body Chassis Assembly 2 11 10 13 PUR PUR WHT To Main Harness 12 6 6 14 F009 9 8 F091 5...

Page 96: ...GNITION SWITCH CIRCUITS OFF START RUN G M B A S1 S2 B A RUN RELAY B START RELAY OFF START PTO ON 30 87 30 87 30 87A 30 87A STARTER SOLENOID MAGNETO RECTIFIER REGULATOR CARB SOLENOID STARTER RUN RELAY...

Page 97: ...N G M B A S1 S2 B A RUN RELAY B START RELAY OFF START PTO ON 30 87 30 87 30 87A 30 87A RUN RELAY C IGNITION RELAY OFF START PTO ON 30 87 30 87 30 87A 30 87A WALKER MODEL MBK Beginning S N 2010 104768...

Page 98: ...________________________ ______________________________________________________________________________________________________________ ________________________________________________________________...

Page 99: ...customer shall pay any charges for making service calls and or for transporting the mower to and from the place where the inspection and or warranty work is performed 3 HOW TO OBTAIN SERVICE UNDER TH...

Page 100: ...ondition Clear Temperature 85 F o 29 C o Wind Speed 5 mph 8 kmh Humidity 20 Barometric Pressure 83 8 kPA LpA 74 OPERATOR LpA 76 OPERATOR Deck Size 122 cm Deck Size 122 cm Sound Model MBK Sound Test So...

Reviews: