
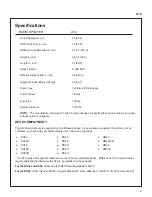


A16
Operating
11
Operating
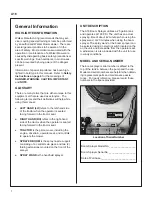
CHEMICAL SAFETY
Always adhere to the following guidelines when
working with the sprayer.
●
Do not
use any flammable materials in this
sprayer.
● Follow the spray material manufacturer’s direc-
tions for each spray material.
● Never allow the water hose used to fill the tank
to reach down into the mixed spray solution.
The end of the spray hose could be contami-
nated.
● Always follow the spray manufacture’s direc-
tions to properly neutralize the chemicals
during the post-use cleaning of the sprayer.
● A material safety data sheet (MSDS) provides
specific details on any spray material being
used and should be available on request from
each chemical manufacturer or distributor.
PUMP OPERATING PRESSURES
The SHURflo pump pressure switch is factory
preset to turn the pump on and off at 100 PSI.
The spray wand has a flow rate of 1 gallon (3.78 L)
per minute. At this flow rate, the pump operating
pressure will be about 60-65 PSI. This operating
pressure gives optimal, continuous spray wand
performance.
The spray boom has three (3) 11008 EVS spray
tips that have a total flow rate of 2.4 gallons (9 L)
per minute. At this flow rate, the pump operating
pressure will be about 30 PSI due to reduced flow
restriction. This will result in less drift and better
spray coverage of plants.
CALIBRATING THE APPLICATION RATE
The flow rates and operating pressures for this
pump result in actual spraying times of:
● 42 minutes with the spray wand
● 20 minutes with the spray boom
When spraying with the spray boom, plan on
driv-
ing about 2.5 MPH, or 220 feet per minute (4
km/h, or 67 meters per minute)
. That results in
33,000 square ft. of application per tank. With
approximately 10% overlap,
place enough chemi-
cal material in the tank to cover 30,000 square
ft. (2800 square meters) of area
.


