background image

English

   - 9 -

Power Connection

IMPORTANT: The TV set is designed to operate on 
220-240V AC, 50 Hz.

After  unpacking,  allow  the  TV  set  to  reach  the 

• 

ambient room temperature before you connect the 
set to the mains. Plug the power cable to the mains 
socket outlet.

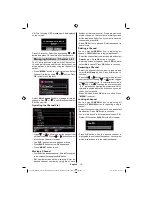
Aerial Connection

Connect  the  aerial  ,cable  TV  plug  to  the AERIAL 

• 

INPUT socket located at the rear of the TV.

Using Digital Multimedia 
Connectors

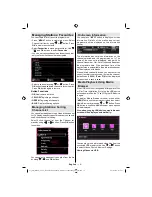
You can connect USB devices to your TV by using 

• 

the USB input of the TV. This feature allows you to 
display/play JPG, MP3 and video  les stored in a 
USB stick.

It is possible that certain types of USB devices (e.g. 

• 

MP3 Players) may not be compatible with this TV. 

You  may  back  up  your   les  before  making  any 

• 

connections  to  the  TV  set  in  order  to  avoid  any 
possible data loss. Note that manufacturer will not 
be responsible for any  le damage or data loss.

 Do not pull out USB module while playing a  le.

• 

CAUTION: Quickly plugging and unplugging USB 
devices, is a very hazardous operation. Especially, 
do  not  repeatedly  quickly  plug  and  unplug  the 
drive. This may cause physical damage to the USB 
player and especially the USB device itself.

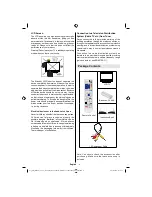
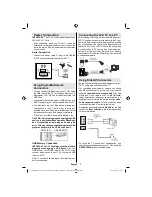
SIDE VIEW        USB MEMORY

USB Memory Connection

IMPORTANT: The TV should be switched off while 
plugging or unplugging a  USB device.

 Plug your 

USB  devices  to  the  USB  input  of  the  TV.  You  can 
connect a usb device to your TV by using the USB 
input of the TV.

Note: It is possible certain types of hard disk drives 
are not supported.

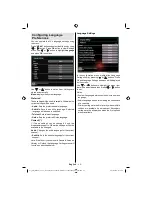
Connecting the LCD TV to a PC

For displaying your computer’s screen image on your 
LCD TV, you can connect your computer to the TV set. 
Power off both computer and display before making 
any connections. Use 15-pin D-sub display cable to 
connect a PC to the LCD TV. When the connection 
is made, switch to PC source. See “Input selection” 
section.  Set  the  resolution  that  suits  your  viewing 
requirements.  Resolution  information  can  be  found 
in the appendix parts

.

Using Side AV Connectors

You can connect a range of optional equipment to your 
LCD TV using side connectors of the TV.

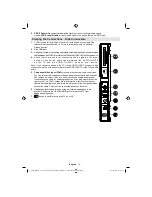
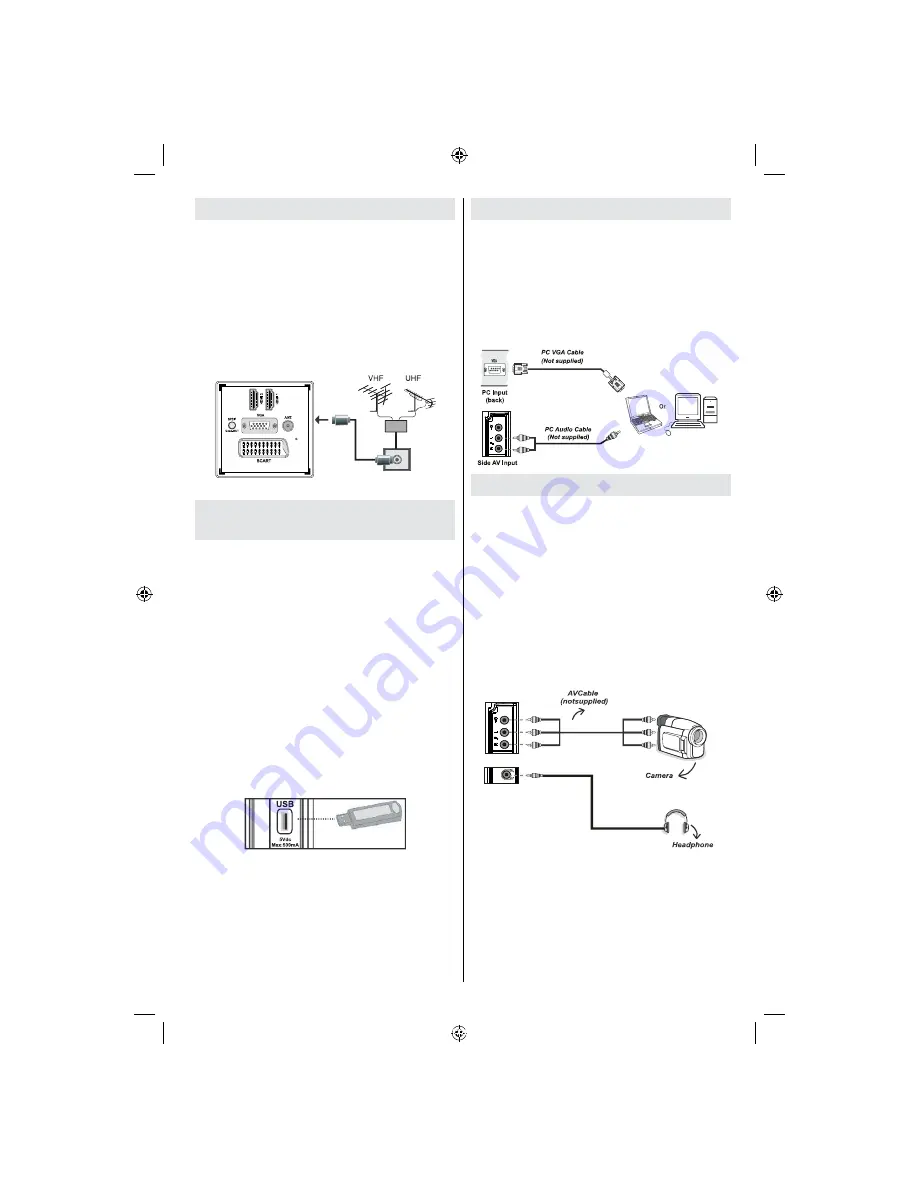
For connecting a camcorder or camera , you should 

• 

use 

AV

 socket (side). To do this, you must use the 

supplied 

video/audio connection cable

. First, plug 

single  jack  of  the  cable  to  the  TV’s

 AV  IN

  socket 

(side). Afterwards, insert your camera cable’s (

not 

supplied

) connectors into the plural part of the 

video/

audio connection cable

. Colours of the connected 

jacks should match. See illustration below. 

Afterwards, you should switch to 

• 

Side AV

 source. See 

the section 

Input selection

 in the following sections 

for more information.

To  listen  the  TV  sound  from  headphones,  you 

• 

should connect headphones to your TV by using the 

HEADPHONE 

jack as illustrated above.

01_[GB]_MB60_(01-TV)_1900UK_IDTV_26883W_NICKEL16_10070464_50177852.indd   9

28.10.2010   13:10:25

Summary of Contents for WP2640DVD

Page 1: ...COLOUR TELEVISION WITH REMOTE CONTROL OPERATING INSTRUCTIONS WP2640DVD BE WALKER WISE logon to www walker ie...

Page 2: ...erating the Channel List 15 Moving a Channel 15 Deleting a Channel 15 Renaming a Channel 15 Locking a Channel 15 Managing Stations Favourites 16 Button Functions 16 Managing Stations Sorting Channel L...

Page 3: ...ence When selling the device or giving it away absolutely give these direction for use Thank you for choosing this product This manual will guide you for the proper operation of your TV Before operati...

Page 4: ...top of the TV Batteries should not be exposed to excessive heat such as sunshine re or the like Lightning In case of storm and lightning or when going on holiday disconnect the power cord from the wa...

Page 5: ...of children Never let children use electrical device unsupervised Children can t always recognize properly the possible dangers Batteries accumulators can be life threatening when swallowed Store batt...

Page 6: ...e please switch off or disconnect the TV from the mains plug This will also reduce energy consumption Disconnect power when going away for longer time Note that annually using the TV set in Power Save...

Page 7: ...on Zooms videos in Media Browser 16 video mode Green button 17 Yellow button 18 Menu on off 19 Blue button 20 OK Edit Channel list Hold in TXT mode 21 Cursor right Subpage in TXT mode 22 Cursor down P...

Page 8: ...t 3 connects to an aerial antenna system Note that if you use a decoder or a media recorder you should connect the aerial cable through the device to the television with an appropriate antenna cable a...

Page 9: ...nect a device to the TV via the VIDEO INPUT you should also connect your device with an audio cable to the AUDIO INPUTS of the TV to enable audio Component Video Input YPbPr 5 is used for connecting c...

Page 10: ...e USB input of the TV You can connect a usb device to your TV by using the USB input of the TV Note It is possible certain types of hard disk drives are not supported Connecting the LCD TV to a PC For...

Page 11: ...io quality When you connect to DVD player as illustrated above switch to the connected HDMI source See Input Selection section for more information on changing sources Connecting to a DVD Player via C...

Page 12: ...ttons will function as volume up down as default Even if you set other functions for these buttons buttons will perform as default after a short while Volume Setting Press P V AV button once and then...

Page 13: ...y Displays the programmes of previous day Blue button Next day Displays the programmes of the next day Numeric buttons Jump Jumps to the preferred channel directly via numeric buttons OK Options Displ...

Page 14: ...after setting Teletext Language option Scan Encrypted will be then highlighted You can set Scan Encrypted as Yes if you want to scan coded stations Afterwards select the desired Teletext Language Pres...

Page 15: ...tions will change accordingly Use button to highlight an item and then press or button to set an option You can press MENU button to cancel Digital Manual Search In manual channel scan the number of t...

Page 16: ...he channel and press OK Press OK button to process Selected channel is now moved Deleting a Channel You can press GREEN button to tag untag all channels YELLOW button to tag untag channel Select the c...

Page 17: ...programme will be displayed on the information banner The information banner gives information on the channel selected and the programmes on it The name of the channel is displayed along with its chan...

Page 18: ...ill be ltered and listed on this screen 0 9 Jump Numeric buttons Jump to selected le using the numeric buttons OK Views the selected picture in full screen Slideshow button Starts the slideshow using...

Page 19: ...btitle Position Sets subtitle position as up or down Subtitle Font Size Sets subtitle font size max 54pt Changing Image Size Picture Formats Programmes can be watched in different picture formats depe...

Page 20: ...use different picture settings in detail Press MENU button and select the Picture icon by using or button Press OK button to view Picture Settings menu Operating Picture Settings Menu Items Press or b...

Page 21: ...cal to the settings explained in main menu system PC Position Select this to display PC position menu items Autoposition Automatically optimizes the display Press OK to optimize H Position This item s...

Page 22: ...setting options of the TV set Using a Conditional Access Module IMPORTANT Insert or remove the CI module only when the TV is SWITCHED OFF In order to watch certain digital channels a conditional acce...

Page 23: ...l not be available to be changed Audio Changes the audio language for the current channel Subtitle Sets the subtitle language for the current channel Note If the Country option is set to Denmark Swede...

Page 24: ...de your new pin a second time for veri cation purposes IMPORTANT The factory default pin number is 0000 if you change the pin number make sure you write it down and keep it safe Timers To view Timers...

Page 25: ...the Time Zone between GMT 12 or GMT 12 Date Time on the top of the menu list will then change according to the selected Time Zone Changes are automatically stored Press MENU to exit Con guring Source...

Page 26: ...on the screen during the natural pauses in the audio and sometimes during dialogue if deemed necessary You can use this feature only if the broadcaster supports that additional narration track Auto T...

Page 27: ...ying a persistent image LCD TVs image persistence may disappear after a short time Try turning off the TV for a while To avoid this do not leave the screen in still picture for extended periods No Pow...

Page 28: ...patibility Input Signal Types Source Supported Signals Available EXT SCART PAL 50 60 O NTSC 60 O RGB 50 O RGB 60 O Side AV PAL 50 60 O NTSC 60 O YPbPr 480I 60Hz O 480P 60Hz O 576I 50Hz O 576P 50Hz O 7...

Page 29: ...binaire etc Lecture mpg dat vob mkv rmvb ts trp tp MPEG1 MPEG Layer 1 2 3 20Mbit sec MPEG2 MPEG2 XviD 3ivx PCM MP3 Version XviD jusqu 1 1 2 Mpeg2 TS H264 TS EAC3 AC3 20Mbit sec RMVB IMA LBR 10Mbit se...

Page 30: ...t power up TV opens with new software version Note on reboot operation Reboot is the last step in software upgrade operation if download of new software is nished successfully During reboot TV makes n...

Page 31: ...ONS mm DxLxH With foot 164 75 x 645 40 x 483 70 Weight Kg 9 15 DxLxH Without foot 88 70 x 645 40 x 433 00 Weight Kg 8 70 Digital Reception MHEG 5 ENGINE compliant with ISO IEC 13522 5 UK engine Pro le...

Page 32: ...loured blue or black must be connected to the terminal which is marked with the letter N or coloured Black The wire which is coloured brown or red must be connected to the terminal which is marked wit...

Page 33: ...NTSC PAL playback according to disc content LPCM audio via coaxial digital audio output optional Multi Audio up to 8 support According to disc content Multi Subtitle up to 32 support According to dis...

Page 34: ...ources such as hot air ducts or leave it in a car parked in direct sunlight as the temperature can rise quickly and damage the disc After playing store the disc in its case On cleaning Before playing...

Page 35: ...remote control While playing a le you should press STOP button three times to eject Overview of the Remote Control Standby 1 Numeric buttons 2 Return back 3 Language selection Set language 4 Display t...

Page 36: ...atedly to switch between modes LANG Audio language X X MENU Displays TV menu OK SELECT Enter View Play REPEAT Displays repeat options RETURN Returns back to the previous menu if available ROOT Goes ba...

Page 37: ...tle language will automatically be set to the disc s priority language Usually a circulation will happen while switching 8 to another language that is you can cancel the subtitle by pressing this butt...

Page 38: ...set Spdif Output as PCM or RAW If you select PCM from SPDIF Output in DVD menu and play DVD with Dolby audio you can get audio output with two channels via the speakers and the SPDIF Out If you select...

Page 39: ...hnology MPEG II and high density recording technology DVD enables aesthetically pleasing full motion video to be recorded over long periods of time for instance a whole movie can be recorded DVD has a...

Page 40: ...English 39 Disc Types Compatible with This Unit 02_ GB _MB60_ 02 DVD _WDIVX_1900UK_10070464_50177852 indd 39 28 10 2010 13 28 34...

Page 41: ...rayscale External Subtitles optional srt Support Text File Format but do not support Picture File Format smi sub ssa ass Note It is not guaranteed that all DivX formats are supported Speci cations Typ...

Page 42: ...50177852...
Reviews: