background image

3

iLook Camera(Option)

We define the orientation of  Aircraft in order not to cause confusion in the following descriptions. That is to say,
the tail boom of  Aircraft is facing the pilot (tail in), and its head facing forward (front of pilot). The left hand of
pilot is the left side of  Aircraft, the right hand of pilot is the right side of  Aircraft Its head is to the front and its tail
boom is to the back. The direction in which main body of  Aircraft is facing is up, and its skids are facing down.

03

Definition

of 


Aircraft

Orientation

front

back

up

down

left

right

Tool kit

Li-polymer battery pack(Option)

Transmitter (Option)

User Handbook

04

Equipments

Main rotor blades

Charger(Option)

QR X350PRO

Summary of Contents for 25174

Page 1: ......

Page 2: ...nstruction and attention of GA005 balance charger 17 17 17 17 17 18 18 18 12 Steps of flight 13 Flight over 19 19 08 Basic Flight Instruction 6 8 1 Main Control System Control Mode 6 8 2 Code binding...

Page 3: ......

Page 4: ...h transmitter and receiver are fully charged saturated 2 Ensure both the throttle stick of your transmitter stay at the lowest positions before operation 3 Please strictly obey the order of turn on an...

Page 5: ...and of pilot is the left side of Aircraft the right hand of pilot is the right side of Aircraft Its head is to the front and its tail boom is to the back The direction in which main body of Aircraft i...

Page 6: ...tion please follow the order to connect the wires with yellow green red from outside to inside M2 M4 brushless motor is counterclockwise rotation please follow the order to connect the wires with gree...

Page 7: ...AILE To control Aileron leftward rightward CHECK POWER To check voltage Connect with power board DATA BUS Data transmission connect DEVO RX703A JUMP PORT Jumper port when regular receiver is need ins...

Page 8: ...otes The aircraft is in Motor lock status after Code binding successfully 8 3 3 Motors stop rotating If you push the throttle to the lowest positon the motors stop rotation 8 3 4 Notes 1 After unlock...

Page 9: ...on Mode 2 Keep the throttle rudder sticker to the lowest position and move to the right side then push the Elevator stick to the lower left corner compass calibration mode entered 2 Mode 1 keep the th...

Page 10: ...nk over 2 times 3 Compass should be calibrated well And the THRO trim ELEV trim AILE trim and RUDD trim at the neutrla positions Position Hold Setup One Key Go Home Setup 09 Advanced function specific...

Page 11: ...Low Voltage Protection is a design to avoid the aircraft to crash by the low voltage of the battery When the battery voltage is too low the left green LED will slow blink warning the aircraft will des...

Page 12: ...MOD and it is close For setting please ref to radio setting 9 6 3 IOC Setup 1 The quadcopter is in manual mode when FMOD switch turns to postion 0 and 1 Note 2 The quadcopter is in IOC mode when FMOD...

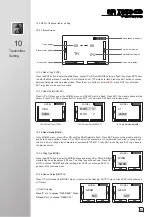
Page 13: ...odel Name 10 1 2 Type Select 10 1 3 Model Select 10 1 5 Wing Type Press UP or DN to select Wing Type in Model Menu press ENT to enter the Wing Type setting interface Press UP or DN to select Wing Type...

Page 14: ...select Function setting press R or L to select Active Press UP or DN to select Function Menu in Main Menu press UP or DN to select Reverse Switch and press ENT to enter the Reverse Switch setting int...

Page 15: ...nd then press EXT to return to Model Menu 10 2 5 Wing Type Under the Model Menu interface press UP or DN to move the cursor to point to Model Name press ENT to Model Name setting interface press UP or...

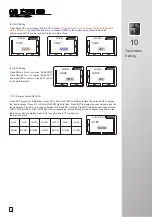
Page 16: ...move the cursor to point to Video Select press ENT to Video Select setting 10 2 8 Video Select interface Press R or L to select Active Press DN to move the cursor to point to Channel item press R or...

Page 17: ...GEAR MIX Press DN and R or L to choose GEAR ACT MODEL MOD 1 MOD 2 MODEL 0 1 X350P 10 3 1 Boot Screen 10 3 3 Model Select SELEC 10 3 2 Model Type TYPE Press UP or DN key under the MODEL menu until SELE...

Page 18: ...the channel name and the reverse status Press R or L to change between NOR and REV settings Press DN to display each channel AILE THRO RUDD GEAR FLAP AUX2 and their corresponding reverse setting Set...

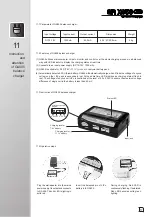
Page 19: ...in red The voltage of anyone cell LiPo is controlled at the level of 4 2 0 05V to ensure the maximum voltage difference of single cell in the battery is less than 50 mV Weight 62 5 47 20 8mm 46g DC15...

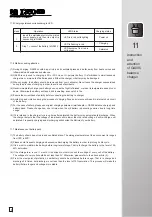
Page 20: ...of the battery 7 For the sake of safety please use original charging equipment wall adapter GA005 balance charger and battery pack Please change new one in time when the old battery is becoming swoll...

Page 21: ...he transmitter sticks or the Aircraft until binding has completed Step 2 Turn all the switch of transmitter to 0 position push the throttle stick to the lowest position turn on the transmitter power 1...

Page 22: ...Guangzhou Tel 8620 8491 5115 8491 5116 Fax 8620 8491 5117 Web www walkera com Email heli walkera com info walkera com The specifications of the R C aircraft may be altered without notice Children und...

Reviews: