background image


WallbedFactory.com 

Assembly Instructions


Page 2 of 19


1.800.975.8451


Tube Leg Murphy Beds


**Please make sure all hardware is included. If anything is missing call 1.800.975.8451.


A. 

B. 

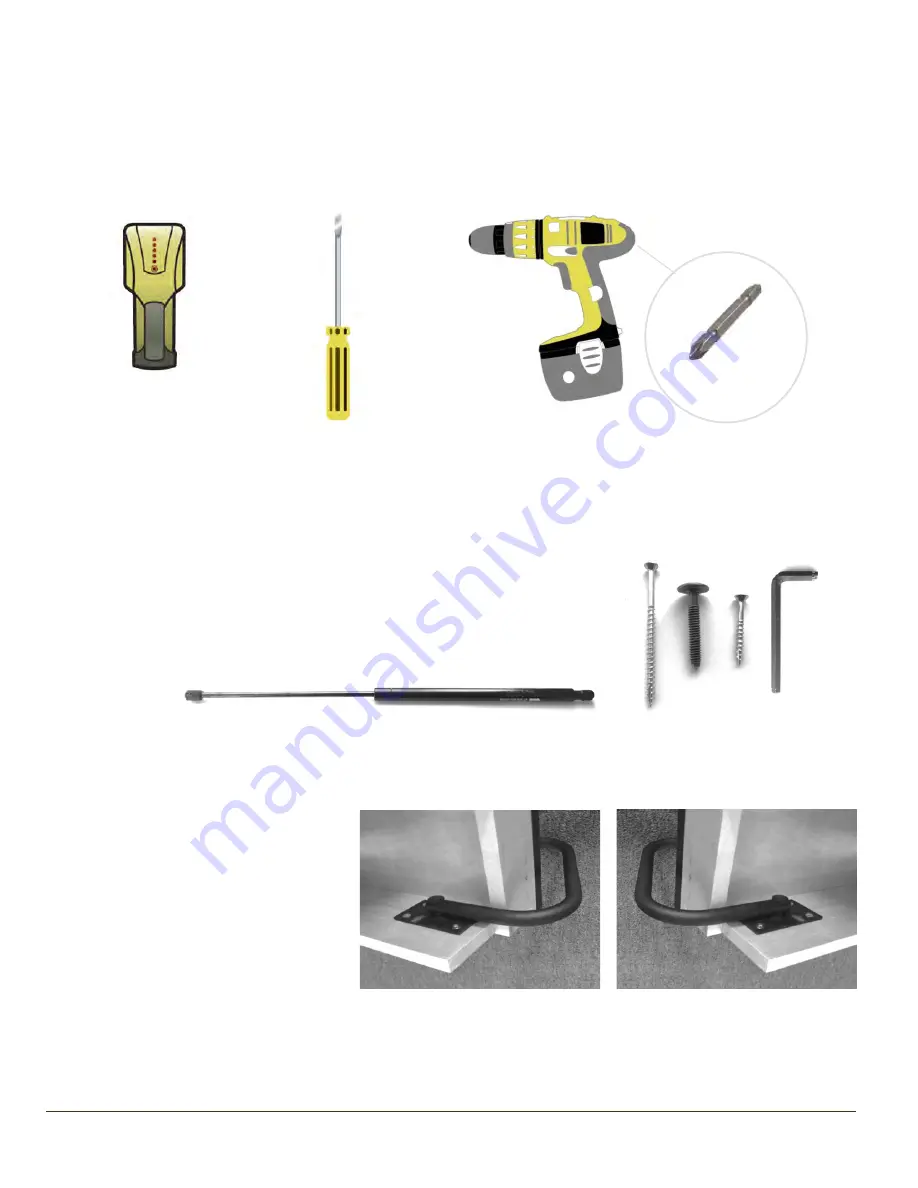
Leg Installation Parts 

A. Right-Facing Leg (1) 
B. Left-Facing Leg (1) 
C. Machine Screws (8) 

(NOTE: Machine Screws are  
pre-screwed into Bed Frame.) 

B. 

D. 

C. 

E. 

A. 

Items Not to Scale


INCLUDED HARDWARE: 

Bed Installation Parts 

A. Air Pistons (2) 
B. 3” Sheet Rock Screws (4) 
C. 1 5/8” Hexagonal Screws (4) 
D. 1 1/2” Zinc Screws (4) 
E. Allen Wrench 

OPTIONAL: Hardware Kit for Metal 
Stud/Masonary Walls


TOOLS NEEDED:  

A. Stud Finder 
B. Flathead Screwdriver 
C. Power Drill w/ Phillips Head Screwdriver Bit & Drill Bits 

A. 

B. 

Phillips Head 

Screwdriver Bit 

C. 

Summary of Contents for Mission

Page 1: ...Wall Bed Factory Assembly Instructions Camden Murphy Bed Farmhouse Murphy Bed Hudson Murphy Bed Mission Horizontal Murphy Bed Mission Murphy Bed...

Page 2: ...1 C Machine Screws 8 NOTE Machine Screws are pre screwed into Bed Frame B D C E A Items Not to Scale INCLUDED HARDWARE Bed Installation Parts A Air Pistons 2 B 3 Sheet Rock Screws 4 C 1 5 8 Hexagonal...

Page 3: ...packaging package includes 5 bed pieces Retrieve 2 blue green Foam Pieces from Side Panel packaging to use in a later step Determine where you want to position Wall Bed Place Head of Bed 18 from wall...

Page 4: ...Cal King 92 Cal King 82 To locate studs 1 Slide Stud Finder along wall behind Wall Bed until lights indicate a stud beneath 2 Draw a line at this point 3 Slide Stud Finder along wall in opposite direc...

Page 5: ...Page 5 of 19 1 800 975 8451 Tube Leg Murphy Beds E clip Step 3 PARTS NEEDED FLATHEAD SCREWDRIVER Remove E clip from Right Side Panel see A by inserting Flathead Screwdriver between E clip and Pivot B...

Page 6: ...tions Page 6 of 19 1 800 975 8451 Tube Leg Murphy Beds Step 4 Lift Right Side Panel onto its long edge see A and slide toward Bed Frame inserting Pivot Bar through metal plate on Bed Frame see B Right...

Page 7: ...ut E clip back on Pivot Bar by sliding E clip into grooves on Pivot Bar until it snaps into place E clip Step 6 Repeat steps 3 5 on left side of bed for Left Side Panel installation Both Side Panels a...

Page 8: ...of Bed Frame Step 8 PARTS NEEDED 2 AIR PISTONS Piston Head narrow end wide end Piston Head Foot of Bed bumper bumper Step 7 PARTS NEEDED FOAM BLOCKS At Foot of Bed pivot both Side Panels slightly out...

Page 9: ...ds Step 10 Repeat Step 8 9 to install second Air Piston on left side of bed Step 9 Have your helper stand at Foot of Bed and raise lower Bed Frame see A to align Piston Head at wide end of Air Piston...

Reviews: