background image

27

Wallbox App

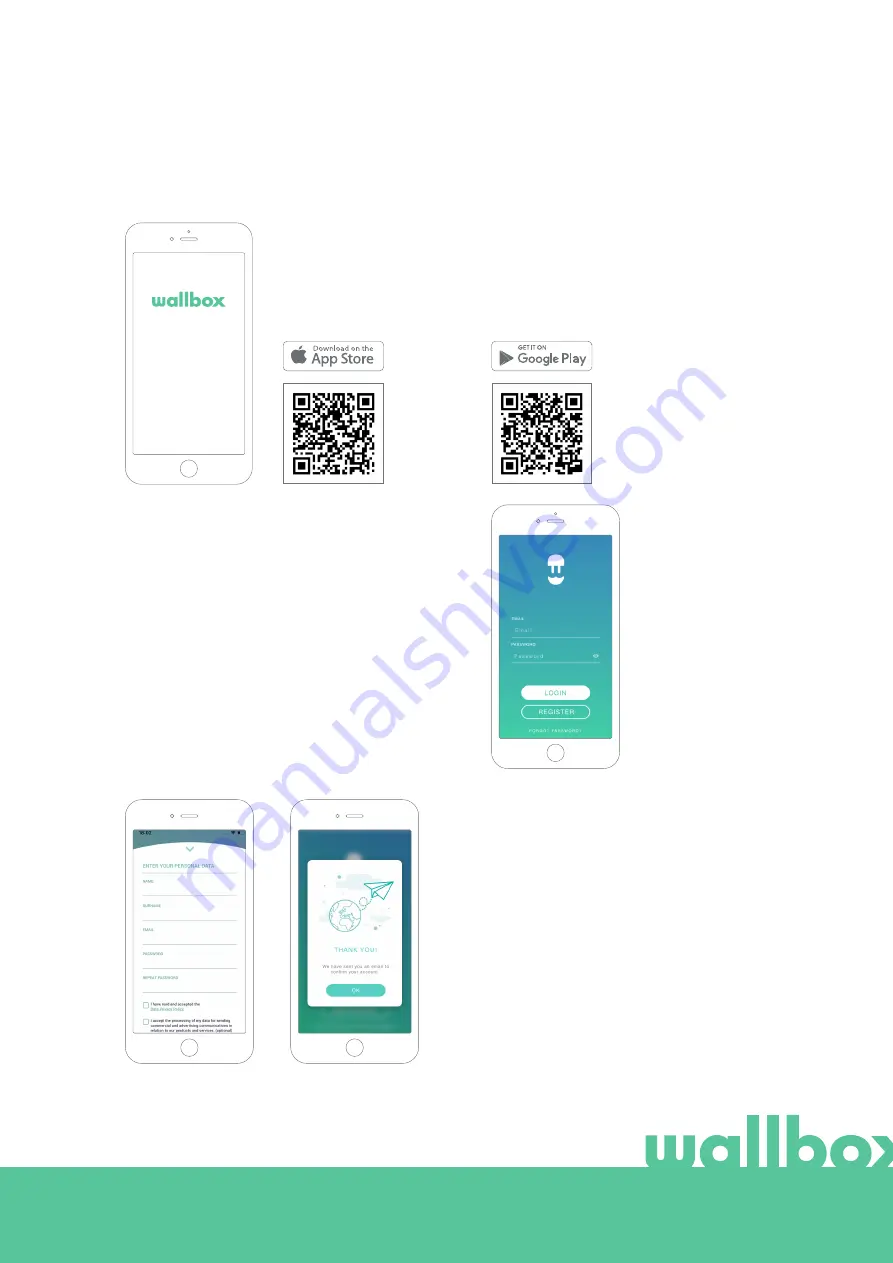
Download the App

Before you start using your Wallbox charger, we recommend that you download 
the Wallbox app on your smartphone and create a myWallbox account for 
managing the charger remotely. The Wallbox app is available on PlayStore and 
AppStore. 

To download the Wallbox App, scan the QR code.

Create a myWallbox account / Log in

If you are already a registered user, use your email 
and password to login into the app.


For the first time of use, you need an account to 
access the Wallbox App. Click the “Register” button so 
you can fill in your personal details on the registration 
form. A confirmation popup will appear on the screen.


1

Summary of Contents for Commander 2

Page 1: ...User Guide COMMANDER 2 ENGLISH...

Page 2: ...dules Current session info Charger screen Current user Statistics Settings Charger info Connectivity Options Multi user Power Boost Power Sharing Help RFID Authentication Discover myWallbox Wallbox Ap...

Page 3: ...ss Add a charger to your account Charger info Chargers Modify charger name Charger info Interact with the charger Statistics Sessions User list Statistics Users Add a user to your group User info User...

Page 4: ...ht to make changes to the specifications and processes of the product and documentation at any time without prior notice Safety Instructions Do not operate if physical defects such as cracks breakage...

Page 5: ...the vehicle connector and the equipment plug can be disconnected Never use force to disconnect the vehicle connector from the inlet or the equipment plug power outlet Doing so is dangerous and may cau...

Page 6: ...utionary electric vehicle charging system designed with cutting edge technology to satisfy your daily needs This user guide will show you how to charge your electric vehicle and also explain the basic...

Page 7: ...FID READER FRONT COVER RFID CARD OPENING TOOL PRODUCT INFO STICKER Once your Wallbox Commander 2 is ready and powered on you can operate it through a 7 inch touchscreen display or the Wallbox mobile a...

Page 8: ...nt on the screen to start using the interface LOGIN The first time you start the charger the default user called Wallbox will log in automatically There is no default PIN code for this user The first...

Page 9: ...search of users Once selected the PIN code of the user will be requested CHARGER MENU Different aspects and features of the charger can be checked and configured in the Charger menu The buttons to ent...

Page 10: ...be used This is shown in green CONNECTED STATE The charger detects that it is connected to a car This is shown in turquoise There are a few situations where the charger can remain in this state Waiti...

Page 11: ...uchscreen Schedule programmed If there is a schedule programmed within the next 12 hours or the charging was stopped because a schedule has ended CHARGING STATE The charging process has started and th...

Page 12: ...Schedules button allows you to enter the menu for setting scheduled charging sessions The Info button allows you to view information on the current charging session kW cost etc SCHEDULES After pressi...

Page 13: ...arger is very likely to disconnect The charger is connected to a network using a Wi Fi connection with a low signal your charger is likely to disconnect The charger is connected to a network using a W...

Page 14: ...ser press the Change PIN button and follow the steps that will be shown in popup windows STATISTICS In the Statistics section you can find a summary of your charger activity on a daily monthly and yea...

Page 15: ...Boost Power Sharing CHARGER INFORMATION You can check specific infor mation on the charger in this section such as its serial number the software version and the maximum available current per phase C...

Page 16: ...is necessary to switch on the charger s WiFi connection by pressing the Enable button Then select the network you want to connect to from the dropdown list of available networks and enter the passwor...

Page 17: ...tion parameters provided by the SIM provider Then press the Save button to save the configuration and start the connection process Once a connection to the mobile network is established an icon will b...

Page 18: ...server By default this option is disabled To ena ble this feature press Auto or Manual For Auto you only need to enter the proxy Server address For Manual you will also need to enter the proxy server...

Page 19: ...tivating this feature the charger will lock automatically after the configured period of time Switch the Auto Lock on enter the timeout in minutes and press Save to save the configuration Energy Manua...

Page 20: ...to save the configuration Appearance Use this screen to change the language of the interface and the country Select your country to see the local Wallbox Service phone number in the Help section Rest...

Page 21: ...onfigurations will be lost Updates Check if any software updates are available in order to get the most out of your charger We recommend you update your charger as soon as a new software version is av...

Page 22: ...tarting the configuration Switch on the Enable button and set the maximum current allowed by the electrical installation Press the Save button to save the configuration When you disable all of these o...

Page 23: ...eck the status of the link to the Slave chargers Check the Notification area icon on the Dashboard to view the status of Power Sharing Smart For more information about the installation and setup of Po...

Page 24: ...24 RFID Authentication...

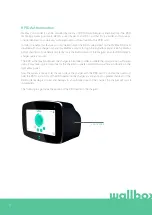
Page 25: ...Note that only the Administrator of the charger can enter RFID codes in charger users accounts The RFID authentication requires the charger to be online in order to update the information on authoriz...

Page 26: ...26 Discover myWallbox...

Page 27: ...p is available on PlayStore and AppStore To download the Wallbox App scan the QR code Create a myWallbox account Log in If you are already a registered user use your email and password to login into t...

Page 28: ...ation manual and on the label on the outer surface of the charger Please remember that Wallbox Standard customers are allowed a maximum of five users and two chargers Wallbox Pro customers can add an...

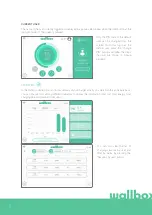
Page 29: ...s screen is shown when you are connected to the charger The controls on the upper half of the screen allow you to perform the following actions Charger locked press to unlock Charger unlocked press to...

Page 30: ...it in two ways chart mode and list mode Chart mode This shows the data based on energy or charging time List mode This shows a list of all sessions between the dates selected SCHEDULES The lower half...

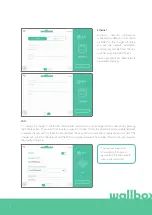
Page 31: ...t limitation After every modification in this section please be sure to click Save to ensure the changes are saved CHARGER INFO ADVANCED OPTIONS CONNECTIVITY INSTALLATION OPTIONS POWER SHARING POWER B...

Page 32: ...of them you will be connected to the network or if it is protected it will ask you to enter the password To see further information on the network once connected click the icon Ethernet It is possible...

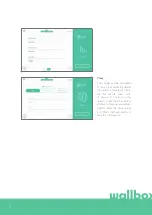
Page 33: ...the earthing system of the installation Unlink the charger from your user account ADVANCED OPTIONS In Advanced Options you can change the energy cost for the charger to make an estimated cost with it...

Page 34: ...account Click on the register button A registration pop up will appear NOTE If you have already created an account using the Wallbox App you can use the same username and password to log on to the we...

Page 35: ...onfirm your account If you do not see the email in your inbox please check the spam folder Having opened the email click the Confirm button to start using your account If you have not purchased a lice...

Page 36: ...ite you to join their groups you will not be the super administrator You will be just an administrator or user depending on their group invitation specifications Access to the website LOG IN Once your...

Page 37: ...click on the restore password button to start using your account You will then receive an email with instructions on how to create a new password If you do not see the email in your inbox please chec...

Page 38: ...ticker that is on the outer surface of the charger You will then see a notification that the charger has been added successfully to your account The charger will then appear automatically in your char...

Page 39: ...ng the connection from the first time the charger is connected to the internet before the first connection there is no icon Connection types displayed include Wi Fi 3G 4G and Ethernet Bluetooth connec...

Page 40: ...an find information about internet connection type next to charger title An icon appears showing the connection from the first time the charger is connected to internet before the first connection the...

Page 41: ...he new current is automatically displayed inside the circle Charge is paused press to start charging Charging press to pause If it is not available the icon is displayed in grey but still displays if...

Page 42: ...e charger By clicking on the switch the user is unassigned User not assigned to the charger By clicking on the switch the user is assigned to the charger Statistics You can access statistics from the...

Page 43: ...argers ADD A USER TO YOUR GROUP Add a new existing user to the group to give them access to the chargers Fill in the user information and set user or administrator permissions User Allow them access t...

Page 44: ...r s email User type Sessions count Number of sessions completed by said user Identifiers RFID facial recognition and Commander 2 PIN Enabled Disabled value is given by saved data in the details of eve...

Page 45: ...info User information can be viewed but not modified except RFID value Charger list List of chargers from users groups This list includes the option to see which chargers are available to the user an...

Page 46: ...t menu On the top right hand side of the screen you can access the user configuration MODIFY COMMANDER 2 PIN Only necessary for locking unlocking Commander 2 by PIN Set by default to 1234 Here you can...

Page 47: ...The circuit breaker could be off or have tripped Please check the circuit breaker and make sure that it is working Press the test button on the circuit breaker it should disconnect Charging session di...

Page 48: ...up that will say Updates are available for this device Click this message and make sure you do not turn off the phone or leave Bluetooth range for the duration of the installation as it may take a few...

Page 49: ...to be open TCP 80 Used for data transfer UDP 123 Used for time synchronisation Connect using a different Wi Fi Network If you don t have another Wi Fi network available you can create a Wi Fi network...

Page 50: ...com Belgi Belgique 32 28082353 45 89870290 49 303 11 99629 34 930181668 Danmark Deutschland France 33 186260541 39 694804494 31 202410845 Espa a Italia Nederland Norge 47 51742000 351 308809158 43 720...

Reviews: