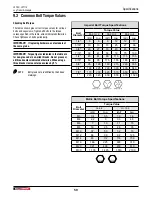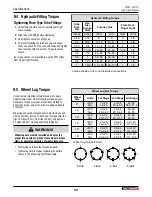
7.8 LXT115 Electric Brakes
IMPORTANT! Repair and maintenance of the brakes should
be performed by a qualified mechanic.
When adjusting or repairing the brakes, be aware there are a
left- and right-hand brake assemblies.
Trailer brakes must be inspected and serviced immediately if a
loss of performance is indicated. With normal use, servicing at
one-year intervals is usually adequate. With increased usage,
this work should be done more frequently as required.
After replacement of brake shoes and linings, the brakes must
be re-burnished to seat in the new components.
This should
be done by applying the brakes 20 to 30 times from an initial
speed of 40 mph (65 km/h) then slowing to 20 mph (32 km/h).
Allow ample time for brakes to cool between applications. This
procedure allows the brake shoes to seat in to the drum surface.
Shoes and Linings
Replacement is necessary if the lining is worn (less than 1/16"
[1.5 mm]), contaminated with grease or oil, or abnormally
scored or gouged. Hairline heat cracks are normal in bonded
linings and should not be cause for concern.
When replacement is necessary, it is important to replace both
shoes on each brake and both brakes of the same axle. This
helps retain the braking balance.
Magnets
The electric brakes are equipped with electromagnets designed
to provide the proper input force and friction characteristics.
Magnets should be inspected and replaced if worn unevenly or
abnormally. Use a straight edge to check magnet flatness. Even
if wear is normal the magnets should be replaced if any part of
the magnet coil has become visible through the friction material
facing of the magnet.
It is also recommended that the drum armature surface be
re-faced when replacing magnets. Magnets should also be
replaced in pairs (both sides of the axle).
Hardware
Check all hardware. Check shoe return spring, hold down
springs and adjuster for stretch or wear. Replace as required.
Brake Adjustment
1.
Raise the trailer and secure on adequate jack stands. Make
sure the wheels and drums can rotate freely.
2.
Locate and remove the adjusting hole cover from the slot
on the brake backing plate.
3.
With a screwdriver or standard adjusting tool, rotate the star
wheel of the adjuster assembly to expand the brake shoes.
Adjust the brake shoes out until the pressure of the linings
against the drum makes the wheel very difficult to turn.
4.
Then rotate the star wheel in the opposite direction until the
wheel turns freely with a slight lining drag.
5.
Replace the adjusting hole cover and lower the wheel to the
ground.
6.
Repeat the above procedure on all brakes. For best results,
the brakes should all be set at the same clearance.
Service and Maintenance
LXT95 / LXT115
Log Trailer & Grapple
56
Summary of Contents for LXT115
Page 64: ...www wallensteinequipment com ...

