background image

WX900 Series
Log Splitter

 Safety

Safety

9

2.5  Equipment Safety Guidelines

Safety is one of the main concerns in designing and developing 
equipment. However, every year many accidents occur which 
could have been avoided by a few seconds of thought and a 
more careful approach to handling equipment. 

Avoid hazards by observing the following precautions. Insist 
anyone working with you follow them as well.

• 

Replace safety or instruction labels that are not readable 
or are missing. For locations and explanations, see 

Safety 

Labels on page 11.

• 

Do not modify the equipment in any way. Unapproved 
modification can result in serious injury or death. In 
addition, unapproved modification can cause incorrect 
operation and decrease the life of the machine. Unapproved 
modification voids the warranty.

• 

Make sure that the machine is correctly stationed, adjusted, 
and in working condition.

• 

Keep the machine free of accumulated grease and debris to 
prevent fires and machine damage.

• 

Make sure that the split wood does not interfere with the 
safe operation of the machine.

• 

Look for and avoid overhead hazards (for example; 
branches, cables, and electrical wires).

• 

Never exceed the limitations of the machine. If the machine 
is not operating normally or you feel unsafe, stop the 
machine!

2.6  Safe Condition

The term 

Safe Condition

 is referenced throughout this manual. 

What this means is setting the machine in a state that makes it 
safe to load, service, maintain, or prepare for storage.

Complete the following to place the machine in a Safe 
Condition before performing any service, maintenance work, 
or storage preparation: 

SAFE CONDITION

1. 

Stop the machine. 
For instructions, see 

Stop the Machine on page 27.

2. 

Make sure all moving parts have stopped.

3. 

Disconnect the engine spark-plug wire and keep it away 
from the spark plug.

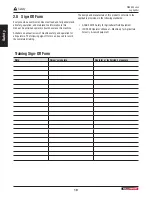
2.7  Safety Training

An untrained operator can cause serious injury or death to 
themselves or others. Review the safety instructions with all 
users annually. The 

Sign-Off Form on page 10 

can be used to 

keep a training record.

• 

When someone does not understand the operation of a 
machine, they can create dangerous situations very quickly. 
Operators must understand the safety information in this 
manual and the safety labels that are on the machine 

• 

The owner has the responsibility to provide instruction to 
anyone who is going to operate the machine. This machine 
is dangerous to anyone who is unfamiliar with its operation.

• 

If the machine is loaned or rented, it is the owner's 
responsibility to make sure that, before using the machine, 
every operator:


-

Reads and understands this manual.


-

Is instructed in the safe and correct use of the machine.


-

Understands and knows how to set the machine to a 

Safe Condition

For instructions, see 

Safe Condition.

Summary of Contents for WX900 Series

Page 1: ...OPERATOR S MANUAL Log Splitter Serial number 1100760 and up WX900 Series Part Number Z97136_En Rev Aug 2023...

Page 2: ...art Checklist 20 6 4 Machine Break In 21 6 5 Engine Operation 21 6 6 Hydraulic System Operation 24 6 7 Set Up the Machine 26 6 8 Start the Machine 27 6 9 Stop the Machine 27 6 10 Emergency Stop 27 6 1...

Page 3: ...ce For the most current information go to WallensteinEquipment com Information that is specific to a model is noted Otherwise the information in this manual applies to all of the listed models Units o...

Page 4: ...ode Phone Number Dealer Inspection Checklist All support stands move freely Machine controls function correctly All fasteners are torqued to the correct specification All grease points are lubricated...

Page 5: ...product when ordering parts or requesting service or other information The product information plate location is shown in the illustration For future convenience record the product Model and Serial Nu...

Page 6: ...pe of personal protective equipment PPE that is necessary for safe operation Information labels are usually pictorial with a white background and the number of panels can be different This type of lab...

Page 7: ...ho uses the machine about unsafe practices CAUTION Identifies a hazardous situation that if not avoided could result in minor or moderate injury It can also be used to tell anyone who uses the machine...

Page 8: ...el Definitions on page 13 Learn the controls and how to stop the machine quickly in the event of an emergency For instructions see Emergency Stop on page 27 Keep a first aid kit available and know how...

Page 9: ...Condition The term Safe Condition is referenced throughout this manual What this means is setting the machine in a state that makes it safe to load service maintain or prepare for storage Complete the...

Page 10: ...nnual review of machine safety and operation for all operators The following sign off form can be used to record the completed training The design and manufacture of this product conforms to the appli...

Page 11: ...s the operator at risk of serious injury or death W100 Learn what the safety labels mean and know the safety hazards A safety label can be vertical or horizontal Vertical safety labels have a top pane...

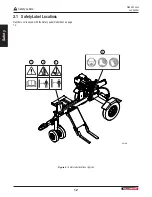
Page 12: ...Safety Labels WX900 Series Log Splitter Safety 12 3 1 Safety Label Locations Numbers correspond with the Safety Label Definitions on page 13 Figure 2 Safety label locations typical 02198 1 2 3 4...

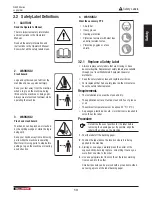
Page 13: ...goggles or a face shield 3 2 1 Replace a Safety Label Always replace safety labels that are missing or have become illegible Replacement safety labels are available through your local Wallenstein Equ...

Page 14: ...operator to read this manual and to train all new operators before they start working with the machine Follow all safety instructions Untrained operators are not qualified to use the machine They can...

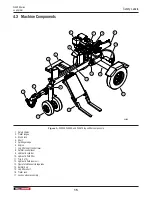
Page 15: ...Stop block 4 Shelf 5 Splitting wedge 6 Engine 7 Log lifter shelf control lever 8 Splitter control lever 9 Hydraulic cylinder 10 Hydraulic fluid filter 11 Tire 1 of 2 12 Hydraulic fluid reservoir 13 O...

Page 16: ...cturer s manual 5 1 1 Throttle Lever The throttle control lever has the following functions Fast Engine speed is fast Slow Engine speed is slow 02041 Figure 4 Engine throttle control 5 1 2 Fuel Shut o...

Page 17: ...cord slowly until you feel resistance and then pull it rapidly to avoid kickback W102 The engine is a recoil start An operator grips the starter cord handle to pull the starter cord and start the engi...

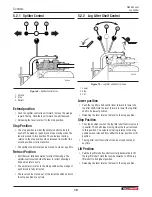
Page 18: ...sition when wedge or push block is fully retracted The lever can be moved out of the retract position and into the stop position at any time 5 2 2 Log Lifter Shelf Control 00656 1 2 3 Figure 10 Log li...

Page 19: ...nd free of debris Only operate the engine in a location that has good air flow Engine exhaust gases contain carbon monoxide an odorless gas that can cause asphyxiation Attach all guards and shields an...

Page 20: ...l and fuel levels If necessary add engine oil or fuel Make sure that the machine is lubricated as specified in the Maintenance Schedule on page 35 Check that the push block or wedge is lubricated Chec...

Page 21: ...instructions see the engine manufacturer s manual After Eight Hours of Operation Complete the tasks listed under After One Hour of Operation 6 5 Engine Operation CAUTION Before starting the engine re...

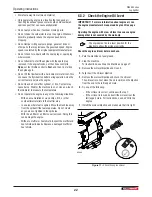
Page 22: ...irt or other combustible materials in the muffler area In an area where fuel is spilled Move the machine away from the spill until the fuel evaporates Do not create any sources of ignition in the spil...

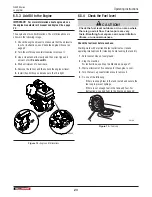
Page 23: ...that it is tight 02043 Figure 12 Engine oil fill locations 6 5 4 Check the Fuel Level CAUTION Check the fuel level outdoors or in an area where there is good air flow Fuel vapors are very toxic Breat...

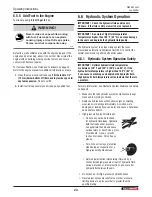
Page 24: ...ontrol and log lifter shelf control valves 6 6 1 Hydraulic System Operation Safety IMPORTANT Optimal hydraulic fluid temperatures are between 120 F and 140 F 50 C and 60 C If the hydraulic fluid tempe...

Page 25: ...machine parked on level ground and the engine stopped The proper level is when the fluid is visible at the full upper mark on the dipstick 02219 Figure 14 Hydraulic tank fluid level dipstick 6 6 3 Add...

Page 26: ...le do steps 6 to 9 3 Remove the snap lock pin and lower the jockey wheel assembly Insert the snap lock pin 4 Turn the trailer jack to set the jockey wheel assembly on the ground 5 If the ground is une...

Page 27: ...and in a stable position 3 Move the hydraulic controls to the neutral position out of detent 4 Move the choke control to the Closed position 5 Move the throttle control to the Fast position 6 Firmly g...

Page 28: ...ter shelf control lever to the Lift position Hold the control lever in this position until the shelf is even with the splitter bed 5 Push the log onto the splitter bed Figure 17 Lower the log lifter s...

Page 29: ...see Log Lifter Shelf on page 28 2 Move control lever to the Extend position until push block or wedge starts to split the wood 3 Release the lever when the log splits or cylinder reaches full stroke a...

Page 30: ...the correct size ball mount hitch 2 inches Secure all guards shields and covers Make sure that all fuel and hydraulic tank caps are installed and secure to prevent spills during transport Remove all...

Page 31: ...ry 8 2 Put the Machine in Storage For information about engine storage see the engine manufacturer s manual 1 Fully retract the cylinder ram 2 Do one of the following If the machine will be in storage...

Page 32: ...tank and properly dispose of the fuel 2 Add new fuel to the engine For instructions see Add Fuel to the Engine on page 24 3 Start the machine For instructions see Start the Machine on page 27 4 Wait...

Page 33: ...d fuel connections are properly secured When completing a maintenance or service function make sure all safety shields and devices are installed before placing splitter in service When cleaning any pa...

Page 34: ...r than three months replace the fuel with one of the following fuel types An alkylate fuel An engineered fuel that is high octane ethanol free and formulated with power detergent to prevent the buildu...

Page 35: ...Clean around the muffler and controls N A Check the hydraulic fluid level See page 25 Inspect the hydraulic fluid quality See page 39 Grease the frame slide hinges and pivot points See page 37 Grease...

Page 36: ...ons see Grease on page 57 Use a clean cloth to clean each grease fitting before you apply grease This prevents grease and dirt from getting inside the component Use a hand held grease gun to apply one...

Page 37: ...s Item Location Frequency Number of Locations 1 Jockey wheel bearing 100 hours or annually 1 2 Splitter bed sliding frame 40 hours or annually 1 3 Log lifter shelf hinge 40 hours or annually 1 4 Wheel...

Page 38: ...s are tight and the hoses and fittings are not damaged Replace hydraulic hoses that show signs of swelling wear leaks or damage A swollen worn damaged or leaking hose can burst and cause a hazardous a...

Page 39: ...6 Start the machine and cycle hydraulic functions to purge air from the system 7 Stop the engine and recheck the fluid level Fill to the full mark 00208 Figure 24 Hydraulic fluid reservoir drain plug...

Page 40: ...lines and fittings frequently for cracks or leaks Replace damaged fuel lines or fittings if necessary Store fuel away from all wood material Do not check for a spark with the spark plug or spark plug...

Page 41: ...rol handle does not go to neutral after the rod is fully retracted The valve detent is set too tight Adjustment is necessary to the detent on the splitter control The hydraulic fluid is cold Allow the...

Page 42: ...e type 3 postion auto return detent Log lifter shelf control valve type 3 position spring loaded to neutral Hydraulic pump type 2 stage Hydraulic pump flow 16 gpm 60 5 Lpm Splitter bed height 25 64 cm...

Page 43: ...Bolt grades are identified by the marks on top of the bolt head Imperial Bolt Torque Specifications Bolt Diameter Torque SAE Gr 2 SAE Gr 5 SAE Gr 8 lbf ft N m lbf ft N m lbf ft N m 1 4 inch 6 8 9 12...

Page 44: ...proper wheel mounting torque on your trailer axle Torque wrenches are the best method to assure the proper amount of torque is being applied to a fastener Wheel lugs should be torqued before first roa...

Page 45: ...the original purchase receipt with any claim This warranty does not cover the following 1 Normal maintenance or adjustments 2 Normal replacement of wearable and service parts 3 Consequen al damage in...

Page 46: ...ine 24 Check the fuel level 23 Engine fuel type 34 Replace the engine fuel 32 Fuel shut off valve 16 G Grease 34 Grease fitting and hinge pivot point locations 37 Grease points 36 H Hydraulic Controls...

Page 47: ...bol 7 Safety labels 11 Replace a safety label 13 Safety label definitions 13 Safety label locations 12 Safety rules 8 Service and maintenance 33 Engine maintenance 40 Fluids and lubricants 33 Grease p...

Page 48: ...WallensteinEquipment com...

Reviews:

Related manuals for WX900 Series