background image

28

29

Operational Handling

5.1 

Safety Warnings

Please pay special attention to the following safety warnings prior to taking this 

spray gun into operation!

• 

Wear proper respiratory protection masks and protective overalls, whenever 

you are operating this spray gun. Air-borne particles represent a health 

hazard.

• 

Make sure to wear suitable haering protectors. The gun produces sound 

levels of up to 86 dB (A) which may cause hearing defects.

• 

Open fires, naked lights and smoking prohibited in the working area. Spraying 

of readily flammable media such as paints and adhesive compounds is 

always accompanied by the risk of fire and explosion.

5.2 

Starting / Stopping Requirements

The following requirements must be met before taking this spray gun into operati-

on:

• 

control air must be available at the gun

• 

atomizing air (round - and wide/flat air) must be available at the gun

• 

material pressure must be available at the gun.

Caution

The material pressure shall not exceed

•  6 bar

, as, otherwise, the functional reliability of the spray gun will suffer.

Adjust the control air pressure to

•  at least 4,5 bar

, in order to operate the spray gun.

The operation of the spray gun can be started/stopped by way of the 3/2-way con-

trol valve (see the Operating Instructions of the plant systems manufacturer).

Warning

It is important to remember that the spray gun must be relieved of all pressures 

whenever work is terminated. Lines left in pressurized condition could burst, with 

their contents likely to injure anybody present nearby.

5.3 

Spray Pattern Test

Spray pattern tests should be performed whenever:

• 

the spray gun is taken into operation for the first time

• 

the spraying medium is changed

• 

the spray gun was taken apart for servicing or repairs.

The spray pattern can be tested using a work piece sample, a sheet of metal, 

cardboard or paper.

Warning

Keep away from the front of the spray gun - imminent risk of injury.

Warning

Make sure that nobody is present in the spraying zone when the gun is started - 

imminent Risk of Injury.

1.  Start the gun to produce a spray pattern sample (see 

5.2. Starting/Stopping   

Requirements

).

2.  Inspect the sample and readjust the settings of the gun as may be required 

(see 

5.4 Spray Pattern Adjustments

).

5.4 

Spray Pattern Adjustments

The spray pattern of the PILOT WA 450, WA 451, WA 452 and WA 453 can be 

adjusted as follows:

Adjustment of the Control Air

The control air is adjusted external by the plant (see Operating instructions of the 

plant systems manufacturer).


Adjustment of the Material Flow Rate

Adjustment of the Material Pressure

This adjustment can only be made at the controls of the pump or the material pres-

sure tank. Please comply with the operating instructions and safety warnings issu-

ed by the manufacturers concerned.

Adjustment of the Round Jet and Wide/Flat Jet

The round jet and wide/flat jet are adjusted external by the plant (see Operating 

instructions of the plant systems manufacturer).
If you wish to change the spraying pattern beyond the adjustments outlined so far, 

you must retool the spray gun (See

 5.5 Retooling of Spray Gun

).

WALTHER offers a great variety of air cap / material nozzle / -needle combinations 

for this purpose.

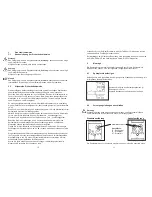
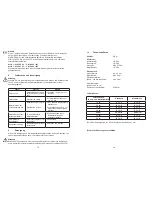
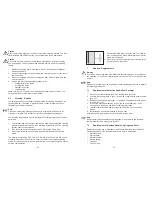
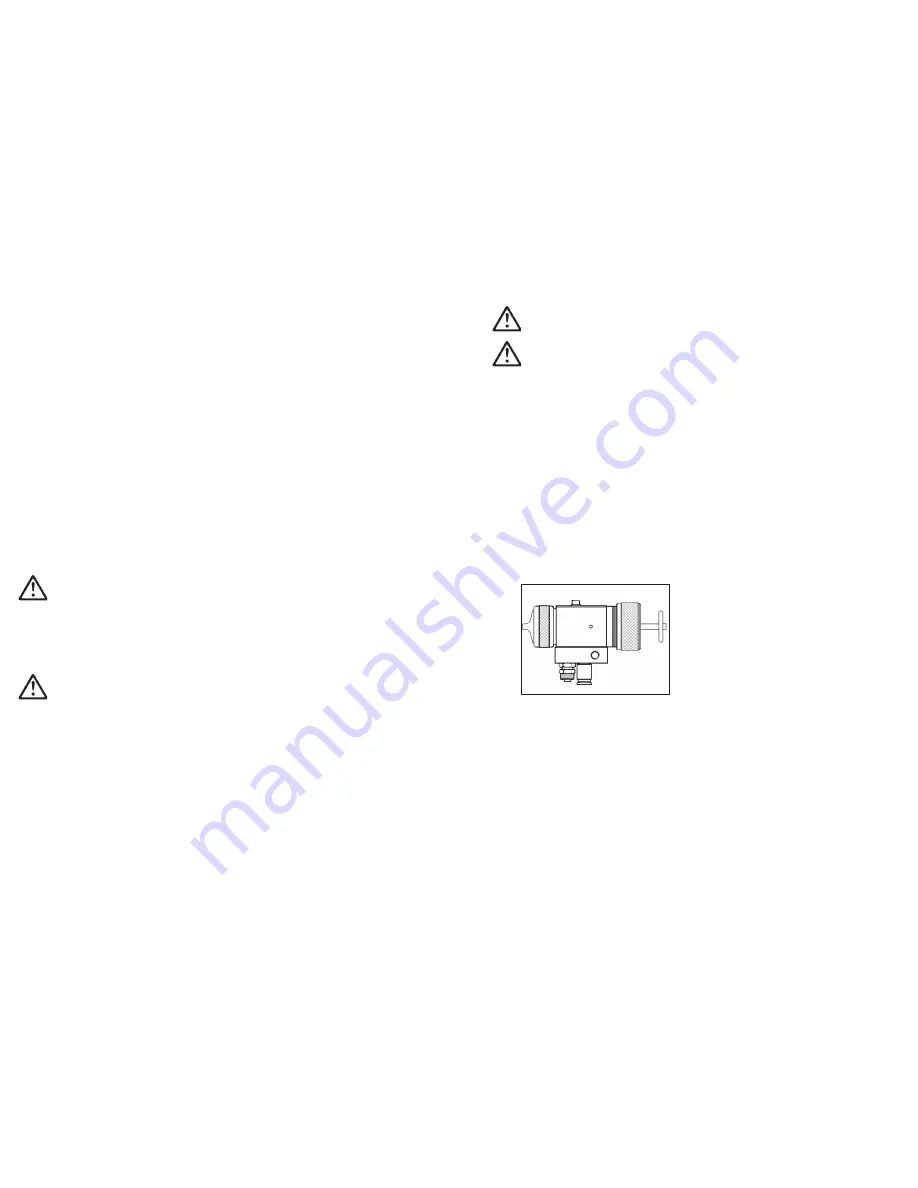
Turn cap (1) from the standard position        

(= notch mark on the piston housing)

•  to the inside in order to decrease the materi-

al flow  rate.

•  to the outside in order to increase the mate-

rial flow rate.

The material flow through the nozzle can be 

performed without using atomizing air 

(round - and wide/flat air), when the drawbar 

(2) is used.

1

2

Summary of Contents for PILOT WA 450

Page 1: ...eitung Operating Instructions Automatische Spritzpistolen Automatic Spray Gun PILOT WA 450 PILOT WA 451 PILOT WA 452 PILOT WA 453 REV 01 12 DISTRIBUTED BY COATING EQUIPMENT TECHNOLOGY INC PHONE 586 21...

Page 2: ...rkl rung ihre G ltigkeit Hersteller WALTHER Spritz und Lackiersysteme GmbH K rntner Str 18 30 D 42327 Wuppertal Tel 49 0 202 787 0 Fax 49 0 202 787 2217 www walther pilot de e mail info walther pilot...

Page 3: ...4 5 PILOT WA 450...

Page 4: ...ur Set enthalten Reparatur Set WA 450 451 V 16 545 06 3 Reparatur Set WA 452 453 V 16 547 03 3 Bei Ersatzteilbestellung bitte entsprechende Gr e angeben Ersatzteilliste WA 452 HVLP WA 453 HVLP U V 20...

Page 5: ...en nur nach Ma gabe der zust ndigen Aufsichtsbeh rde eingesetzt werden Der zust ndigen Aufsichtsbeh rde bzw dem Betreiber obliegt die Festlegung der Explosionsgef hrdung Zoneneinteilung Es ist betreib...

Page 6: ...inweise der Hersteller von Spritzmaterial und Reinigungsmittel Insbesondere aggressive und tzende Materialien k nnen gesundheitliche Sch den verursachen Tragen Sie im Arbeitsbereich der Spritzpistole...

Page 7: ...ausgetauscht wird die Pistole zur Wartung oder Instandsetzung zerlegt wurde Die Spritzbildprobe kann auf ein Probewerkst ck Blech Pappe oder Papier abgegeben werden Warnung Halten Sie beim Verspritze...

Page 8: ...teil SW 13 Entfernen Sie die Dichtscheibe Pos 4 und den Luftverteilerring Pos 5 3 Schrauben Sie die Zugstange Pos 24 heraus 4 Schrauben Sie die Kappe Pos 23 und die Gewindebuchse Pos 22 aus dem Pistol...

Page 9: ...zanlage in Betrieb gesetzt werden muss k nnen Sie die Materialzufuhr der PILOT WA 450 WA 451 WA 452 WA 453 auch von Hand entsperren Die gesamte Spritzanlage sollte nun bis zum n chsten Einsatz druck l...

Page 10: ...er Spritzstahl zu wenig Material im Materialbeh lter Material auff llen siehe Betriebsanleitung des Anlagenherstellers Pistole Bl st in Ruhestellung Topfmanschette Pos 18 besch digt auswechseln Spritz...

Page 11: ...prior consultation with us Manufacturer WALTHER Spritz und Lackiersysteme GmbH K rntner Str 18 30 D 42327 Wuppertal Tel 49 0 202 787 0 Fax 49 0 202 787 2217 www walther pilot de e mail info walther pi...

Page 12: ...ir Kit WA 450 451 V 16 545 06 3 Repair Kit WA 452 453 V 16 547 03 3 Please make sure to quote the required size s when placing an order for replacement parts Replacements parts WA 452 HVLP WA 453 HVLP...

Page 13: ...led out The equipment may be used in potentially explosive atmospheres only with the authorisation of the relevant supervisory authority The relevant supervisory authority or the operator of the equip...

Page 14: ...Always observe the spraying and safety instructions given by the manufacturers of the spraying material and the cleaning agent Aggressive and corrosive materials in particular can be harmful to health...

Page 15: ...praying medium is changed the spray gun was taken apart for servicing or repairs The spray pattern can be tested using a work piece sample a sheet of metal cardboard or paper Warning Keep away from th...

Page 16: ...he gun body pos 6 Remove the sealing washer pos 4 and the air distribution ring in pos 5 3 Unscrew the drawbar pos 24 4 Unscrew the cap pos 23 and the threaded bushing pos 22 from the gun body 5 Pull...

Page 17: ...ion emerges from the nozzle The material supply of the PILOT WA 450 WA 451 WA 452 and WA 453 can be manually released so that it is not necessary to operate the complete spraying system All pressures...

Page 18: ...plan systems manufacturer Gun keeps blowing in off position Cup seal pos 18 damaged Replace cup seal Spray jet one side Horn boring soiled at air cap Remove and clean 9 Disposal of Cleaning Servicing...

Page 19: ...ritz und Trockenboxen Absaugsysteme mit Trockenabscheidung Absaugsysteme mit Nassabscheidung Pulverspr hst nde Trockner Zuluft Systeme Atemschutzsysteme und Zubeh r The WALTHER PILOT Programme Hand He...

Reviews: