background image

27

26

5.1 

Changing the Air Cap

1.  Unscrew the air cap nut. 

2.  Remove the air cap (Pos.1).

5.2 

Changing the Material Nozzle

1.  Unscrew the air cap nut. 

2.  Remove the air cap.

3.  Unscrew the material nozzle (Pos.2) from the spray gun head.

Installation takes place in reverse order.

5.3 

Changing the Material Needle

1.  Unscrew the threaded rod (Pos. 22).

2.  Unscrew the air cap (Pos. 21). 

3.  Remove the needle spring (Pos 20).

4.  Unscrew the threaded ring (Pos. 19).

5.  Withdraw the piston (Pos. 11) together with the material needle (Pos. 17).

6.  Unscrew the material needle from the piston.

7.  The distance between the tip of the material needle and the piston should be 

set at 79,0 mm.

Installation takes place in reverse order.


5.4 

Changing the Needle Seal

1.  Unscrew the front part from the piston casing.

2.  Remove the seal. 

3.  Remove the complete needle packing using a strong wire with a hook at its 

end.

4.  Lubricate the new needle seal packing..

Installation takes place in reverse order.

4.3 

Changing the Spray Pattern

• 

Round-fan or wide-fan air caps are available.

• 

The fan width can be varied by changing the atomising air.

• 

The material flow rate is determined by the material pressure and the diameter 

of the material nozzle.

4.4 

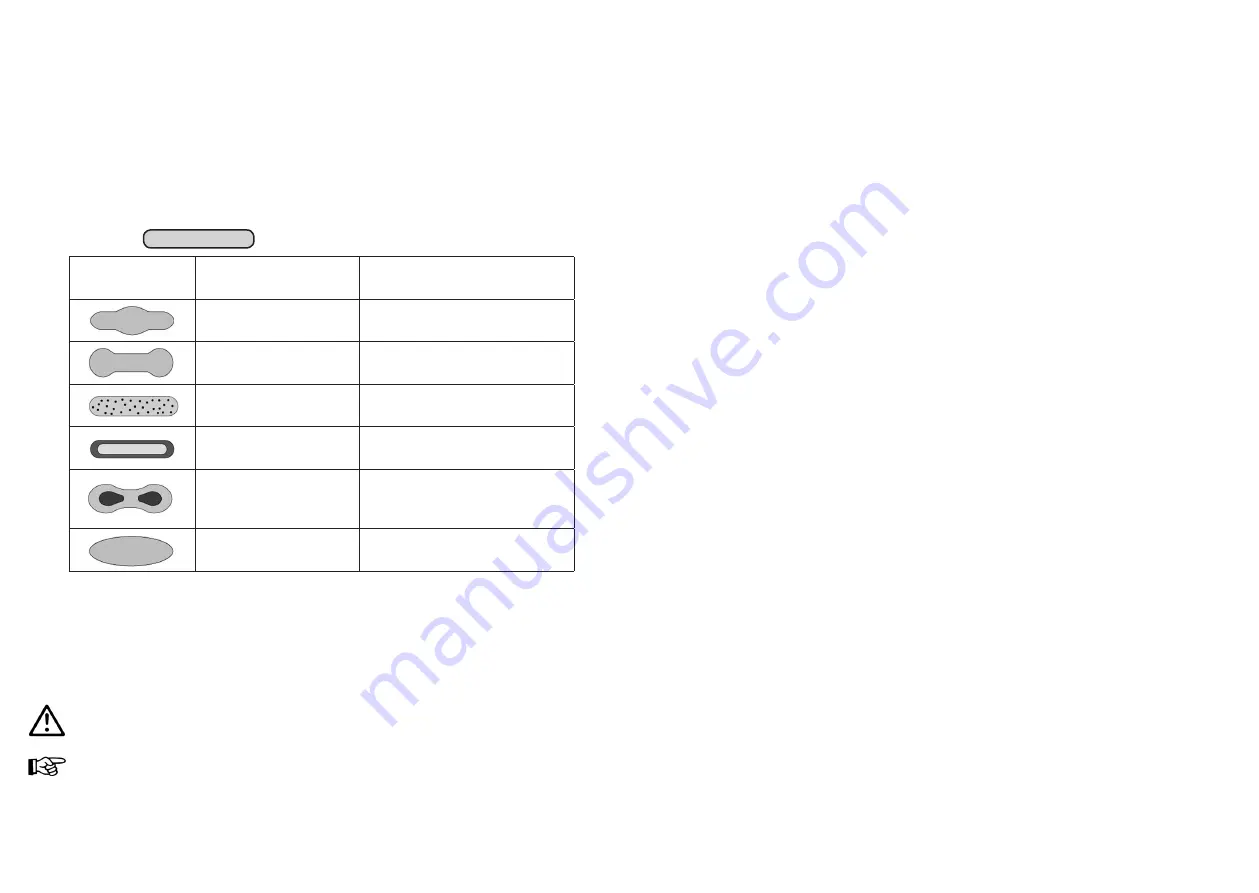
Correction of Spray Pattern Imperfections

The following table shows how to correct a defective spray pattern.

Spray pattern 

test

Fault

Necessary adjustment

Swollen centre

•  Spray jet should be flatter

Swollen ends

•  Spray jet should be rounder

Coarse pearl effect

•  Increase atomising air pressure

Unduly thin paint layer in 

centre 

•  Decrease atomising air pressu-

re

Split centre

•  Increase nozzle diameter

•  Reduce atomising air pressure

•  Increase material pressure

Very spherical

•  Decrease material pressure

•  Increase atomising air pressure

Re-tooling the Spray Gun

The combination of air cap, material nozzle and needle for a certain spraying       

material forms a specially matched unit - the nozzle assembly.

Always exchange the complete nozzle assembly in order to maintain the desired 

spray pattern quality.

Warning

Air and material inputs must be shut off prior to re-tooling - risk of injury.

Note

Please refer to the exploded view at the beginning of this manual to perform the steps 

detailed below.

Desired Spray Pattern

Summary of Contents for WA 600

Page 1: ...Betriebsanleitung Operating Instructions PILOT WA 600 WA 610 WA 625 WA 635 Automatische Spritzpistolen Automatic Spray Guns...

Page 2: ...Seite 6 17 Page 18 29...

Page 3: ...600 WA 610 WA 625 WA 635 Rep Set Nr Repair Set No V 16 600 02 3 1 2 28 26 3 25 10 9 8 7 11 12 13 14 23 15 4 6 16 17 18 22 21 20 19 29 5 24 27 29 29 23 29 29 23 23 WA 600 WA 625 WA 610 WA 635 Umlaufve...

Page 4: ...eit Hersteller WALTHER Spritz und Lackiersysteme GmbH K rntner Str 18 30 D 42327 Wuppertal Tel 49 0 202 787 0 Fax 49 0 202 787 2217 www walther pilot de e mail info walther pilot de Typenbezeichnung A...

Page 5: ...te entsprechende Gr e angeben Durchmesser 0 3 0 5 0 8 1 0 1 2 1 5 1 8 2 0 2 2 mm Wir empfehlen alle fett gedruckten Teile Verschleissteile am Lager zu halten Ersatzteilliste PILOT WA 600 WA 610 WA 625...

Page 6: ...ngesetzt werden Der zust ndigen Aufsichtsbeh rde bzw dem Betreiber obliegt die Festlegung der Explosionsgef hrdung Zoneneinteilung Es ist betreiberseitig zu pr fen und sicherzustellen dass alle techni...

Page 7: ...ist maximaler Widerstand 106 Achten Sie darauf dass nach Montage und Wartungsarbeiten alle Muttern Schrauben und Verschraubungen fest angezogen sind Verwenden Sie nur Original Ersatzteile da WALTHER...

Page 8: ...die Strahlbreite variiert Die Materialdurchflussmenge wird durch den Materialdruck und dem Durchmesser der Materiald se bestimmt 4 4 M ngel eines Spritzbildes beheben Die folgende Tabelle zeigt Ihnen...

Page 9: ...cklos Die Reinigung sollte nach jedem Farb und Materialwechsel oder je nach Verschmutzungsgrad erfolgen Verwenden Sie zur Reinigung nur Reinigungsmittel die vom Hersteller des Spritzmaterials angegebe...

Page 10: ...ER Spritz und Lackiersysteme GmbH K rntner Str 18 30 D 42327 Wuppertal Tel 49 0 202 787 0 Fax 49 0 202 787 2217 www walther pilot de e mail info walther pilot de Type Designation Automatic Spray Gun P...

Page 11: ...quired size when placing an order for replacement parts diameter 0 3 0 5 0 8 1 0 1 2 1 5 1 8 2 0 2 2 mm We recommend to hold all bold faced replacement parts on stock Listing of Replacement Parts PILO...

Page 12: ...of the relevant supervisory authority The relevant supervisory authority or the operator of the equipment are responsible for determining the explosion hazard zone classification The operator must ch...

Page 13: ...earthed grounded either separately or in connection with the equipment with which it is being used maximum resistance 106 After carrying out assembly and maintenance work ensure that all nuts bolts an...

Page 14: ...air caps are available The fan width can be varied by changing the atomising air The material flow rate is determined by the material pressure and the diameter of the material nozzle 4 4 Correction o...

Page 15: ...terial feed are depressurised Cleaning should be carried out after every colour and material change or according to the degree of contamination For cleaning the spray gun use only those cleaning agent...

Page 16: ...THER PILOT Product Range Manual spray guns Automatic spray guns HVLP spray guns Two component spray guns Pressure containers Nonpressurized containers Agitator systems Airless equipment and fluid pump...

Reviews: